
You are using an out of date browser. It may not display this or other websites correctly.
You should upgrade or use an alternative browser.
You should upgrade or use an alternative browser.
Counter-Strike Guides + Tips
- Thread starter Legend
- Start date
- Status
- Not open for further replies.



- Joined
- May 8, 2008
- Messages
- 14,991
How to fix your lag in CS:S
How to fix your lag in CS:S - Guide Originally Posted By Lt.Dan
Choke - Choke is server lag. Choke basically means that your computer is sending your players position, and what he does (shoot, nade, knife) to the server, and its not getting there. Counter Strike Source default is to send your players actions to the server 30 times a second. Choke is caused by two things:
1.
Your computer is sending too many packets to the server per second. If you try to send 100 commands to the server per second, and it can only accept 40, you are going to be getting 60 choke. This will make you SUCK, none of your shots will register, and only 40% of the things you try to make your player do will be done. (for solution, see below)
2.
The server is not able to read all of the information being sent to it. This can be caused by network lag at the server, or CPU lag at the server. The client cannot control this, but can accomodate for it (solution below)
Loss - Loss is lag from outside your computer and usually outside the server. This means that while your commands that are going to the server, they are following a path (sometimes can be 30 networks your commands go thru before they reach the server) and somewhere in that path, the packets dont make it to the next place. Those packets are 'lost' in the bowels of the net. Loss can also come from wireless connections, in which case you can change your wireless channel to fix.. Loss is for the most part out of your control, and could always be the most common situation, your connection just plain sucks.
net_graph 3 on CSS
To start, you will need to be able to access the console in Counter Strike Source. Press the ~ button, and drop the console. Enter the command "net_graph 3" and press enter (to remove this later, net_graph 0). Once you leave the console, you should see in the lower right of your screen some numbers that look like this:
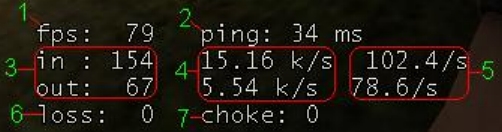
Definitions of this menu:
1. FPS- How many frames per second your graphics card is doing
2. Ping- Round trip time from your computer to the server and back
3. Data - How many TCP/IP packets youre sending (you dont need to know this)
4. kilobits per second- how much actual data youre sending in and out (not needed)
5. How many times per second your computer updates your players position on the server (out -- the bottom one)
How many times per second the server sends your computer players positions (in -- the top one)
6. Loss - explained above
7. Choke - explained above
Steps to fix your lag in CSS
The following steps are meant for anyone that can read (even n00bs). These steps will solve your network lag, as long as it has to do with your Counter Strike Source settings. Use this guide for fixing all types of lag.
Note: Your ping may not be affected with these, but your lag will be cured.
You are going to be changing your rates, in an educated guess and check method, to achieve the best rates for your computer. You will need to know how to read net_graph 3, and you will need to have it enabled. You need to join a server, to tweak these settings properly.
To set your rates, enter the rate you want to set, then the number of times per second you want it set to.
Example: cl_cmdrate 30
cl_updaterate - How often your computer asks the server for players positions per second (default: 20)
cl_cmdrate - How many times per second your computer sends your position to server per second (default: 30)
rate - Maximum bytes per second you can receive
cl_interp - Changes the speed at which players positions are updated
Part 1 - Cmdrate and Updaterate
1. Enter a server and change your rates. cl_cmdrate 80 and cl_updaterate 60
2. Play the game for a few minutes. You will need to make sure that area 5 on the net_graph is not being limited by the server. If it stays at 33.3 or 66.6 all the time, it means you should tweak this on a different server that allows for higher rates (100 tick servers mean max of 100 updates and commands per second!)
3. Once you find a server that is not limited, you want to make sure your rates are cmd 80, and update 60. Play on the server for a few rounds, and keep an eye on your CHOKE and LOSS.
4. If you are experiencing choke, you will need to change your rates lower. The correct ratio for update to command means cl_updaterate should be 3/4 of cmdrate (75% is good)-- *This means CMDRATE is higher than UPDATERATE by a pinch*. So, lower your rates, keeping ROUGHLY the same ratio. If your choke is 30, lower your rates about 30 (but make sure you still use the ratio of 75%). This would mean cl_updaterate 35 and cl_cmdrate 50 (thats 70% ratio, close enough)
5. Try the new settings, and adjust your rates as needed. You want to lower your rates until you get less than 2 choke in the middle of a round, and less than 10 at the beginning, and end of a round. (choke is higher at beginning and end of rounds while server does stats, and resets objects)
6. Once you get to 0 choke, and 0 loss (loss may not change if it is a network problem) you have your proper rates.
Part 2 - The rate setting in CSS
The rate setting is used to set the MAX amount of data coming to you from the server in bytes per second. Rarely does your computer receive more than the max, and the more players on the server you are on, the more data you will recieve. On a 32 player server, you receive player positions, voice, chat, and nades weapons etc move. That will obviously use a lot of bandwidth to receive all that info.
In short, heres what you set your rate to, its not very important to tweak.
Connection Speed Set your rate to:
56k or slower 1800comcast
Slow DSL/Cable 20000
Fast DSL/Cable 25000
Part 3 - Interp setting in CSS
In Counter Strike Source, once your lag ping choke and loss are all fixed, you can improve your connection even more. The interp setting in CSS is used to tell your computer how fast to interpret the player and object positions sent to you by the server. The proper interp depends on your updaterate. Your cl_interp should be 1/updaterate. This means that if your updaterate is 50, your interp should be .02 - In the console type "cl_interp .02" or whatever yours should be. MAKE SURE YOU GET THE .02 and not just .2
There is also an interp setting that sets your interp automatically, adjusting dynamically. I do not use it, and cant give any advice, but the command is cl_interp 0.
this is quoted from http://www.fishtankclan.com/e107_plugins/content/content.php?content.44
How to fix your lag in CS:S - Guide Originally Posted By Lt.Dan
Choke - Choke is server lag. Choke basically means that your computer is sending your players position, and what he does (shoot, nade, knife) to the server, and its not getting there. Counter Strike Source default is to send your players actions to the server 30 times a second. Choke is caused by two things:
1.
Your computer is sending too many packets to the server per second. If you try to send 100 commands to the server per second, and it can only accept 40, you are going to be getting 60 choke. This will make you SUCK, none of your shots will register, and only 40% of the things you try to make your player do will be done. (for solution, see below)
2.
The server is not able to read all of the information being sent to it. This can be caused by network lag at the server, or CPU lag at the server. The client cannot control this, but can accomodate for it (solution below)
Loss - Loss is lag from outside your computer and usually outside the server. This means that while your commands that are going to the server, they are following a path (sometimes can be 30 networks your commands go thru before they reach the server) and somewhere in that path, the packets dont make it to the next place. Those packets are 'lost' in the bowels of the net. Loss can also come from wireless connections, in which case you can change your wireless channel to fix.. Loss is for the most part out of your control, and could always be the most common situation, your connection just plain sucks.
net_graph 3 on CSS
To start, you will need to be able to access the console in Counter Strike Source. Press the ~ button, and drop the console. Enter the command "net_graph 3" and press enter (to remove this later, net_graph 0). Once you leave the console, you should see in the lower right of your screen some numbers that look like this:
Definitions of this menu:
1. FPS- How many frames per second your graphics card is doing
2. Ping- Round trip time from your computer to the server and back
3. Data - How many TCP/IP packets youre sending (you dont need to know this)
4. kilobits per second- how much actual data youre sending in and out (not needed)
5. How many times per second your computer updates your players position on the server (out -- the bottom one)
How many times per second the server sends your computer players positions (in -- the top one)
6. Loss - explained above
7. Choke - explained above
Steps to fix your lag in CSS
The following steps are meant for anyone that can read (even n00bs). These steps will solve your network lag, as long as it has to do with your Counter Strike Source settings. Use this guide for fixing all types of lag.
Note: Your ping may not be affected with these, but your lag will be cured.
You are going to be changing your rates, in an educated guess and check method, to achieve the best rates for your computer. You will need to know how to read net_graph 3, and you will need to have it enabled. You need to join a server, to tweak these settings properly.
To set your rates, enter the rate you want to set, then the number of times per second you want it set to.
Example: cl_cmdrate 30
cl_updaterate - How often your computer asks the server for players positions per second (default: 20)
cl_cmdrate - How many times per second your computer sends your position to server per second (default: 30)
rate - Maximum bytes per second you can receive
cl_interp - Changes the speed at which players positions are updated
Part 1 - Cmdrate and Updaterate
1. Enter a server and change your rates. cl_cmdrate 80 and cl_updaterate 60
2. Play the game for a few minutes. You will need to make sure that area 5 on the net_graph is not being limited by the server. If it stays at 33.3 or 66.6 all the time, it means you should tweak this on a different server that allows for higher rates (100 tick servers mean max of 100 updates and commands per second!)
3. Once you find a server that is not limited, you want to make sure your rates are cmd 80, and update 60. Play on the server for a few rounds, and keep an eye on your CHOKE and LOSS.
4. If you are experiencing choke, you will need to change your rates lower. The correct ratio for update to command means cl_updaterate should be 3/4 of cmdrate (75% is good)-- *This means CMDRATE is higher than UPDATERATE by a pinch*. So, lower your rates, keeping ROUGHLY the same ratio. If your choke is 30, lower your rates about 30 (but make sure you still use the ratio of 75%). This would mean cl_updaterate 35 and cl_cmdrate 50 (thats 70% ratio, close enough)
5. Try the new settings, and adjust your rates as needed. You want to lower your rates until you get less than 2 choke in the middle of a round, and less than 10 at the beginning, and end of a round. (choke is higher at beginning and end of rounds while server does stats, and resets objects)
6. Once you get to 0 choke, and 0 loss (loss may not change if it is a network problem) you have your proper rates.
Part 2 - The rate setting in CSS
The rate setting is used to set the MAX amount of data coming to you from the server in bytes per second. Rarely does your computer receive more than the max, and the more players on the server you are on, the more data you will recieve. On a 32 player server, you receive player positions, voice, chat, and nades weapons etc move. That will obviously use a lot of bandwidth to receive all that info.
In short, heres what you set your rate to, its not very important to tweak.
Connection Speed Set your rate to:
56k or slower 1800comcast
Slow DSL/Cable 20000
Fast DSL/Cable 25000
Part 3 - Interp setting in CSS
In Counter Strike Source, once your lag ping choke and loss are all fixed, you can improve your connection even more. The interp setting in CSS is used to tell your computer how fast to interpret the player and object positions sent to you by the server. The proper interp depends on your updaterate. Your cl_interp should be 1/updaterate. This means that if your updaterate is 50, your interp should be .02 - In the console type "cl_interp .02" or whatever yours should be. MAKE SURE YOU GET THE .02 and not just .2
There is also an interp setting that sets your interp automatically, adjusting dynamically. I do not use it, and cant give any advice, but the command is cl_interp 0.
this is quoted from http://www.fishtankclan.com/e107_plugins/content/content.php?content.44
Last edited:
- Joined
- May 8, 2008
- Messages
- 14,991
**Dust2 Survival Guide** - Guide Originally Posted By JunK
http://ego.hlstatsx.com/hlstats.php?mode=servers&server_id=14&game=css

Presents
JunK's Dust2 Survival Guide
Dust2 was an original map for Counter-Strike and favourited by many due to its brilliant layout and non bias ways. It is just as easy to win on the terrorist team as it is on the counter-terrorist team, so long as you know your role. Hence this guide, which will walk you through various roles, strategies, thinking and even basic knowledge, for both T and CT, with links to pictures to boot! So lets get started shall we.
Points of Interest
This is dust2, this is not rocket science. These strategies will be based on the assumption we are working with a server that is 15v15 up to 20v20, so you won't see things like CTs TMP rushing Middle against a full team...this just won't happen with this many people, especially on a pub.
Terrorist
Terrorists can absolutely dominate this map if they know their role. Well I'm telling you their role is to RUSH RUSH RUSH. Playing it safe and cozy won't cut it 95% of the time for this map. This is a DE map, if you want to camp and take your time switch to CT or go play a CS map as a terrorist, it just doesn't work here my friend. The time limit is against you, every second you spend poking your head out at short A you are wasting away your chances of success.
Where should we rush, and what is the best way? Good question. There are 4 conflict points which a terrorist can get through in order to end up at a bomb site, Long A ,Short A, Middle and Tunnels. We will look at these in great detail below.
However just before we begin, i would like to suggest EVERY single terrorist look to the left of your screen and see if you're holding bomb!! It should look like THIS. If you have bomb, make sure you're rushing with the team, not the one guy trying to hold off B tuns as your team rushes A.
Also wait until the beginning of the round to call rushes, and only call them over the mic. If you call them before a round begins people could switch teams via auto swap and give you away. Call rushes loud and frequently and repeat them after 2:00 game time in case others are lagging.
Rushing Note:
Hopefully not EVERY person on your team rushed one spot. Reason? You lose the advantages of the flank. If you are putting pressure on long A there is a good chance they are not paying attention, or just don't have the man power, to hold down short A. Have a few ready to take it over because the CTs cannot look two places at once, somebody is gonna take them down.
Also they'll be wanting to push B in order to get behind you at long. If you're up on short, watch out for getting shot from lower.
Counter-Terrorist
Counter-Terrorists usually have it pretty easy on this map purely because the terrorists usually do not do a coordinated successful rush. Otherwise its a bit more difficult to be a CT than a T on this map.
First and foremost, communication is key. Not everybody is experienced enough to know exactly where the enemy is at all times just by using radar. Call it where you see it, if the terrorists are flashing long A like crazy and their whole team rushes it, yell it out on the mic before you die or use radio commands...do something to alert the others.
Terrorists have the numbers advantage, they can rush their whole team at one spot, yet as a CT you need to cover all 4 conflict points fairly evenly so you'll probably have 4-5 people at each spot. 4-5 vs 15-20...odds are if terrorists rush they'll be successful. So what do the CTs do? Well CTs have a big advantage themselves, though its a little more difficult to pull off, and that's map management. Sure the terrorists can dominate long A, but the CTs can then push through tuns and middle and stay on top A, basically trapping all of the terrorists in the pit.
The CTs also have one HUGE advantage...time. Time is on our side my brothers in blue. We just need to delay them as much as possible with smokes/flashes/nades/prefire...whatever works.
Now this is probably one of the most important points I'll mention for a CT. DO NOT RUSH. We'll touch on this in great detail just below, but you do not want to be on the wrong side of a choke point. The terrorists will destroy you, then take over the conflict point you just gave up by dying.
If there was somebody hidden in that said room and you had go to through one doorway to find him, you need to potentially look everywhere in that room to find him. He can be anywhere. However that person knows there is only one spot you can be, that doorway. All his attention is focused on that doorway just waiting....who has the advantage?
As a terrorist you have no way of avoiding choke points, you need to get into that bombsite. However the odds even out with how many people you can have behind you (the whole team).
As a CT the choke point is your saviour because you cannot have your entire team at one choke point, there's 3 others to watch other than your own.
CTs the lesson here is to use choke points to your advantage. Why would you possibly want to rush out of long A, or into B tunnels and turn that choke point around on yourself?
That being said, a CT can only utilize the advantage of choke points if they WATCH the choke points.
There is one exception here. That being if the entire terrorist team is rushing a different choke point, the chances are pretty good that they will not have the man power to hold off the others. Cautiously attempt to push through in order to flank the rushing Ts.
You cannot take money out during the pistol round, however you can very near the end of it dead or alive. So take out 2,350 when you can during the pistol round. Once the round is over it will fully regenerate (back to 50,000) which you can use to take out another 2,350.
Doing things this way you will constantly have 50,000 in your bank and almost always have enough cash for whatever equipment you want.
My personal bind, [bind "\" "withdraw 2350"].
Terrorist
Doesn't really matter what gun you use, but keep in mind you're rushing so you don't want your whole team to carry a scout. The AK47 is extremely cheap for its power and accuracy and my personal terrorist choice. As a terrorist is it a MUST BUY to have kevlar WITH HELMET. Why so important you ask? Well because 90% of the CT team will be using the M4A1, which if wearing a helmet will not kill you with one shot to the head. Max it will do is 91 damage, which could save your life and possibly get you a couple extra kills.
Also i highly suggest all terrorists buying 2 flashes because trust me...you do not want the CTs to be able to see when you're flooding out of a choke point.
Counter-Terrorist
Again doesn't really matter which gun you use, they pretty much all do the job. However if you have a rush of Ts coming at you the M4A1s controllable spray does come in handy. As a CT the HEGrenade is a MUST BUY. Nothing will stop a rush through those choke points faster than 2-4 nades taking out their entire team.
I recommend buying at least 1 flash in order to slow down any possible rushes that may occur. 2 flashes may get you an extra kill or two.
Look...deagles are great ya we get it. But this map is not laid out for terrorists to sit back and try to pick shots at people. If you want my opinion...hell even if you don't, this is my guide so I'm giving it.
I say a terrorists best bet is to buy 2 flashes and a nade, switch his glock to burst and rush just like every other round. With the flashes the CTs won't be able to see you until you're spread out in the open past any choke point, and you'll be close enough that your burst shot will demolish anything unlucky enough to be in the way.
Counter-Terrorist
Again, deagles are great...whoop-de-do. The terrorists have the highest chance of rushing success on this round, which brings me to what i always buy. An HEnade and a kit. You even have enough money to throw in a flash if you want. Reasons for this setup? Well i dunno if you've seen my nade thread, but the majority of my multiple nade kills are especially because of pistol round. I can nearly guarantee less than 10% of the terrorists will buy armor, which means a nade can potentially do 60+ damage to 3-5 people. Quite a bit more than your expensive deagle. Also buy a kit because basically nobody else will, and there's a good chance they'll get the bomb down.
This is usually the preferred rush for the terrorist because of two reasons. Its easiest to succeed which is due to the second reason, CTs don't really need to fight for it. The tricks to successfully rushing long A are as such:
Flashing over the wall does 2 things for the terrorists at long A. It will scare off a lot of CTs even trying to run towards the pit because once they get flashed they run like little girly men thinking to themselves "ahh screw this!". It will also blind the ones unlucky enough to be at long A, no matter how deep into the pit they are.
How do you flash over the wall? Well let me explain where you should throw the flash. HERE is a picture showing you where to throw it for the best effect. Use the red lines as reference points in game and make sure you throw the flash high enough to get over the wall. One team flash will ruin everything at this point. If you throw the flash there it will blow up directly over long A flashing any and all CTs even remotely close, including in pit. You do not want to flash too far to the left or else those rushing towards pit will not be blinded, so you'll have more CTs to deal with. You do not want to throw too far to the right or else it will blow up behind the CTs view point making the flash not as effective.
While in game, assuming you are the first T on your way to long, you want your first flash to be early to discourage them from running into the pit. I recommend throwing it before even reaching the yellow car. As soon as i get off the ramp i get my flash out, line it up, and toss. LIKE THIS. Notice the reference points, the tree and the door, throw it in between them for best results. Do not worry about throwing another flash, your teammates will handle that. Bust out your knife again to rush faster and when you get to the box have your gun ready LIKE SO.
Now this is crucial. Depending on how fast you were and how much the blind CTs hesitated, you will see approximately 1-2 CTs on their way to pit right about HERE, with a possible 3rd just behind the highlighted corner. Now is your time to shine! Either stand or crouch but take out those CTs. They are blind as hell and just running, its duck hunting time baby.
Scenario 1
A CT made it to the pit, uh oh. The longer you wait the harder it is. I suggest you bust out your 2nd flash, throw it down and hop to it. You may also be flashed from those pesky CTs flashing the balls outta you, (eyeballs of course!), but no matter...you need that pit. First one in gets the kill!
Scenario 2
Nobody in pit. Good job, you flashed early and got there quick. Bust out your second flash and throw it down the long A section and bounce yourself into that pit. Hopefully the flash blinded them enough that they couldn't take shots at you while jumping down. Now you can poke your head out and kill anybody dumb enough to still be in your line of fire.
Now what?? Well you have been successful at rushing long A but you're still a long way from planting the bomb. You need to push up, and the easiest way is to smoke CT ramp and flash down CT ramp before crossing to top A. I'm willing to bet there is hardly anybody at top A since CTs usually run away via their spawn. Unless those said CTs read and pay attention to this guide also! Then it will be one hell of a battle.
Hiding Spots
For some reason this is probably where most of the CTs start running towards right off the bat, yet the place where the least actually end up staying. Here are some tips on how to defend this delightful piece of property.
So buy your stuff ASAP, take out that knife and get hauling boy cause they are on their way. Wherever you go as a CT you need to assume they are rushing. Its pretty hard for CTs to cover long A when the Ts do actually rush, so its usually best to get 6-8 guys in that direction right off the bat just to check if they are coming.
Scenario 1
On your way to pit you're getting flashed pretty hardcore, they are definitely on their way.
DO NOT TUCK TAIL AND RUN, you'll be giving up long A before you even get started. Run through the flashes directly into pit. Awww yes i know its sooo difficult to continue holding down the W button while flashed, but i think you'll manage. You can also pull out a flash and just chuck it over the wall without stopping. Make sure you aim a bit to the right tho, your momentum will throw the flash more to the left than what you aim, LIKE SO.
Now that you're in the pit whatever will you do? Well lets just say hopefully there's more than one of you. Best thing to do is assume they are rushing out like crazy, which you'll know if you continue to get flashed like rapid fire craziness. Throw a flash from pit out in the open. For more effect walk backwards when letting loose so it doesn't explode too far behind them as demonstrated HERE.
When the terrorists are flashed, they will retreat behind the box so they are not out in the open. Awesomeness for you because you have a nade waiting for them. Poke your head out and see if you can pop shot anybody in the open, if not throw you nade behind the box RIGHT HERE. Picture note: Try not to pop your head above the wall higher than seeing the top of the barrels, or else you'll be an easy target to be picked off.
Once you're out of nades just try your best to avoid being naded to death yourself. Not by soiling yourself in the bottom pit corner, but by popping up and hopefully head shot anybody with a nade in their hands running towards you. Your teammates will help shoot the people trying to jump into the pit from the corner and top A.
Also if the terrorists are rushing long A, you can try to push B tuns, clear them out and possibly even clear out middle in your best attempts to trap all of the terrorists at pit. This is also a good idea to go up to short A from middle, in order to flank the couple terrorists that may be trying to flank your teammates at top A.
Scenario 2
False alarm, they are not rushing. Even if they flash over the wall it doesn't necessarily mean they are rushing, but if 8-10 flashes come over that wall you can be fairly certain.
So if the terrorists do not rush, its best to fall back to short A/CT ramp, keeping 2-3 behind to continue the watch guard. DO NOT RUSH LONG. I can guarantee with our dust2 population there are at least 3 terrorists just waiting for you to stick your head out so they can take it off.
If they do not rush long, chances are they're rushing somewhere else, so rest easy for now.
Hiding Spots
This can either be the toughest or easiest place for Ts to rush. Allow me to start with this, THE NADE ZONE. You do NOT want to get stuck here, 3-4 nades will kill all of you. You must rush past this zone as fast as humanly possible. Lets go over the list:
Alright I'm going to mention this again, i do not care if you are flash, if you're getting shot, you MUST get out of the nade zone ASAP. Most people don't like rushing short A because of the nade zone, but they don't understand that hesitation will bring the pain. You have the numbers on your side, you need to GO GO GO.
CRAP WAIT! We're getting shot from BEHIND?!?! How is this possible?? I'll tell you, make sure at least one of you checks a pesky freaking corner and behind the cement, especially if Spider-Prime is a CT. Kill two birds with 1 stone by using THIS SPOT to check both at once. Crisis averted.
Now for the flash/flash/rush. This can go 2 ways:
Scenario 1
You're being flashed, you fear there is a CT that is trying to rush you or get into a hiding spot on short A in order to take a couple of you out as you come up. Flash HERE first which should blind them. Get the flash up enough that it will still hit them if they are crouched behind the cement (most likely spot for them to be). And its easy to do even while flashed.
Continue to rush up and just make sure there is nobody directly in your way, bust out your second flash and throw it HERE. This will flash every person watching short A that is behind the corner to the left, on A ramp and even those watching top A to the right. It will infact flash them so bad you'll be able to rush up to at least the boxes.
Now you can proceed to shoot everybody and whomever has the bomb can plant it ASAP. I suggest planting it HERE just so you're not picked off from the long A pit campers.
Scenario 2
You're not being flashed, you suspect there is nobody on top of A but just hiding on A ramp waiting for you to come. Your first flash should probably be HERE which will blind them long enough that you can get your second flash off. Do not forget to check the key points for body parts, and continue on up to planting the bomb just like in scenario 1.
Once you have the bomb down, really...who cares about long A or middle...they cannot get to the bomb from there. I suggest you stay on top of A and at short A and just wait for them to come. No need to stick your heads out trying to shoot them, that's what they are waiting for you to do. Then the CTs will kill you, walk up and defuse. Just be patient now, they will be forced to come towards bomb then BAM all of a sudden they are facing the entire T team staring where they are walking. You'll get the kills if you stick with bomb.
Hiding Spots
Easily the most overlooked spot on the map for CTs. This is hardly covered, and i am constantly yelling over the mic about it because I'm usually the only one here. It doesn't need the most coverage, since most rushes are avoided by a nade barrage, but you do not want to be here alone.
Now i definitely need to include this, but THIS is not in position to watch short, nor is THIS. Those are positions to fall back to long A and fall back to CT spawn, allowing them to take top A and plant. Whats wrong with these spots? Well the first one you are no longer looking at the choke point of short stairs...you can't even watch to see if anybody jumps down into CT spawn. The second you are completely visible and you'll get shot down immediately. Also you are not in a good shooting position, you will only be able to see the tops of their heads for short periods of time, forcing you to fall back before you die. Being in position is on top A behind the boxes, behind the wall to the right, or on A ramp. Either way nade the hell out of short. If you throw 3-4 nades together all around the nade zone before they can get to top A, they'll all die.
Now to introduce you to my awesome short A defending style of Flash, Shoot, Nade.
While they are rushing, FLASH directly over top A by walking backwards and letting loose. Once you hear it go off stick your head out and SHOOT everybody down. If there are still some survivors they are looking for cover, which will likely be the boxes on top A...this is where the NADE comes in!
Do your best to survive and continue to try to pick them off as they come close. At the same time hopefully your teammates that are not defending with you, are making efforts to flank the enemy at short A.
Scenario 1
You successfully defended short A. Great job, hold your position because there are probably 1-2 people left hiding near short A stairs. Nade it if you have an HE and see if your teammates can roll up for a flank. Also once short A rush fails, be weary of terrorists retreating back to spawn/long A area...usually happens.
Scenario 2
You died or your teammates died and they have top A. They paid attention to this guide and you didn't now you're faced with a blinking bomb at the bottom of your screen. Do your best to draw their attention towards long A. Try to pick them off from the pit one by one as the rest of your group come around from B into short A for a flank. They'll most likely be expecting it, but you gotta power through it.
I say DO NOT, i repeat DO NOT, just stand in CT spawn or middle and try to pick of people peeking. You will not defuse bomb this way. If you want to try to rush up CT ramp its pretty much a death trap. There are way too many places to look at once, i suggest rushing up short A.
Hiding Spots
This is a bit of a tough one for terrorists and not commonly rushed. It can be done however, lets find our how. Note: We will be assuming a middle to bombsite B rush. If you would like to do it mid to A just reverse a couple details.
For a middle to B rush you'll want to smoke towards the CT side opening LIKE SO. Here is the RESULT. This will minimize the damage you'll take from CT spawn as well as from CT ramp at A. Not getting shot in the back is a good thing. Note: You'll need to practice that smoke throw so you don't get it stuck on the rocks, just high enough to get over the invisible wall, not too high where it won't bounce down.
Once the smoke is thrown i suggest flashing HERE and HERE and just rush on through baby. Flashing through the double doors like that allows you to strafe to the left so you're not affected but everybody in mid will be flashed. Then bouncing it off of that wall and flashing spawn will allow you to rush up the ramp and take care of business without getting shot in the back or in the head immediately. Practice so you can do it fast and fluid. Hopefully you will not get team flashed and your teammates didn't hesitate, being right behind you for backup.
Now you really have to get inside that bombsite ASAP before that smoke clears, cause then you'll have 4-5 more guns on you. Try your best to flash into B whoever has flashes left, and just bombard the double doors and window at the same time, get inside that bombsite!!
Scenario 1
You have 5-8 teammates sitting in tunnels. GREAT! Tell them to push tunnels just as you are about to rush into the bombsite!! This group attack will absolutely dominate any and all CTs inside B. They cannot watch 3 points at once, you will get in and you will kill them all. Job well done, a pat on the back is deserved for being so coordinated.
Scenario 2
Nobody is willing to push tuns, you're on your own. CRAP! This is going to be difficult, though still easier than a straight tunnel rush. If you do not have people in tunnels, chances are a CT or 2 has entered meaning there is a CT or 2 less inside the bombsite to directly defend. This is CRUCIAL. You must push both the double doors and window at the same time. Good luck.
Hiding Spots
Middle is pretty easy for CTs. As you can see from above there are a lot of areas where you can see middle from. This section will be pretty quick because its quite easy to defend.
It is also a handy tool to see how many people are possibly going up to short A, but careful...they will be waiting for you to peek in order to blast you down.
Scenario 1
You were closer to CT spawn, got flashed and got to cover as quickly as possible. If you suspect a full on rush (multiple flashes going off like crazy, AFKs are getting shot) flash back. Here are some screen shots depending where you may be. 1. 2. 3.
Those will likely stop them from running out and up the ramp, which could cause them to bunch up just beyond double doors. Great time for your nade. Toss it the same way as the flashes if you want. Whats left? Nothing much, just round up the wounded with your handy shooting. Oh and try not to rush out directly in the open.
Scenario 2
You were sniping middle or something but got flash so you retreated up the ramp towards B. Again flash back from these view points depending where you are. 1. 2. Note: Please do NOT flash like THIS. You will flash everybody that is potentially watching middle as well as anybody that wants to pop out and shoot people down. Bad move, team flasher!
FLASH over the wall in this manner. This will allow you the time to throw your second flash without being shot hopefully. FLASH as far up middle as you can and rush on through.
Hiding Spots
Good luck. The tuns is a very hard place for the terrorists to rush because its more of a choke point than any other spot on the map. Instead of a doorway that you need to run through, then you're out in the open, you need to run through this long death-bringing tunnel for like two full seconds. Good luck.
This is important also...the first person should flash in THIS manner. The red line represents approximately the middle of the tunnels. Make sure your flash bounces to the RIGHT of that line so it doesn't stay in the tunnel opening. As soon as they let that flash go you should have your gun out and hug the right wall. If you hesitate and stand at the entrance of tuns, you will all die.
Spread the hell out. Again do not stay all bunched up you will just all die. I personally like to crouch just outside of the tunnels beside the box right HERE. Just because the CTs will be throwing nades and flashes inside the tunnels, so they shouldn't affect you, and especially if you're the first guy you're facing off vs all of the CTs in spawn, so its best not to keep running/shooting. Get in a position where you can see a guy or 2 and try to take them out. Hopefully the rest of your team is flooding inwards.
Not many screen shots that need to go along with this rush because you should only really flash once in order for the CTs to turn their back, and then you're in their face.
Scenario 1
You have people rushing up to B from middle. AWESOME. I just really hope they do not flash inside B because most likely you'll be desperately trying to kill those CTs and you'll need all the vision you can muster.
Scenario 2
You do not have teammates rushing up middle. Well then i sure as hell hope they are all rushing into B right behind you because to succeed a straight tunnel rush you'll need as many people as possible. Lets just say expect to die, just try your best to take as many out as possible.
Hiding Spots
Usually a pretty safe place to be. Oh wait, is that why 3/4 of the team usually runs here when the round begins? Please for the love of God not everybody run here right off the bat...holy crap.
Ok yes B is usually quiet for the most part because as you can see from above, its pretty hard for the terrorists to successfully rush it. No matter, here are still some hints:
Get in position. Remember when i said choke points only work if you're guarding the choke point? Let me clear this up. THIS is a choke point. THIS is guarding a choke point. THIS is not. Whats the difference? Well from guarding the choke point i can shoot/flash/nade them as they are bunched up while running towards bombsite B. I am not surprised to where they will be, i know where they will be. They HAVE to come in through those tunnels so im going to shoot them while they are running and bunched together. While on the other hand, you are waiting for them to exit the tunnels, where they could spread out quite a bit so you won't know exactly where they'll come into your view at. Not to mention, like 95% of the time, as soon as they come out of tunnels they are rushing into that spot. You'll be the first one to die!! HAHA.
FLASH them as they are rushing up the tunnels from behind cover. SHOOT them down while they are blindly running around like n00bs. NADE them right here, because i can almost guarantee they are doing their best to get into that spot...and they'll be all bunched up for you again. KABOOM.
Now laugh at take screen shots.
Scenario 1
You didn't take my advice and watch the choke point. Or possibly there just wasn't enough people in there to hold B. Well this sucks, because now you need to try to get it back. I can guarantee they will spam flashes out into middle so that you cannot rush up, but trust me you do not want to try to come in through tunnels. The only tip I'll give you is to NADE right here. They will most likely have 1-2 people in the far platform corner and you'll probably get a kill or two.
Scenario 2
You successfully defended. Great job. Now keep watching tunnels because there are probably a few people still left crying inside, grieving the loss of their team. Now you could take the initiative and rush with the tips below, or just wait them out. Your teammates will soon be pushing lower tuns and flanking them anyway.
But if you must, we'll go with the flash, flash, shoot.
FLASH like so in order to get them to turn their backs long enough for you to throw your second flash. FLASH now while running inside tunnels. Hug the left wall and by the time you get to the opening the flash JUST went off, giving you the max amount of time to shoot everybody down.
Hiding Spots
Don't forget about Basic Training. Not only do we have events every week for a public lesson on one gun at a time, but you can contact all of the instructors for a private lesson on whatever you need help with.
Note: Please post some feedback. If you think something needs to be added, or taken away. Also let me know if there are any broken or wrong links. I will be proof reading it now (once posted) and testing all links but i may miss one. Thanks guys!
http://ego.hlstatsx.com/hlstats.php?mode=servers&server_id=14&game=css

Server Rules
- Be mindful of your tongue (watch language, be respectful and do not complain about lag)
- No spawn camping for terrorists past 1:30 in game time in order to keep game play fluid.
- Always attempt to complete the map objective (plant bomb/defuse bomb), also in order to keep game play fluid.
Presents
JunK's Dust2 Survival Guide
Introduction
Hello, I am of course JunK. As a newly promoted Basic Training Instructor i will be bringing you this guide, presented by Basic Training, in hopes of sparking your interest in our wonderful 24/7 de_dust2 server.Dust2 was an original map for Counter-Strike and favourited by many due to its brilliant layout and non bias ways. It is just as easy to win on the terrorist team as it is on the counter-terrorist team, so long as you know your role. Hence this guide, which will walk you through various roles, strategies, thinking and even basic knowledge, for both T and CT, with links to pictures to boot! So lets get started shall we.
Points of Interest
- Pit. Also referred to as Long Ramp and JunK's casket.
- Connector. Also referred to as Long Hall and Long Tunnel.
- Barrels. The ruiner of CSS!!
- Bombsite A. Also referred to as A, Platform, Plat and Top A
- Short A.
- Long A.
- CT Ramp.
- A Ramp. Also known as JunK's playground.
- Barrels. The curse buckets!!
- Catwalk. Also referred to as Cat and Middle.
- Short A. Some call it Short Stairs.
- Double Doors.
- T Side Mid.
- Tspawn.
- Long A.
- Short A.
- Tunnels.
- Bombsite B
- CT Side Mid
- CT Spawn
- Barrels. *Grumbles incessantly*
- Top Tunnels. Also referred to as Upper Tuns, Tuns, and The Deathtrap.
- Tunnel Stairs. Also referred to as B Stairs and Tun Stairs.
- Lower Tunnels. Also referred to as Lower, Tuns, and The Deathtrap.
- Barrels. Even though they are not present in the picture, you cannot escape the evils!!
- Bombsite B. Also referred to as B and Why-the-hell-is-every-CT-going-there.
- Window.
- B Doors. Leads to Middle.
- B Car. Also referred to as Jar-Jar-Binks para-domination-zone.
- Entrance to Deathtrap...err Tunnels.
- B Platform. Also referred to as Purple Dranks refrigerator and Daredevils spot-o-fun.
- Barrels. Oh yes...they are everywhere!!
Strategies
Alright now that we have the basic knowledge of each part of the map including the slang names, I'll start on strategies. I am going to split this up into each section of the map for both Ts and CTs, showing you the in's and out's of each area, frequently used hiding spots and how to generally survive as long as possible. There will be multiple screen shots showing you hints and tips, so watch for the links!This is dust2, this is not rocket science. These strategies will be based on the assumption we are working with a server that is 15v15 up to 20v20, so you won't see things like CTs TMP rushing Middle against a full team...this just won't happen with this many people, especially on a pub.
Terrorist
Terrorists can absolutely dominate this map if they know their role. Well I'm telling you their role is to RUSH RUSH RUSH. Playing it safe and cozy won't cut it 95% of the time for this map. This is a DE map, if you want to camp and take your time switch to CT or go play a CS map as a terrorist, it just doesn't work here my friend. The time limit is against you, every second you spend poking your head out at short A you are wasting away your chances of success.
Where should we rush, and what is the best way? Good question. There are 4 conflict points which a terrorist can get through in order to end up at a bomb site, Long A ,Short A, Middle and Tunnels. We will look at these in great detail below.
However just before we begin, i would like to suggest EVERY single terrorist look to the left of your screen and see if you're holding bomb!! It should look like THIS. If you have bomb, make sure you're rushing with the team, not the one guy trying to hold off B tuns as your team rushes A.
Also wait until the beginning of the round to call rushes, and only call them over the mic. If you call them before a round begins people could switch teams via auto swap and give you away. Call rushes loud and frequently and repeat them after 2:00 game time in case others are lagging.
Rushing Note:
Hopefully not EVERY person on your team rushed one spot. Reason? You lose the advantages of the flank. If you are putting pressure on long A there is a good chance they are not paying attention, or just don't have the man power, to hold down short A. Have a few ready to take it over because the CTs cannot look two places at once, somebody is gonna take them down.
Also they'll be wanting to push B in order to get behind you at long. If you're up on short, watch out for getting shot from lower.
Counter-Terrorist
Counter-Terrorists usually have it pretty easy on this map purely because the terrorists usually do not do a coordinated successful rush. Otherwise its a bit more difficult to be a CT than a T on this map.
First and foremost, communication is key. Not everybody is experienced enough to know exactly where the enemy is at all times just by using radar. Call it where you see it, if the terrorists are flashing long A like crazy and their whole team rushes it, yell it out on the mic before you die or use radio commands...do something to alert the others.
Terrorists have the numbers advantage, they can rush their whole team at one spot, yet as a CT you need to cover all 4 conflict points fairly evenly so you'll probably have 4-5 people at each spot. 4-5 vs 15-20...odds are if terrorists rush they'll be successful. So what do the CTs do? Well CTs have a big advantage themselves, though its a little more difficult to pull off, and that's map management. Sure the terrorists can dominate long A, but the CTs can then push through tuns and middle and stay on top A, basically trapping all of the terrorists in the pit.
The CTs also have one HUGE advantage...time. Time is on our side my brothers in blue. We just need to delay them as much as possible with smokes/flashes/nades/prefire...whatever works.
Now this is probably one of the most important points I'll mention for a CT. DO NOT RUSH. We'll touch on this in great detail just below, but you do not want to be on the wrong side of a choke point. The terrorists will destroy you, then take over the conflict point you just gave up by dying.
Choke Points
What are choke points and how can you use them to your advantage? Allow me to explain choke points in this way: Image a room, and the only entrance was through a doorway. The doorway is the choke point.If there was somebody hidden in that said room and you had go to through one doorway to find him, you need to potentially look everywhere in that room to find him. He can be anywhere. However that person knows there is only one spot you can be, that doorway. All his attention is focused on that doorway just waiting....who has the advantage?
As a terrorist you have no way of avoiding choke points, you need to get into that bombsite. However the odds even out with how many people you can have behind you (the whole team).
As a CT the choke point is your saviour because you cannot have your entire team at one choke point, there's 3 others to watch other than your own.
CTs the lesson here is to use choke points to your advantage. Why would you possibly want to rush out of long A, or into B tunnels and turn that choke point around on yourself?
That being said, a CT can only utilize the advantage of choke points if they WATCH the choke points.
There is one exception here. That being if the entire terrorist team is rushing a different choke point, the chances are pretty good that they will not have the man power to hold off the others. Cautiously attempt to push through in order to flank the rushing Ts.
Equipment
Alright let me quickly go over the basic needs of each team. Allow me to mention here that our server uses the bank system, quite awesome actually. The bank system regenerates money at the beginning of each round at a rate of 5%. Now i am going to assume most of you have a full bank, here is the JunK bank tip:You cannot take money out during the pistol round, however you can very near the end of it dead or alive. So take out 2,350 when you can during the pistol round. Once the round is over it will fully regenerate (back to 50,000) which you can use to take out another 2,350.
Doing things this way you will constantly have 50,000 in your bank and almost always have enough cash for whatever equipment you want.
My personal bind, [bind "\" "withdraw 2350"].
Terrorist
Doesn't really matter what gun you use, but keep in mind you're rushing so you don't want your whole team to carry a scout. The AK47 is extremely cheap for its power and accuracy and my personal terrorist choice. As a terrorist is it a MUST BUY to have kevlar WITH HELMET. Why so important you ask? Well because 90% of the CT team will be using the M4A1, which if wearing a helmet will not kill you with one shot to the head. Max it will do is 91 damage, which could save your life and possibly get you a couple extra kills.
Also i highly suggest all terrorists buying 2 flashes because trust me...you do not want the CTs to be able to see when you're flooding out of a choke point.
Counter-Terrorist
Again doesn't really matter which gun you use, they pretty much all do the job. However if you have a rush of Ts coming at you the M4A1s controllable spray does come in handy. As a CT the HEGrenade is a MUST BUY. Nothing will stop a rush through those choke points faster than 2-4 nades taking out their entire team.
I recommend buying at least 1 flash in order to slow down any possible rushes that may occur. 2 flashes may get you an extra kill or two.
Pistol Round
TerroristLook...deagles are great ya we get it. But this map is not laid out for terrorists to sit back and try to pick shots at people. If you want my opinion...hell even if you don't, this is my guide so I'm giving it.
I say a terrorists best bet is to buy 2 flashes and a nade, switch his glock to burst and rush just like every other round. With the flashes the CTs won't be able to see you until you're spread out in the open past any choke point, and you'll be close enough that your burst shot will demolish anything unlucky enough to be in the way.
Counter-Terrorist
Again, deagles are great...whoop-de-do. The terrorists have the highest chance of rushing success on this round, which brings me to what i always buy. An HEnade and a kit. You even have enough money to throw in a flash if you want. Reasons for this setup? Well i dunno if you've seen my nade thread, but the majority of my multiple nade kills are especially because of pistol round. I can nearly guarantee less than 10% of the terrorists will buy armor, which means a nade can potentially do 60+ damage to 3-5 people. Quite a bit more than your expensive deagle. Also buy a kit because basically nobody else will, and there's a good chance they'll get the bomb down.
Long A
TerroristThis is usually the preferred rush for the terrorist because of two reasons. Its easiest to succeed which is due to the second reason, CTs don't really need to fight for it. The tricks to successfully rushing long A are as such:
- RUSH EARLY. As a rushing team you need to get your butt going as fast as you can in order to get there faster than the CTs. This means break out your knife ASAP and run baby run.
- Flash over the wall. EARLY
- Flash a lot.
- Avoid team flashes.
- Come out ready to shoot. Line up the shot expecting a CT or 2 rushing towards pit.
- GET TO THAT PIT!
- Move up, keeping a couple behind preparing for the ambush.
- Have a few teammates attack short A at the same time as moving forward.
Flashing over the wall does 2 things for the terrorists at long A. It will scare off a lot of CTs even trying to run towards the pit because once they get flashed they run like little girly men thinking to themselves "ahh screw this!". It will also blind the ones unlucky enough to be at long A, no matter how deep into the pit they are.
How do you flash over the wall? Well let me explain where you should throw the flash. HERE is a picture showing you where to throw it for the best effect. Use the red lines as reference points in game and make sure you throw the flash high enough to get over the wall. One team flash will ruin everything at this point. If you throw the flash there it will blow up directly over long A flashing any and all CTs even remotely close, including in pit. You do not want to flash too far to the left or else those rushing towards pit will not be blinded, so you'll have more CTs to deal with. You do not want to throw too far to the right or else it will blow up behind the CTs view point making the flash not as effective.
While in game, assuming you are the first T on your way to long, you want your first flash to be early to discourage them from running into the pit. I recommend throwing it before even reaching the yellow car. As soon as i get off the ramp i get my flash out, line it up, and toss. LIKE THIS. Notice the reference points, the tree and the door, throw it in between them for best results. Do not worry about throwing another flash, your teammates will handle that. Bust out your knife again to rush faster and when you get to the box have your gun ready LIKE SO.
Now this is crucial. Depending on how fast you were and how much the blind CTs hesitated, you will see approximately 1-2 CTs on their way to pit right about HERE, with a possible 3rd just behind the highlighted corner. Now is your time to shine! Either stand or crouch but take out those CTs. They are blind as hell and just running, its duck hunting time baby.
Scenario 1
A CT made it to the pit, uh oh. The longer you wait the harder it is. I suggest you bust out your 2nd flash, throw it down and hop to it. You may also be flashed from those pesky CTs flashing the balls outta you, (eyeballs of course!), but no matter...you need that pit. First one in gets the kill!
Scenario 2
Nobody in pit. Good job, you flashed early and got there quick. Bust out your second flash and throw it down the long A section and bounce yourself into that pit. Hopefully the flash blinded them enough that they couldn't take shots at you while jumping down. Now you can poke your head out and kill anybody dumb enough to still be in your line of fire.
Now what?? Well you have been successful at rushing long A but you're still a long way from planting the bomb. You need to push up, and the easiest way is to smoke CT ramp and flash down CT ramp before crossing to top A. I'm willing to bet there is hardly anybody at top A since CTs usually run away via their spawn. Unless those said CTs read and pay attention to this guide also! Then it will be one hell of a battle.
Hiding Spots
- Behind the door. CTs will not have enough time to get there if you rush however.
- On the cement behind the box. You will not be able to see him from double doors.
- Behind the cement. You will be able to see him from double doors, stand or crouch.
- Right of pit. They can shoot you in the corner behind box from here.
- In the pit.
- Long plat. Sometimes includes the pit ledge.
- Behind corner. Almost always somebody there watching double doors.
- Double cars. Usually somebody that got stuck behind that corner after being flashed.
For some reason this is probably where most of the CTs start running towards right off the bat, yet the place where the least actually end up staying. Here are some tips on how to defend this delightful piece of property.
- GET TO THE PIT! Don't even bother running towards long A if you are not willing to rush into the pit while blind, its a waste of time and gives those that do get into pit false hope that somebody is behind them.
- Get there early.
- Flash over the wall.
- Flash flash flash.
- Avoid team flashes.
- Peek cautiously
- Control yourself. Try not to spray and waste all your bullets on one person as your pissing in your pants.
- Push out of tunnels.
So buy your stuff ASAP, take out that knife and get hauling boy cause they are on their way. Wherever you go as a CT you need to assume they are rushing. Its pretty hard for CTs to cover long A when the Ts do actually rush, so its usually best to get 6-8 guys in that direction right off the bat just to check if they are coming.
Scenario 1
On your way to pit you're getting flashed pretty hardcore, they are definitely on their way.
DO NOT TUCK TAIL AND RUN, you'll be giving up long A before you even get started. Run through the flashes directly into pit. Awww yes i know its sooo difficult to continue holding down the W button while flashed, but i think you'll manage. You can also pull out a flash and just chuck it over the wall without stopping. Make sure you aim a bit to the right tho, your momentum will throw the flash more to the left than what you aim, LIKE SO.
Now that you're in the pit whatever will you do? Well lets just say hopefully there's more than one of you. Best thing to do is assume they are rushing out like crazy, which you'll know if you continue to get flashed like rapid fire craziness. Throw a flash from pit out in the open. For more effect walk backwards when letting loose so it doesn't explode too far behind them as demonstrated HERE.
When the terrorists are flashed, they will retreat behind the box so they are not out in the open. Awesomeness for you because you have a nade waiting for them. Poke your head out and see if you can pop shot anybody in the open, if not throw you nade behind the box RIGHT HERE. Picture note: Try not to pop your head above the wall higher than seeing the top of the barrels, or else you'll be an easy target to be picked off.
Once you're out of nades just try your best to avoid being naded to death yourself. Not by soiling yourself in the bottom pit corner, but by popping up and hopefully head shot anybody with a nade in their hands running towards you. Your teammates will help shoot the people trying to jump into the pit from the corner and top A.
Also if the terrorists are rushing long A, you can try to push B tuns, clear them out and possibly even clear out middle in your best attempts to trap all of the terrorists at pit. This is also a good idea to go up to short A from middle, in order to flank the couple terrorists that may be trying to flank your teammates at top A.
Scenario 2
False alarm, they are not rushing. Even if they flash over the wall it doesn't necessarily mean they are rushing, but if 8-10 flashes come over that wall you can be fairly certain.
So if the terrorists do not rush, its best to fall back to short A/CT ramp, keeping 2-3 behind to continue the watch guard. DO NOT RUSH LONG. I can guarantee with our dust2 population there are at least 3 terrorists just waiting for you to stick your head out so they can take it off.
If they do not rush long, chances are they're rushing somewhere else, so rest easy for now.
JunK CT Rushing Tips
FLASH over the wall to blind people or make them turn their back. FLASH over the entire area through the hole for the same effect, just before you rush out. Rush out and shoot em down baby...shoot em down.Hiding Spots
- Behind the box.
- Behind the door. Very easy to not properly look there.
- Beside or on top of white car. Can be very tricky to see a terrorist in this spot.
- Behind white car. Typical spot for a terrorist to be looking through both double doors.
- T spawn wall. Easy to over look this spot.
- T spawn. Scouters located here.
- Yellow car. Can be either right behind the car, or having the car block their body but actually right beside the wall.
- On cement behind box. Tricky spot for a CT to remember to check.
- Long corner. Usually a guy ending up here if he was flashed while defending long A.
- Middle corner. Usually a guy or two here, make sure nobody comes out of long A.
Short A
TerroristThis can either be the toughest or easiest place for Ts to rush. Allow me to start with this, THE NADE ZONE. You do NOT want to get stuck here, 3-4 nades will kill all of you. You must rush past this zone as fast as humanly possible. Lets go over the list:
- Smoke Double Doors early and effectively.
- Flash Flash Rush.
- RUSH HARD. You don't have to be fast getting to short A, no matter what they'll get in position faster, which means you must rush HARD.
- Power through the nade zone. AT ANY COSTS get away from the nade zone.
- Secure bombsite.
- Plant quickly.
- STAY WITH BOMB.
- Do not worry about middle or long A.
Alright I'm going to mention this again, i do not care if you are flash, if you're getting shot, you MUST get out of the nade zone ASAP. Most people don't like rushing short A because of the nade zone, but they don't understand that hesitation will bring the pain. You have the numbers on your side, you need to GO GO GO.
CRAP WAIT! We're getting shot from BEHIND?!?! How is this possible?? I'll tell you, make sure at least one of you checks a pesky freaking corner and behind the cement, especially if Spider-Prime is a CT. Kill two birds with 1 stone by using THIS SPOT to check both at once. Crisis averted.
Now for the flash/flash/rush. This can go 2 ways:
Scenario 1
You're being flashed, you fear there is a CT that is trying to rush you or get into a hiding spot on short A in order to take a couple of you out as you come up. Flash HERE first which should blind them. Get the flash up enough that it will still hit them if they are crouched behind the cement (most likely spot for them to be). And its easy to do even while flashed.
Continue to rush up and just make sure there is nobody directly in your way, bust out your second flash and throw it HERE. This will flash every person watching short A that is behind the corner to the left, on A ramp and even those watching top A to the right. It will infact flash them so bad you'll be able to rush up to at least the boxes.
Now you can proceed to shoot everybody and whomever has the bomb can plant it ASAP. I suggest planting it HERE just so you're not picked off from the long A pit campers.
Scenario 2
You're not being flashed, you suspect there is nobody on top of A but just hiding on A ramp waiting for you to come. Your first flash should probably be HERE which will blind them long enough that you can get your second flash off. Do not forget to check the key points for body parts, and continue on up to planting the bomb just like in scenario 1.
Once you have the bomb down, really...who cares about long A or middle...they cannot get to the bomb from there. I suggest you stay on top of A and at short A and just wait for them to come. No need to stick your heads out trying to shoot them, that's what they are waiting for you to do. Then the CTs will kill you, walk up and defuse. Just be patient now, they will be forced to come towards bomb then BAM all of a sudden they are facing the entire T team staring where they are walking. You'll get the kills if you stick with bomb.
Hiding Spots
- Behind the cement. Usual place for a CT.
- On the ledge. Looking over top of the cement, also very likely spot.
- Corner. Not also, but just enough to keep you in fear!
- Box corner. While crouched they'll see you just over top of the baskets in front of them. Sneaky.
- On top of the box. Usually totting a pump shotgun, they'll nade and shoot at you while jumping.
- Wall ledge. Oh this is a great spot for a CT to be. Hard to see him and he'll be able to just see the tip of your heads.
- Corner. Just waiting for you to venture into his field of view.
- Long A. Usually CTs watching long A double doors will come here to watch top A. More specifically wait for you to run behind the box represented as 4.
- Double cars. Not often a CT here since he is completely out in the open, but sometimes!
- A ramp. Most common place to defend short from. Focus your flashes and nades here.
- Top A. May be a CT here waiting for you. However easily shot through the boxes.
- Right side. Watch out, i guarantee Nuclear Waffles is gonna mp5 your face from here!!
Easily the most overlooked spot on the map for CTs. This is hardly covered, and i am constantly yelling over the mic about it because I'm usually the only one here. It doesn't need the most coverage, since most rushes are avoided by a nade barrage, but you do not want to be here alone.
- Prevent the rush to begin with.
- Nade Nade Nade.
- Get in position.
- Flash. Shoot. Nade.
- Hang in there.
- Push out of tunnels, possibly long A.
Now i definitely need to include this, but THIS is not in position to watch short, nor is THIS. Those are positions to fall back to long A and fall back to CT spawn, allowing them to take top A and plant. Whats wrong with these spots? Well the first one you are no longer looking at the choke point of short stairs...you can't even watch to see if anybody jumps down into CT spawn. The second you are completely visible and you'll get shot down immediately. Also you are not in a good shooting position, you will only be able to see the tops of their heads for short periods of time, forcing you to fall back before you die. Being in position is on top A behind the boxes, behind the wall to the right, or on A ramp. Either way nade the hell out of short. If you throw 3-4 nades together all around the nade zone before they can get to top A, they'll all die.
Now to introduce you to my awesome short A defending style of Flash, Shoot, Nade.
While they are rushing, FLASH directly over top A by walking backwards and letting loose. Once you hear it go off stick your head out and SHOOT everybody down. If there are still some survivors they are looking for cover, which will likely be the boxes on top A...this is where the NADE comes in!
Do your best to survive and continue to try to pick them off as they come close. At the same time hopefully your teammates that are not defending with you, are making efforts to flank the enemy at short A.
Scenario 1
You successfully defended short A. Great job, hold your position because there are probably 1-2 people left hiding near short A stairs. Nade it if you have an HE and see if your teammates can roll up for a flank. Also once short A rush fails, be weary of terrorists retreating back to spawn/long A area...usually happens.
Scenario 2
You died or your teammates died and they have top A. They paid attention to this guide and you didn't now you're faced with a blinking bomb at the bottom of your screen. Do your best to draw their attention towards long A. Try to pick them off from the pit one by one as the rest of your group come around from B into short A for a flank. They'll most likely be expecting it, but you gotta power through it.
I say DO NOT, i repeat DO NOT, just stand in CT spawn or middle and try to pick of people peeking. You will not defuse bomb this way. If you want to try to rush up CT ramp its pretty much a death trap. There are way too many places to look at once, i suggest rushing up short A.
JunK CT Rushing Tips
FLASH over the wall to blind everybody potentially on cat, and in middle. (the red line approximately represents the hidden wall, get it over that) FLASH into middle. Rush out and shoot em down baby...shoot em down.Hiding Spots
- Beside stairs. You'll need to really look down to ensure you do not miss them.
- Catwalk. Again make sure you fully check here, easy to miss.
- On top of middle box. While crouched their head will just be visible above the wall.
- Viewed HERE. On top of box in lower tunnels. Their head will barely stick above the second box.
- Screen shot above. On top of the cement in lower tunnels.
- Middle corner. Always somebody there.
- Tspawn tunnel. Sometimes somebody here. They could also be on top of the first box.
Middle
TerroristThis is a bit of a tough one for terrorists and not commonly rushed. It can be done however, lets find our how. Note: We will be assuming a middle to bombsite B rush. If you would like to do it mid to A just reverse a couple details.
- Smoke flash flash.
- For the love of God do not hesitate.
- GO GO RUSH RUSH GO DAMMIT GO!
- Rinse and repeat.
For a middle to B rush you'll want to smoke towards the CT side opening LIKE SO. Here is the RESULT. This will minimize the damage you'll take from CT spawn as well as from CT ramp at A. Not getting shot in the back is a good thing. Note: You'll need to practice that smoke throw so you don't get it stuck on the rocks, just high enough to get over the invisible wall, not too high where it won't bounce down.
Once the smoke is thrown i suggest flashing HERE and HERE and just rush on through baby. Flashing through the double doors like that allows you to strafe to the left so you're not affected but everybody in mid will be flashed. Then bouncing it off of that wall and flashing spawn will allow you to rush up the ramp and take care of business without getting shot in the back or in the head immediately. Practice so you can do it fast and fluid. Hopefully you will not get team flashed and your teammates didn't hesitate, being right behind you for backup.
Now you really have to get inside that bombsite ASAP before that smoke clears, cause then you'll have 4-5 more guns on you. Try your best to flash into B whoever has flashes left, and just bombard the double doors and window at the same time, get inside that bombsite!!
Scenario 1
You have 5-8 teammates sitting in tunnels. GREAT! Tell them to push tunnels just as you are about to rush into the bombsite!! This group attack will absolutely dominate any and all CTs inside B. They cannot watch 3 points at once, you will get in and you will kill them all. Job well done, a pat on the back is deserved for being so coordinated.
Scenario 2
Nobody is willing to push tuns, you're on your own. CRAP! This is going to be difficult, though still easier than a straight tunnel rush. If you do not have people in tunnels, chances are a CT or 2 has entered meaning there is a CT or 2 less inside the bombsite to directly defend. This is CRUCIAL. You must push both the double doors and window at the same time. Good luck.
Hiding Spots
- Behind the door. Very over looked spot.
- In front of box beside the wall. Could be.
- Rocks. Could be a sniper here.
- On top of rocks. There is an area there you can jump on top of though it is easy to see them.
- Behind cement. Sometimes its difficult to see them above the cement beside the tree.
- On top of rocks. Again they can jump on top of there and hunt you down.
- Behind rocks. Usually cannot see them too well until you're half way up the ramp to B.
- Window. They'll be peeking out at you most likely.
- Double doors. Most likely a CT will check mid using this slot.
- Metal crate. Most likely be on top of the metal crate. You'll be able to just see the tip of his head over the wooden box.
- Ramp corner. It might not look like much, but you cannot see a guy here until you're rubbing noses most of the time.
- View HERE. Behind the box. Almost guarantee somebody will be here. They usually listen for footsteps on short A.
- Behind the box. You cannot see him here unless he peeks out a little bit.
- CT spawn. Ya there will be a guy or two in here. The second middle flash will flash all people mentioned in point 12, 13, 14 and possibly 15.
- On top of or behind box. Usually the guy trying to jump shoot at short A will drop down to protect middle.
- Behind wall. Guys watching short A from A ramp will glance down middle.
- Behind wall. Guys watching long A will glance down middle also.
Middle is pretty easy for CTs. As you can see from above there are a lot of areas where you can see middle from. This section will be pretty quick because its quite easy to defend.
It is also a handy tool to see how many people are possibly going up to short A, but careful...they will be waiting for you to peek in order to blast you down.
- Call it out.
- Flash back.
- Nade Nade Nade.
- Shoot the life out of em.
Scenario 1
You were closer to CT spawn, got flashed and got to cover as quickly as possible. If you suspect a full on rush (multiple flashes going off like crazy, AFKs are getting shot) flash back. Here are some screen shots depending where you may be. 1. 2. 3.
Those will likely stop them from running out and up the ramp, which could cause them to bunch up just beyond double doors. Great time for your nade. Toss it the same way as the flashes if you want. Whats left? Nothing much, just round up the wounded with your handy shooting. Oh and try not to rush out directly in the open.
Scenario 2
You were sniping middle or something but got flash so you retreated up the ramp towards B. Again flash back from these view points depending where you are. 1. 2. Note: Please do NOT flash like THIS. You will flash everybody that is potentially watching middle as well as anybody that wants to pop out and shoot people down. Bad move, team flasher!
JunK CT Rushing Tips
Don't do it. Just don't rush middle, it isn't going to end well. As soon as you go through those double doors (not to mention through the double doors themselves) they can see you from tspawn, middle, short A and tunnels. Anyway if you STILL want to do it, this is the way i suggest.FLASH over the wall in this manner. This will allow you the time to throw your second flash without being shot hopefully. FLASH as far up middle as you can and rush on through.
Hiding Spots
- Behind door. Don't forget to check here
- Catwalk. Usually people to the very edge just waiting for you to pop out.
- Behind box. Most likely a guy will be here, trying to peek over and shoot through double doors.
- Catwalk. Expect 1-3 people here. The regular middle shooters.
- Behind tree. Typical middle shooter.
- Left side tspawn. Sometimes referred to as just long A and left side middle.
- Tspawn. If you rush before 1:30, expect a scouter here.
- Middle tunnel. Sometimes a person will be sneaky and try to stay here, usually on top of the first box.
- Right side middle. Most definitely there will be 2-3 guys here.
- Viewed HERE. In the left corner of tunnels.
- Behind box. Either be peeking out from ground level, or on top of the first box.
- On top of cement. Sometimes a guy hiding here.
- In the right corner of tunnels.
Tunnels
TerroristGood luck. The tuns is a very hard place for the terrorists to rush because its more of a choke point than any other spot on the map. Instead of a doorway that you need to run through, then you're out in the open, you need to run through this long death-bringing tunnel for like two full seconds. Good luck.
- RUSH FAST.
- Flash once.
- DO NOT HESITATE.
- Spread out.
- Pray there isn't more than 4 people.
This is important also...the first person should flash in THIS manner. The red line represents approximately the middle of the tunnels. Make sure your flash bounces to the RIGHT of that line so it doesn't stay in the tunnel opening. As soon as they let that flash go you should have your gun out and hug the right wall. If you hesitate and stand at the entrance of tuns, you will all die.
Spread the hell out. Again do not stay all bunched up you will just all die. I personally like to crouch just outside of the tunnels beside the box right HERE. Just because the CTs will be throwing nades and flashes inside the tunnels, so they shouldn't affect you, and especially if you're the first guy you're facing off vs all of the CTs in spawn, so its best not to keep running/shooting. Get in a position where you can see a guy or 2 and try to take them out. Hopefully the rest of your team is flooding inwards.
Not many screen shots that need to go along with this rush because you should only really flash once in order for the CTs to turn their back, and then you're in their face.
Scenario 1
You have people rushing up to B from middle. AWESOME. I just really hope they do not flash inside B because most likely you'll be desperately trying to kill those CTs and you'll need all the vision you can muster.
Scenario 2
You do not have teammates rushing up middle. Well then i sure as hell hope they are all rushing into B right behind you because to succeed a straight tunnel rush you'll need as many people as possible. Lets just say expect to die, just try your best to take as many out as possible.
Hiding Spots
- Left of tuns. Just to the left, your back will be towards him so you will not see unless you check.
- Right of tuns. Not as popular of a spot, but if you just flashed a guy rushing towards tunnels this is a likely spot they'll end up at.
- Beside the box.
- Car corner. Wedged directly into the corner. Hard to spot, easy to miss.
- Behind box. Easier to spot, harder to shoot because they'll usually be crouching.
- White car. 3, 4, 5, 6 are the most popular spots but this one is by far the most dangerous because the car will block your bullets. Expect Jar-Jar-Binks to be here with a para.
- In front of the door. This is bombsite Bs blind spot. For some reason you will not see this guy until you're dead and spectating him.
- Behind door. Could be a guy poking his head in just to shoot whomever is coming out of tunnels.
- Window. Same as above.
- Behind metal crate. They can either be crouching on top of the concrete, or standing behind both.
- Far corner. This guy will likely be crouched, just peering over the concrete.
- Deep B. Either behind or on top of the concrete, peeking periodically to take shots at you.
- B platform. Either crouching on the ledge looking over the big box, or standing on the platform looking over the big box. (will be able to see the very very tip of his head).
- Behind second concrete. Another favourite to defend B from. Expect Daredevil to be here.
- Behind first concrete. Another favourite to defend B from. Expect Purple Drank to be here.
Usually a pretty safe place to be. Oh wait, is that why 3/4 of the team usually runs here when the round begins? Please for the love of God not everybody run here right off the bat...holy crap.
Ok yes B is usually quiet for the most part because as you can see from above, its pretty hard for the terrorists to successfully rush it. No matter, here are still some hints:
- Prevent the rush.
- Get in position.
- Flash. Shoot. Nade.
- Laugh at how many terrorists just got demolished.
- Look around the bombsite to see if there are any funny looking dead bodies to post on the forums.
Get in position. Remember when i said choke points only work if you're guarding the choke point? Let me clear this up. THIS is a choke point. THIS is guarding a choke point. THIS is not. Whats the difference? Well from guarding the choke point i can shoot/flash/nade them as they are bunched up while running towards bombsite B. I am not surprised to where they will be, i know where they will be. They HAVE to come in through those tunnels so im going to shoot them while they are running and bunched together. While on the other hand, you are waiting for them to exit the tunnels, where they could spread out quite a bit so you won't know exactly where they'll come into your view at. Not to mention, like 95% of the time, as soon as they come out of tunnels they are rushing into that spot. You'll be the first one to die!! HAHA.
FLASH them as they are rushing up the tunnels from behind cover. SHOOT them down while they are blindly running around like n00bs. NADE them right here, because i can almost guarantee they are doing their best to get into that spot...and they'll be all bunched up for you again. KABOOM.
Now laugh at take screen shots.
Scenario 1
You didn't take my advice and watch the choke point. Or possibly there just wasn't enough people in there to hold B. Well this sucks, because now you need to try to get it back. I can guarantee they will spam flashes out into middle so that you cannot rush up, but trust me you do not want to try to come in through tunnels. The only tip I'll give you is to NADE right here. They will most likely have 1-2 people in the far platform corner and you'll probably get a kill or two.
Scenario 2
You successfully defended. Great job. Now keep watching tunnels because there are probably a few people still left crying inside, grieving the loss of their team. Now you could take the initiative and rush with the tips below, or just wait them out. Your teammates will soon be pushing lower tuns and flanking them anyway.
JunK CT Rushing Tips
I do not like rushing tunnels. There are usually 4-6 terrorists just waiting inside because they are too scared to rush out. So instead they wait for you to rush them, kill you, then waltz right into an open bombsite B. Its a trap i tells you! A TRAAAAP!But if you must, we'll go with the flash, flash, shoot.
FLASH like so in order to get them to turn their backs long enough for you to throw your second flash. FLASH now while running inside tunnels. Hug the left wall and by the time you get to the opening the flash JUST went off, giving you the max amount of time to shoot everybody down.
Hiding Spots
- Behind box. Hopefully you would have seen somebody run here first though.
- Left of tuns. This is a pretty dark corner, make sure you check this area thoroughly.
- T side tun. Whatever you want to call it, most likely there is somebody here.
- In front of concrete.
- Behind concrete. You can barely see them if they are standing, and cannot see them at all while crouched.
- Stairs. They will poke their head out to shoot yours off so watch for it.
Conclusion
This pretty much sums up my guide. I hope it was an easy and fun read for you all. Please join me on the de_dust2 server, IP: 174.36.42.204:27015, and test out all of these strategies!Don't forget about Basic Training. Not only do we have events every week for a public lesson on one gun at a time, but you can contact all of the instructors for a private lesson on whatever you need help with.
Note: Please post some feedback. If you think something needs to be added, or taken away. Also let me know if there are any broken or wrong links. I will be proof reading it now (once posted) and testing all links but i may miss one. Thanks guys!
Last edited:
- Joined
- May 8, 2008
- Messages
- 14,991
Guide to CS:S - Guide created by KillZone
Rushing
Rushing is one of the major two tactics you can use in Counter-Strike: Source. (The other being camping.) Rushing involves gathering as many players of your team together as possible, and all running as fast as possible along a given path, swarming any opposition and taking the objective. The problem with rushing is that many players do not participate properly; languishing at the back and not running. This means that the rush is not as effective as it should be, and can result in the entire team getting picked off by the other side, and a humiliating defeat.
Camping
Camping is the other major tactic you can use in Counter-Strike: Source, but is less widely spoken of than rushing, as it is seen as rather cowardly by many players. Camping basically involves a player finding a good, sheltered spot in which they can hide (generally by crouching down), and then waiting there (without moving or making any noise) for the enemy to appear, and shooting them in the back as they pass. Although it is very similar to real-life operative tactics, it is not adviseable to camp on anything other than a server full of like-minded players.
Footsteps
All players run when moving by default in Counter-Strike: Source, and if you listen carefully, you can hear their footsteps. This can help pinpoint where people are if they're close to you, or when to shoot if you feel somebody's about to pop out from around a corner. Players who walk instead of run (by holding down Shift by default) make no noise, and so this tactic doesn't work. Crouching is also silent.
Flashbangs
Flashbang grenades will blind anyone who sees them go off, or a reflection of them going off; and deafen anyone within a certain radius (to a lesser or higher degree depending on their distance from the grenade). Although they will not hurt anybody, if somebody is caught in a flashbang "explosion", they will be incapable of a co-ordinated response to any attack, and will be an easy kill. Flashbangs should be preferably used against groups of enemies, and you should only attack if you're sure the flashbang has been effective. Flashbangs may be bounced off walls when thrown, but you must always remember that the "hitbox" of any grenade is slightly larger than you might expect, so if throwing one close to a wall (perhaps over a parapet), you must remember to throw it slightly further away from the wall than you might normally do so, to prevent it bouncing back.
If you see a flashbang coming your way, there are two ways to avoid being blinded:
• Move behind cover
• Face away from the flashbang
Frag grenades
If caught by a grenade going off, jump away from the blast. The further away you are from the grenade when it goes off (or as it goes off), the less damage you will receive.
Jumping
Jumping is a very useful tactic. When you're being shot at it's good to jump around, if you don't mind the accuracy of your shooting falling. If you're reloading, it's especially useful to jump around, as it lessens the chance of you being hit, yet your accuracy cannot incur any penalty, as you're not shooting. Jumping around corners (running towards the corner, jumping, and turning in mid-air) is quite a useful trick, as anybody waiting around the corner will be expecting somebody to come in at ground-level, and so any shots fired will hit your less-important chest, as opposed to your head. Jumping also has the added benefit of getting you around the corner faster, so any enemies will have less time in which to react.
Bunny-hopping
"Bunny-hopping" is a technique that allows you to move faster and be a harder target. Bunny-hopping is actually quite simple, it just needs to be mastered to be of any use. To bunny-hop, you start off by running forward until you reach your max speed, then jump. While in the air, strafe to the left while turning 35 degrees to the left with your mouse. As soon as you touch the ground, jump again. This time, strafe to the right while turning 35 degrees to the right. Always alternate between left and right. Continue this procedure and you should pick up speed, but it is crucial that you jump just as you land. It will take a lot of practice, but you will later find it to be worth it. To turn while bunny-hopping, simply turn more than 35 degrees to the direction you want to go and less than 35 degrees to the opposite direction (like if you want to go right, then turn >35 degrees to the right and <35 degrees to the left). Bunny-hopping can be much easier by binding jump to your mouse wheel (which can be done by opening a console and typing "bind mwheeldown +jump").
Weapon accuracy
The accuracy of any weapon is greatly increased if you stand still, and/or crouch when firing, as such a position will allow you to hold the weapon more steadily. With just about any weapon, the accuracy tails off after the first few rounds of automatic fire. Experienced players will usually fire in bursts no more than three rounds long – unless they're at point-blank range &ndash' else they lose all the accuracy of their weapon. (This is a do as I say, not as I do type of thing: top tier play involves a good deal of spraying more than a three shot burst.)
Headshots
Shots which hit somebody's head cause the most damage, and most rifles and high caliber pistols can kill in one shot to the head if the target is not wearing armor and helmet.
Counter-terrorists
These strategies apply only to counter-terrorists, but terrorists might gain useful insight into the way the other team works by reading them.
Bomb site
If you're on the counter-terrorist team, the terrorists plant the bomb, and you know at which bomb site they've planted it (either A or B), make this known to your team by saying either "a" or "b" in team chat. Doing this will help all your team to arrive at the right bomb site, and give you a greater chance of disarming the bomb before it goes off.
Get the hostages
If you're playing a hostage rescue map, don't ignore the hostages! Rescuing them will get you money and win the round for your team. Many counter-terrorists ignore the hostages, and just search for the terrorists, but if the area around the hostages is clear of terrorists, why not just rescue the hostages?
Terrorists
These strategies apply only to terrorists, but counter-terrorists might gain useful insight into the way the other team works by reading them.
Planting the bomb
When planting the bomb, a lot can rest on where you plant it. If you know of a good hiding place near the bomb site, make sure to plant it within view of that hiding place. Another strategy is to plant it so it isn't immediately visible to the counter-terrorists; some of them have been known to not notice hidden bombs, and go off to check the other bomb site. One way of doing this is to plant it, then knock over any nearby barrels and roll them on top of the bomb.
Check the hostages
Go back to the hostage areas regularly and check if the hostages are still there. If they aren't, alert your team and head straight for the hostage rescue area. If you see the counter-terrorist who is leading the hostages away, wait until you've got a good clear shot before attacking; attacking prematurely can cause him to get tactical and seek cover. Try your best not to hit the hostages, as killing them takes money away from you, but killing the counter-terrorist and the hostages is better than losing the round.
Quick Switching
Quick switching is very useful when you're using a sniper rifle or when your ammo is low or out. By default this is "Q" Select the main gun then your pistol, then push Q, the gun will automatically move back and forth. This is useful when you ran out of ammo for your gun and you need to quickly use your pistol. Quickly tap Q and you're weapon of choice will came out.
Quick Crouch
When running and confronted by an enemy, quickly crouch and fire, this will force them to aim down making them be killed or at least seriously hurt.
Rushing
Rushing is one of the major two tactics you can use in Counter-Strike: Source. (The other being camping.) Rushing involves gathering as many players of your team together as possible, and all running as fast as possible along a given path, swarming any opposition and taking the objective. The problem with rushing is that many players do not participate properly; languishing at the back and not running. This means that the rush is not as effective as it should be, and can result in the entire team getting picked off by the other side, and a humiliating defeat.
Camping
Camping is the other major tactic you can use in Counter-Strike: Source, but is less widely spoken of than rushing, as it is seen as rather cowardly by many players. Camping basically involves a player finding a good, sheltered spot in which they can hide (generally by crouching down), and then waiting there (without moving or making any noise) for the enemy to appear, and shooting them in the back as they pass. Although it is very similar to real-life operative tactics, it is not adviseable to camp on anything other than a server full of like-minded players.
Footsteps
All players run when moving by default in Counter-Strike: Source, and if you listen carefully, you can hear their footsteps. This can help pinpoint where people are if they're close to you, or when to shoot if you feel somebody's about to pop out from around a corner. Players who walk instead of run (by holding down Shift by default) make no noise, and so this tactic doesn't work. Crouching is also silent.
Flashbangs
Flashbang grenades will blind anyone who sees them go off, or a reflection of them going off; and deafen anyone within a certain radius (to a lesser or higher degree depending on their distance from the grenade). Although they will not hurt anybody, if somebody is caught in a flashbang "explosion", they will be incapable of a co-ordinated response to any attack, and will be an easy kill. Flashbangs should be preferably used against groups of enemies, and you should only attack if you're sure the flashbang has been effective. Flashbangs may be bounced off walls when thrown, but you must always remember that the "hitbox" of any grenade is slightly larger than you might expect, so if throwing one close to a wall (perhaps over a parapet), you must remember to throw it slightly further away from the wall than you might normally do so, to prevent it bouncing back.
If you see a flashbang coming your way, there are two ways to avoid being blinded:
• Move behind cover
• Face away from the flashbang
Frag grenades
If caught by a grenade going off, jump away from the blast. The further away you are from the grenade when it goes off (or as it goes off), the less damage you will receive.
Jumping
Jumping is a very useful tactic. When you're being shot at it's good to jump around, if you don't mind the accuracy of your shooting falling. If you're reloading, it's especially useful to jump around, as it lessens the chance of you being hit, yet your accuracy cannot incur any penalty, as you're not shooting. Jumping around corners (running towards the corner, jumping, and turning in mid-air) is quite a useful trick, as anybody waiting around the corner will be expecting somebody to come in at ground-level, and so any shots fired will hit your less-important chest, as opposed to your head. Jumping also has the added benefit of getting you around the corner faster, so any enemies will have less time in which to react.
Bunny-hopping
"Bunny-hopping" is a technique that allows you to move faster and be a harder target. Bunny-hopping is actually quite simple, it just needs to be mastered to be of any use. To bunny-hop, you start off by running forward until you reach your max speed, then jump. While in the air, strafe to the left while turning 35 degrees to the left with your mouse. As soon as you touch the ground, jump again. This time, strafe to the right while turning 35 degrees to the right. Always alternate between left and right. Continue this procedure and you should pick up speed, but it is crucial that you jump just as you land. It will take a lot of practice, but you will later find it to be worth it. To turn while bunny-hopping, simply turn more than 35 degrees to the direction you want to go and less than 35 degrees to the opposite direction (like if you want to go right, then turn >35 degrees to the right and <35 degrees to the left). Bunny-hopping can be much easier by binding jump to your mouse wheel (which can be done by opening a console and typing "bind mwheeldown +jump").
Weapon accuracy
The accuracy of any weapon is greatly increased if you stand still, and/or crouch when firing, as such a position will allow you to hold the weapon more steadily. With just about any weapon, the accuracy tails off after the first few rounds of automatic fire. Experienced players will usually fire in bursts no more than three rounds long – unless they're at point-blank range &ndash' else they lose all the accuracy of their weapon. (This is a do as I say, not as I do type of thing: top tier play involves a good deal of spraying more than a three shot burst.)
Headshots
Shots which hit somebody's head cause the most damage, and most rifles and high caliber pistols can kill in one shot to the head if the target is not wearing armor and helmet.
Counter-terrorists
These strategies apply only to counter-terrorists, but terrorists might gain useful insight into the way the other team works by reading them.
Bomb site
If you're on the counter-terrorist team, the terrorists plant the bomb, and you know at which bomb site they've planted it (either A or B), make this known to your team by saying either "a" or "b" in team chat. Doing this will help all your team to arrive at the right bomb site, and give you a greater chance of disarming the bomb before it goes off.
Get the hostages
If you're playing a hostage rescue map, don't ignore the hostages! Rescuing them will get you money and win the round for your team. Many counter-terrorists ignore the hostages, and just search for the terrorists, but if the area around the hostages is clear of terrorists, why not just rescue the hostages?
Terrorists
These strategies apply only to terrorists, but counter-terrorists might gain useful insight into the way the other team works by reading them.
Planting the bomb
When planting the bomb, a lot can rest on where you plant it. If you know of a good hiding place near the bomb site, make sure to plant it within view of that hiding place. Another strategy is to plant it so it isn't immediately visible to the counter-terrorists; some of them have been known to not notice hidden bombs, and go off to check the other bomb site. One way of doing this is to plant it, then knock over any nearby barrels and roll them on top of the bomb.
Check the hostages
Go back to the hostage areas regularly and check if the hostages are still there. If they aren't, alert your team and head straight for the hostage rescue area. If you see the counter-terrorist who is leading the hostages away, wait until you've got a good clear shot before attacking; attacking prematurely can cause him to get tactical and seek cover. Try your best not to hit the hostages, as killing them takes money away from you, but killing the counter-terrorist and the hostages is better than losing the round.
Quick Switching
Quick switching is very useful when you're using a sniper rifle or when your ammo is low or out. By default this is "Q" Select the main gun then your pistol, then push Q, the gun will automatically move back and forth. This is useful when you ran out of ammo for your gun and you need to quickly use your pistol. Quickly tap Q and you're weapon of choice will came out.
Quick Crouch
When running and confronted by an enemy, quickly crouch and fire, this will force them to aim down making them be killed or at least seriously hurt.



- Joined
- Jan 16, 2007
- Messages
- 6,091
Increasing your FPS Guide by Daria
Guide Thread
Becoming a better player, the first step is to improve your fps believe it or not.
Frames per second or the framerate at which your game runs is a crucial aspect of getting the smoothest Counter-Strike: Source experience.In a game like CS:S where the player (and team) with the faster action dominates, fps is fundamentally vital because you need to visually trace the movement of animated objects and come up with your own response quickly.
Use the command net_graph 3 to see your fps.
If your fps is low, then in-game actions will take far too long (the difference is certainly very small, but even that is significant) to complete because of the less frames available and your gameplay will falter.
Now I am assuming you have already lowered your ingame resolution to help with FPS without having a totally crappy game. Turning your ingame options to low or off also nets more FPS every little bit helps.
Aside from the above methods, you will be glad to know that the Source engine has other user friendly options to give you that extra edge on fps. You need to open Steam (usually in your system tray, the lower right of your desktop) > My Games > Right-Click on Counter-Strike: Source > Properties > Set Launch Options.
Here you can set which DirectX level Source should run in by typing -dxlevel ##.
-dxlevel 95 for DirectX 9.0c
-dxlevel 90 for DirectX 9.0
-dxlevel 81 for DirectX 8.1
-dxlevel 90 This is the default for all directx 9.0 compatible cards, if yours is different please find out what dx level its supports otherwise you might end up with the wrong dx config skewing your CSS performance
this level has all of css's features, nothing taken away.
-dxlevel 81 A favourite of mine as it maintains a nice balance between graphics and performance, your models will have less poly's (lower quality) but you will still maintain all the eye candy features like bumapping. (If you have no idea what im talking about just look for things you understand)
-dxlevel 80 very similar to 81 but without the bumpmapping.. no point really unless you are really desperate, will improve smoothness a tad more than 81.
-dxlevel 70 Now this leaves all of the basic eye candy which makes css look decent but improves smoothness phenominally on my old comp I went from 20 - 30 fps to 60 - 100 /w a config not bad eh? I will include my fps config later, if you really need it.
An interesting fact is that choosing the level lower than what your card supports may actually increase the performance. Go ahead and try it and figure out which one gives you the best performance. But you must be careful which level you choose (dxlevel 70 is considered illegal for leagues).
You can also choose how much system memory to dedicate to Source by typing -heapsize <number>.
-heapsize 262144 for 512 MB RAM
-heapsize 524288 for 1 GB RAM
-heapsize 1048576 for 2 GB RAM
Applying this setting will stabilize your game performance greatly - with no reduction in visual quality. Textures are better handled by the game, and the game has an increased ability to cache resources.
Finally, if you want to go beyond these, you can create your config file to tweak your fps. First open Notepad and then File > Save As. Delete *.txt and type cs.cfg. Now save it in this folder: Steam > SteamApps > your steam username > counter-srike source > cstrike > cfg. In this cs.cfg file, you will type any scripts that will tweak the in-game graphics and performances. But for this file to work you need to open the config.cfg file that can be found in the same directory. At the very bottom of the config.cfg file type: exec cs.cfg and save that file. This way, CS:S will run your own config file each time you start the game.
r_3dnow "1" (enables 3DNow! instruction set)
r_mmx "1" (enables MMX instruction set)
r_sse "1" (enables SSE instruction set)
r_sse2 "1" (enables SSE2 instruction set)
These commands above can also be used against your processor to better handle the gaming graphics.
CVARs
The following is a list of CVAR tweaks I've compiled through experimenting and various research. These commands help to strike an appropriate balance between quality and performance. You can find other CFGs that basically destroy the look of the game. I tried to maintain the appeal of Source while making it playable. These commands are CAL / CSP compliant.
cl_ejectbrass "0"
Disables shells flying out of guns
cl_phys_props_enable "0"
Disables physics objects
cl_phys_props_max "0"
Disables physics objects
cl_muzzleflash_dlight_3rd "0"
Disables 3rd person muzzle flashes lighting up surrounding area
cl_muzzleflash_dlight_1st '0"
Disables 1st person muzzle flashes lighting up surrounding area
cl_ragdoll_fade_time "1"
Causes dead bodies to disappear immediately (default: 15)
cl_ragdoll_physics_enable "0"
Disable ragdoll physics
cl_show_splashes "0"
Disables water splash effects
cl_smooth "0"
Disables smoothing views after prediction errors/juddering effect
commentary "0"
Disables map commentary
dsp_enhance_stereo "0"
Disable stereo effect sound enhancing
dsp_slow_cpu "1"
For systems with slower CPU's: Reduces quality of dsp effects
mat_antialias "0"
Disables AA
mat_bumpmap "0"
Disables Bump Mapping
mat_bloom "0"
Disables bloom effect
mat_bufferprimitives "1"
Buffer primitive objects
mat_clipz "0"
Lowers water quality
mat_fastspecular "1"
Fast specular lighting
mat_hdr_enabled "0"
Disables HDR
mat_mipmaptextures "0"
Textures quality worsens with distance
r_cheapwaterstart "1"
Worsens water quality
r_cheapwaterend "1"
Worsens water quality
r_drawdetailprops "0"
Don't draw detail props
r_dynamic "0"
Disables dynamic lighting
r_lightinterp "0"
Disables light interpolation
r_propsmaxdist "100"
Object fading distance
r_RainSimulate "0"
Disables rain
r_shadows "0"
Disable shadows
rope_smooth "0"
Disables Anti-Aliasing effect on ropes
fog_enable "0"
Disables Fog
fog_enable_water_fog "0"
Disables water fog
gl_clear "0"
Disables hiding of cracks/faults between textures
cl_lagcomp_errorcheck "0"
Disables lagcompensation error checking, only needed if you're having any registration/loss/choke problems.
mp_decals "0"
How many player sprays will be shown.
cl_drawmonitors "0"
Disables the rendering of ingame "monitors" which contain 3d rendered images.
cl_forcepreload "1"
Forces the game to load all texture and model information into memory on map load
cl_phys_props_enable "1"
Enables phsyics props.
cl_phys_props_max "50"
Maximum amount of physics props allowed.
cl_ragdoll_physics_enable "0"
Disables ragdoll.
cl_show_splashes "0"
Disables water splashes.
r_3dsky "0"
Disables the rendering of 3d sky boxes.
r_decal_cullsize "9999"
Any decals under this size are not rendered.
r_drawbatchdecals "1"
Enables the rendering of decals in batch.
r_drawdetailprops "1"
Enables the rendering of detail props.
r_drawflecks "0"
Disables the sparks and dirt from bullet impacts.
r_drawmodeldecals "0"
Models decals (i.e. blood).
r_eyes "0"
Disables eyes in models.
r_lod "-1"
Different level of details on models. -1 = Variable at distance. 0 = None. 1 = Minor. 2 = Less minor.
r_modellodscale "1.0"
The transitioning power of LOD.
r_occlusion "0"
Enables the Model Occlusion system.
r_propsmaxdist "100"
Max distance at which props are rendered.
r_rootlod "2"
Base lod of the model in the memory.
r_shadowmaxrendered "32"
Max shadows the game will render.
r_shadowrendertotexture "1"
Rendered the shadow texture causing it to match the player model.
r_teeth "0"
Disables teeth in models.
r_waterdrawreflection "0"
Disables the rendering of water reflections.
r_waterforceexpensive "0"
Forces cheap water.
gl_clear "0"
Disables the gl_clear convariable.
props_break_max_pieces "0"
Disables prop fragmenting
mat_antialias "0"
Disables the use of multisampling to smooth out edges.
mat_bumpmap "0"
Disables bump mapping.
mat_clipz "0"
Disables optimized Z-Buffer rendering.
mat_compressedtextures "1"
Disables texture compression. Users with low amounts of system memory should turn this on.
mat_disable_bloom "1"
Disables bloom effects.
mat_hdr_enabled "0"
Disables HDR.
mat_hdr_level "0"
Double Disables HDR.
mat_mipmaptextures "1"
Enables the use of mipmapping to make textures look smooth.
mat_monitorgamma "1.6"
Lower the number the brighter the screen. Only works in fullscreen.
mat_picmip "2"
Changes the resolutions of textures when they're loaded into memory. May
improve FPS on graphics cards with low memory sizes.
mat_reducefillrate "1"
Reduces the fillrate when the game is run in DXLevel 8.
mat_specular "0"
Disables Specularity on objects.
mat_trilinear "0"
Disables the use of Trilinear mipmapping.
mat_wateroverlaysize "8"
Sets the resolution of water distortion. Must be multiple of 8.
fps_max "101"
Caps framerate. Set to max monitor refresh rate + 1.
cl_forcepreload 1
forces preload to help increase performance
This is a copy of a script that I used to use tweak it however you want. Just add this into your config.cfg as I stated before
cl_cmdrate "101"
cl_interp "0.01"
cl_interpolate "1"
cl_lagcomp_errorcheck "0"
cl_lagcompensation "1"
cl_smooth "1"
cl_updaterate "101"
rate "25000"
cl_forcepreload 1
//_Set MP vars_
mp_decals "0"
//_Set Client vars_
cl_drawmonitors "0"
cl_ejectbrass "0"
cl_forcepreload "1"
cl_phys_props_enable "1"
cl_phys_props_max "50"
cl_ragdoll_physics_enable "0"
cl_restrict_server_commands "0"
cl_show_splashes "0"
//_Set Render vars_
r_3dsky "0"
r_decal_cullsize "9999"
r_decals "0"
r_drawbatchdecals "1"
r_drawdetailprops "1"
r_drawflecks "0"
r_drawmodeldecals "0"
r_eyes "0"
r_lod "-1"
r_modellodscale "1.0"
r_occlusion "0"
r_propsmaxdist "100"
r_renderoverlayfragment "0"
r_rootlod "2"
r_shadowmaxrendered "32"
r_shadowrendertotexture "1"
r_teeth "0"
r_waterdrawreflection "0"
r_waterforceexpensive "0"
gl_clear "0"
props_break_max_pieces "0"
//_Set Materials vars_
mat_antialias "0"
mat_bumpmap "0"
mat_clipz "0"
mat_compressedtextures "1"
mat_disable_bloom "1"
mat_hdr_enabled "0"
mat_hdr_level "0"
mat_mipmaptextures "1"
mat_monitorgamma "1.6"
mat_picmip "2"
mat_reducefillrate "1"
mat_specular "0"
mat_trilinear "0"
mat_wateroverlaysize "8"
//_Set Violence vars_
violence_ablood "1"
violence_agibs "1"
violence_hblood "1"
violence_hgibs "1"
//_Set HUD vars_
hud_centerid "1"
net_graph "3"
net_graphpos "2"
//_Set Misc settings_
cl_downloadfilter "nosounds"
fps_max "101"
jpeg_quality "100"


ZombieMod Guide by Daria
ZombieMod is a server side modification for Counter-Strike Source. The aim of the game is to conquer the attacking zombies or kill all humans depending on what side of the field you currently are. The game may be played on any map, and users join a server like any other CS:S server without any pre-requisites. The plug in was designed so that it may be run on either Windows or Linux Source Dedicated Servers with a minimal installation time.
When enabled on default settings, the level is loaded very, very dark with fog all around. All players spawn normally and you cannot hurt anybody; Rifles and the MG are restricted.
After a random amount of time (2-10 seconds), one player is changed into a Zombie complete with model, unable to use any weapon other than the knife, and is given 5,000 health. He is changed to the (T) team and everyone else to the (CT) team to allow for an operational scoreboard. They can also run a lot faster than humans, are provided with night vision and have a 125? ‘Field Of Vision’ instead of the regular 90?. His only goal is to infect as many humans as possible by slashing them once with the knife, each scoring him one frag. Each subsequent Zombie is given 2,500 health, moved to the (T) team and also reduced to using their knife only. Zombies are knocked backwards with each shot so their only hope of survival is attacking in numbers. A few well aimed shots to a zombie’s head and it comes off complete with blood spray!
Zombies can only use voice with other zombies, the same goes for humans.
The round ends when either all the Zombies are killed, or all Humans have been turned to zombies.
1. Go with other teammates to the hiding place that everyone uses when the round starts. The more players in an area, the more firepower and higher chance of survival.
2. Find a nice hiding spot with many other teammates. Aim for the head of the zombie. It's the quickest way to score a kill. Zombies only can attack you with their knives. Stay higher ground where they can't reach you.When you are trying to kill a zombie, stay away from the edge of any ledge. It is easy to fall off as they swarm.
3. Make sure that you aim at someone near you. If they turn into a zombie, at least you got the heads up on him. If that happens, you'll be able to push him into other players, or shoot him out or off of your barricade.
4. Repeatedly shoot attacking zombies in the head.
5. Use teamwork to survive!
6 If starting out as a human, if you see the green shopping cart press the letter b. Then click Smg, pick a gun from that selection.
7. Once a gun is bought find a room with chairs/coke machine, make a barricade, by shooting fire towards the stuff to move the stuff.
8. Back yourselves into the room and use the levels. The best way to confront the zombies is to make sure there is only one entrance into the room. That means you only have to scope one area. Also, use height to your advantage by getting up on second levels so you can shoot down at the zombies.
Eventually REAL zombies will come..
I'm not letting any of you into my house once the zombies come. Plywood the doors and windows to hold them of for a while, but they will break through eventually. Most likely when I get into a shouting match with someone else who I let in the house, but I don't like at all.
I will then escape to my truck with my boyfriend... my driveway is right next to the house, but for some reason the truck will be parked 500 feet away from the house, and my keys will be hard to find. Once we get there my truck won't start right away, but eventually it will and we will get away safely.
The last time you see us, you will see some sort of figure pop its head up in my back seat, then my truck will swirve and hit a tree.
Last edited:
- Joined
- May 8, 2008
- Messages
- 14,991
The Warden Guide
by Chase

Heres a guide i felt like creating to help some people out with the jail server.
Basically, theres a few distinct qualities necessary in order to establish yourself as a warden, and to complete your job quickly and successfully.
Keep in mind this is all based off my personal experience.
by Chase
Heres a guide i felt like creating to help some people out with the jail server.
Basically, theres a few distinct qualities necessary in order to establish yourself as a warden, and to complete your job quickly and successfully.
Keep in mind this is all based off my personal experience.
~~~~~~~~~~~~~~~~~~~~~~~~
Voice
- This is a quality thats simply a gift from your parents.
Good voices can be described as, soothing, calm, stern, or deep.
- Depending on what voice type you have, determines how terrorists will react to you.
- A deep/mature voice typically commands respect, and most people describe it as "I feel like i HAVE to listen and follow orders".
- On the other side of the spectrum, if your mic is very fuzzy, or your voice is high pitched, terrorists typically feel inclined to disobey, or attack you directly.
~~~~~~~~~~~~~~~~~~~~~~~~
Strictness
- The level of strictness you enforce, typically relates to how submissive/controlled the terrorists will be.
heres a common scenario
Warden: Terrorists face this wall, and dont move/look around.
*A terrorists moves*
CT: should i shoot that guy, he moved
Warden: No, no let him live.
- When a warden gives orders, and doesnt deliver consequences to a Terrorist who disobeys, it again shows a weakness. They realize that their on a "chance system" which leads to rebelling.
- My advice to wardens, SET AN EXAMPLE, when someone doesnt follow the order, shoot them in the face, right then and there and announce that "he didnt follow the order"
- What this does is set an example for the terrorists, they know their on thin ice, and are less likely to rebel for fear of death.
Now this is purely up to the warden, and ive seen plenty easy going wardens that do fine. However, in my experience, the example setting works well. And people who give second chances, usually end up paying for them.
(often at the hand of the person they gave the chance to!)
~~~~~~~~~~~~~~~~~~~~~~~~
Orders
- This is another key to being successful.
When giving orders, speak clearly, speak slowly and most of all keep it short and simple.
- Collect your thoughts and figure out what you want them doing.
- For the most part, just ignore the terrorists chatter, only repeat your orders once or twice.
- One of the biggest problems I see, is wardens getting mixed up and frusterated due to terrorist chatter. They simply give up and hollar out freeday because they dont wana deal with it.
- Again, this shows weakness, Terrorists now know "if i pester this guy a ton, or play mind games with him, he'll give me what i want".
~~~~~~~~~~~~~~~~~~~~~~~~
Freedays
- This is something that really sets true wardens apart from well...wana-be's. If your whole plan when it comes to wardening is to give a simple order and then jump to freeday, your not truely wardening. Your more-or-less letting wild animals out of a cage.
- Another thing you should stray from is freedays mid round, or when things start getting choatic. This shows a weakness, and the terrorists will feed off it.
- If when a few CT's die, the warden jumps to freeday out of fear or panic. Then the T's realize "if we can get a riot going, this warden will just let us free".
- They expect and as long as you keep doing so in a predictable manner, riots will continue.
- Wardening requires leadership capabiliites, situational awarness, and crowd control.
Freedays show none of these.
~~~~~~~~~~~~~~~~~~~~~~~~
Tips for getting the job DONE
Timelimits - Timelimits are one of the BEST ways to get things done, and orders completed.
- By giving a timelimit for something to be done, you eliminate stalling/delays. This allows you to get things done more efficently and quickly, instead of dealing with those 1 or 2 guys who refuse to get moving.
Restriced movement - Give limitations as to where T's can move, when T's can move, and how T's can move.
- When playing games such as trivia, it helps dramatically to have them face either a wall, or the opposite direction of the CT's.
It minimizes their view, and abolishes most of their ability to plan out rebellions. By restricting thier movement, essentially all rebellion opportunitties are elminated.
- This tip also applies when moving terrorist to a new location, have them shift walk or crouch to the new area.
- Allowing running is BAD idea, especially when moving to new area's. There will be CT's trying to get to the new location, and when they hit doors, theres a good amount of time for moving Terrorists to catch up, and kill him.
- if that happens, then the terrorists now have weapons, momentum, and an area to head to, void of CT presence. Thats a bad equation.
Stacking- Players being bunched up in one spot
- Avoid stacking terrorists purposesly, and when it occurs, order them to un-stack.
- The reason i say this is because if theres one place a rebel terrorist know's to shoot from, its in a stack of his teamates.
- Reason being, its hard to tell where shots are coming from, its hard to see whos doing the shooting, and most CT's are hesitant to fire into stacks of people.
Back to the Basics - Originally posted by DARIA
I. Getting Started
Purchasing Weapons and Supplies:
“You Get What You Paid For”
If you’ve just started playing CS then I suggest that you spend time orienting yourself with each of the many various weapons. Everyone has their particular favorite(s) weapons. Since you’ll undoubtedly not always have enough money to buy the gun you desire, it is best that you are proficient with one from each category: Pistols - Shotguns - Sub Machine Guns - Rifles - Para. If you ask me, not buying a gun and saving for another round is a waste. With only a pistol, one does not stand a chance against an automatic rifle. If you continue to do this, your deaths will pile up and you kills will be few and far between. Say for instance you wait two rounds for money to purchase a Para and only produce one frag. For these three rounds your K [Kill-to-Death] Ratio would be around 1:3 which is not good. As a result, buy what you can, when you can and fight with what you have. Ex = a SMG round + a SMG round + a SMG round > a Pistol round + a Pistol round + a Para Round. While the expensive weapons are fun, I don’t believe dying constantly and having bad statistics is enjoyable.
“The Biggest Stick Is Not Always the Best”
As stated before, practice with all the weapons in a LAN game and find one of each category that suits your skills. Each of the guns has a different recoil and damage, and playing with an assortment will confuse a player’s aim. Personally I use the USP or Glock as my Pistol, MP-5 as my SMG, and either a M4A1 or AK-47 as my rifle. Depending on the map, I buy one over the other. If a map contains open spaces I’ll likely go with a Rifle over a SMG because of its long range power and accuracy. Although it will take many shots for a kill, the MP5’s low recoil makes it accurate in close quarters. Once you’ve chosen your favorite(s): practice, practice, practice. Knowing a gun’s accuracy and tendencies will help you in combat.
“Bare Essentials”
At the buy screen my number one priority is to first purchase my suit of Kevlar with helmet. Although you might question the effectiveness of the armor at times, it does provide protection. If for nothing else, Kevlar helps your self-confidence. Going into a round without armor, one has to feel less comfortable. My second selection at the buy screen is my weapon and its matching ammo. From here you’re ready for combat; that is unless you have a few bucks left for the “extras.” Grenades are a topic I will discuss later on, and when used properly can bail you out of sticky situations. Unless you’re a CT facing a T team who make’s a priority of planting the bomb, a defusal kit it unnecessary. You can defuse the bomb without one if you clear the bombsite of hostiles quickly enough. Also, a fallen comrade may have a defuse kit on their corpse which you can “borrow” after they’re gone. Nightvision = a complete waste of funds, thus you should not buy.
Movement:
The ability to transgress every obstacle will help you evade death. Ex = A Terrorist has you pinned you down with automatic fire and you need to retreat. Choice A: you can stumble over the file cabinets and be a sitting duck, or Choice B: execute a crouch-jump over the objects and around the next corner. As with weapon efficiency, practicing these maneuvers will help in -game. In CS:S most of the moveable objects can be hurdled if your timing and tactic of jumping is correct. Below are tips and explanations of the various jumps.
1. Normal Jump [Space Bar]
* This jump is self-explanatory and basic. With this command you can jump over objects or boundaries of heights no greater than, let’s say two feet. If you so chose, one can use this to “hop” around a firefight in order to be a harder target. A negative side of jumping while shooting is that your accuracy will be lower than walking. Also if you’re hit in mid-air you are stopped dead and will be a much easier kill.
2. Crouch-Jump [Combination of Ctrl and Space Bar]
* In order to climb those boxes and crates you’ll need this jump. To execute, approach the desired climb and hit the space bar. At the apex, or the top of your jump, hit the crouch button [Ctrl]. Often times it might take a few attempts, but once you’ve had practice you should be able to crouch-jump smoothly and with ease. So next time you see a guy in a hiding spot and state “how the heck did he get there,” you’ll know that he used a combination of normal and crouch jumps to do so. [Hint: your teammates can be used as stepping stones do reach otherwise unreachable heights.]
3. Running-Jump w/Knife
* If an area of length is your target jump, the running-jump will be needed. There is really no difference between this and the normal jump except that you need momentum and your knife equipped.
“Run, Forest, Run”
If you’re wondering why others on your team are moving faster than you, it’s due to them equipping their knife instead of their primary weapon. You may not choose to run with a knife due to the fact that you’re vulnerable to an attack without a weapon out. However, in order to reach that bombsite before the Terrorists do, you’ll need to run faster.
“Shhhhh…Be Quiet”
Sound is the most important factor in CS. By listening to footsteps, you can know when to start walking silently (default - shift) or to crouch and hide in a dark area. Then when your enemy walks out into the open.... Boom headshot! Also pay attention to the type of footstep sound, there are different sounds for gravel, wood, cement, and steel. Knowing which sound was made can pinpoint an enemy and make him very easy to shoot through a wall. These sounds are especially useful in detecting the elevation of a player, a good example would be de_nuke. Avoid hiding in obvious places, often times it's more of a surprise to an enemy to find you in the open than behind a paper-thin box.
If you're loud, the enemy will know where you are and likely put a bullet in your head.Walking or sneaking around is most often necessary when you’re outnumbered by the other team and the only one on your team alive.
By holding down Shift or Ctrl, you will hear footsteps approaching while silencing your own. However, if the other team is walking around it can provide quite a fright suddenly seeing a hostile. If you see one of your teammates sneaking around, please be courteous and do so as well. When he’s trying to hear the enemy, he doesn’t need your footsteps interfering. [Hint: If you’re a CT and in a silent mode, it is best to use a silenced weapon: either the H&K USP or Colt M4A1 can be equipped with a silencer by simply right-clicking. The Steyr TMP also comes with a fixed silencer. Using a silenced weapon against your opponent can allow you to remain hidden, while the other team cannot hear your shots.]
Teamwork
Teamwork is the basis of a successful Counter-strike match. Without an organized group of people you can’t possibly win. For instance, if everyone splits up and goes their separate ways, everyone will be eliminated one-by-one. However even if a team sticks together, it doesn’t necessarily mean that “teamwork” exists. If someone is being shot at, don’t wait until they die to shoot the enemy, help them out. When playing online I have frequently been shot when I was surrounded by teammates. This should not happen if a true team atmosphere exists. Instead one should focus on covering their teams’ back and hope that they’ll do likewise. An example for teamwork: going up the ladder from the sewers on Militia. In this situation, you should not let a teammate go up alone as they will be eliminated quickly. Flashbangs should be thrown up before the rush and the rest of the team should follow. Although some may die in this situation, at least it will not be the entire team.
“Don’t Irritate Your Teammates”
You see it in every Counterstrike server, a person whose sole purpose is to annoy. These few people choose to cause disruption and don’t care about what happens to you or them. They choose to constantly swear or verbally abuse both people on their team and their opponents. Because you need your teammates in order to succeed, I don’ recommend that you take to such actions. However, if you choose to annoy then you be aware that your teammates might not come to your rescue when you press the “Need Backup” message. I suggest that you remain polite and courteous, answering everyone’s questions and helping those who are inexperienced.
“Blinded by the Light”
Although you may not mean to do so, flashing a teammate can be almost as bad as killing them. If you throw a flashbang into a room when a teammate is nearby, he’ll be a sitting duck until the blinding affect wears off. In order to prevent this from occurring be sure to check before throwing flashbangs and to work on your grenade tossing. There is an art to throwing grenades, involving distance, ricochet, and trajectory. Distance: you can throw a grenade a great distance by moving forward and releasing while running. If you pull this tactic off, you’ll launch the grenade like Michael Vick does a football. Ricochet: although you may not be able to see the enemy around that corner, you are able to bounce a grenade off a wall and towards its destination. Be careful when throwing off walls, as the grenade can come back to bite you, literally. Trajectory: in order to throw a great distance you’ll have the correct level of launch. If you aim too low you’ll cause the grenade to hit the ground before reaching the opponent. Despite the ability to reach vast distances with a HE grenade, the weapon itself will detonate after a certain time. The most common cause of a miss-thrown grenade is not the player’s inexperience, but an ill-fated “bump.” For example, you’re moving to throw a grenade and a teammate runs into you, causing your throw to be offline and unsuccessful.
“Don’t Put to Sleep Those Who Watch Your Back”
If you’re the last person alive and are not likely to take out the remaining enemy you shouldn’t do one thing; camp. Choosing to camp will only accomplish a waste of time and the growing disloyalty of your teammates. One does not play Counterstrike to sit around waiting to start the next round; they want to be in the action. As a result, when people have to wait over 3 minutes they start to become annoyed. If this happens once, alright but if it happens multiple times you’ve lost your team. When your own team wants you dead, they won’t bother covering your back in a firefight. They’d rather see you die then have to wait more wasted minutes. The one exception to this is if the surviving teammate is a player of many skills, someone like me. In this situation, these types of players can take out multiple enemies before dying and therefore will provide a show for those watching.
“Keep Your Friends Close… and Your Enemy Dead”
You're less likely to die if you stick together with your team. It's easier to take on a threat when you've got people watching your back. Just make sure you're going with the right group. You can't count on a squad of n00bs to watch your back, make sure to stick with the more experienced players.Having good teamwork is good, having a close-knit group of friends… priceless. In my opinion a small group of three or four team members moving together can accomplish much. In order to have this success you must befriend those who are both skillful and show teamwork. Basically, you are working in a clan-like manner without actually being in a clan.
“Are You Deaf? I Said Hold This Position”
In Counterstrike, the three groups of radio messages are important to the game. If one does not have a microphone at their disposal to voice commands with, then these can be used instead of typing. Typing messages can make you venerable to attack and stop your movement completely. Instead uses the keys [Z, X, C] and the corresponding numbers for radio commands. I use these messages numerous times during each round, and without them my team wouldn’t know of the situation at my position. Using the commands is one aspect of radioing, the other is more important: listening. When a teammate plants the bomb and wants assistance covering it, they’ll radio “hold this position.” A team can work fluently to plant the bomb, but if everyone ignores this message and goes their separate ways, a Counter-Terrorist can easily defuse.
Camping
“Difference Between a Camper and a Retarded Sloth…Nothing”
I don’t recommend making a habit of camping in Counterstrike. As I have stated above, your teammates will grow to dislike you on their side and hope you die quickly each round. There are both advantages and disadvantages of camping. One positive is that you might be able to kill a few opponents before they recognize were you’re hiding. However, proficient players know almost all camping sites and routinely check them as they pass the area. A major disadvantage is that when camping you are sitting still and thus you are easier to hit. Also, when shooting at an enemy from a camping position you will have to hit a moving target, a much more difficult task. If you’re not successful with your first few shots, you’re likely to be spotted. Reaction time is generally longer when you’re camping making your shots more important than those of your target.
“To Camp, or Not To Camp, That is the Question”
There is only two times in which you can camp without being ridiculed. If you’re a Terrorist and the bomb has been planted, you’re safe to camp and guard the area. [Hint: when covering the bomb, I suggest that you don’t sit directly on the bomb. Instead remain hidden until you hear the sound of the defuse beginning. When a Counter-Terrorist is defusing, they are a “sitting-duck.” Even if they stop their defusing, it will take a second or two in order to fire.] The second time in which camping is allowed is when Terrorists are guarding hostages. However, I suggest that one waited until the Counter-Terrorists are approaching to start camping. I don’t think any situation calls for a Counter-Terrorist is called upon to camp, unless he is guarding the bombsite.
Game Preparation
1. Brightness: Adjust your settings to fit every map. Because each map has its own characteristics, different settings will be need to optimize gameplay. A map such as Havana is very dark in much of the areas and thus your monitor’s brightness should be higher than normal. On the lighter, Dust maps a much lower brightness level can be used without affecting your game. I don’t however recommend that one play Counterstrike with their brightness set very low. If you play like this, it’s unlikely that you’ll see anyone.
2. Rest: Do not play when you’re too tired or just awakening. If you wake up and want to play Counterstrike, I’d suggest taking a shower and refreshing yourself before playing. A nice warm shower will open your eyes and heighten your senses. On the other hand, playing Counterstrike for a lengthy period of time and growing tired will decrease your playing ability. If you care about your statistics and reputation don’t play if you need sleep. Likewise, if you notice your skills declining stop playing for a while and re-gather yourself.
3. Temperature: I have found that most people are affected by the temperature of their surroundings. Almost daily you’ll see someone state how their hands are freezing. Cold hands are probably the biggest threat to a person’s gameplay. One’s body loses warmth constantly and the first to lose heat is the extremities. Using freezing hands to play Counterstrike is similar to playing with your feet. Reaction time will be far, far slower when your hands are this way. Too much heat, on the other hand, isn’t good either. Becoming irritable and starting to sweat causes stress and a “slip” in performance [See below for more information on “slip”]
4. Food: Eating during play is up to the gamer, but I don’t suggest eating some foods. Greasy food such as pizza will cause both a slick mouse and a dirty keyboard. Nobody wants an unclean computer, but the damage will must likely be in gameplay. Trying to click your mouse when your fingers are either greasy or sweaty is a difficult task. You will not maintain solid contact with the fire button and thus you will often misfire. To prevent from having a slick system I recommend either not eating or constantly washing you hands. Cleaning with soap and water will dry your hands and improve your accuracy. Despite foods’ influence to gameplay, one must eat if playing for a lengthy time. If one does not eat they will grow physically weak and their body will tire. As I stated, it’s all up to the gamer, but if you want to eat while playing choose something with little crumbs and little grease.
5. Exercise: Before starting to play, I generally begin with a tapping regiment. Sure this may sound a bit strange, but drumming your fingers in different patterns helps out profoundly. Try rolling all your digits up and down, back and forth until they feel loose and ready to rock-and-roll. Stiff fingers will cause a drop in reaction time and fire effectiveness. In order to play Counterstrike you will need to use each hand simultaneously and with great precision. Because looking down at your keyboard will result in your demise, one must memorize the keys. This will come to a player after hours of playing CS. I’ve been often commented to have incredible movement skills. I accept this compliment because I am able to fly around the keyboard and multi-task. If you have heightened hand-eye coordination you will probably succeed at Counterstrike, much like me.
6. Watch: After you die in Counterstrike, you’ll go to a spectator mode in which you can watch those left alive. Use this time to study your opponent’s every move. If a particular enemy player is fairing well, observe where they go and how they act. Not only can you learn how a certain person behaves, but an entire team. If you’re wondering how your team is being annihilated, ascertain the other team’s strategies and tactics.
Various Strategy Topics:
Shot Selection
There are three types of firing methods in Counterstrike: full auto, burst, and single shot. Each should be used in different situations. The advantage of fully automatic firing is that you’ll spray rounds in the enemy’s direction at maximum clip. However, your accuracy will be greatly diminished holding down the fire button. Example: you’re pointing at an opponent point-blank. Here, you’re likely to go full auto and hit them only a few times. [Hint: because of each gun’s recoil, aim slightly downward when firing fully automatic. Your shots will jump upwards and aiming low might give you a better chance of hitting your opponent.] There are two methods of burst fire; fixed and manual. Some weapons have built-in burst fire modes, such as the Glock and the FAMAS. These particular weapons will shoot 3 rounds at a time when on this setting, while maintaining good accuracy. However, any gun can be fired in burst, simply hold the fire button down for short periods of time. I recommend using this shot selection when fighting long-to-medium range. The final type of shot selection is single shot. While basically self-explanatory, single shot is probably the most successful way to kill an opponent. Although you won’t be able to shoot as many shots as full auto or burst, you won’t have to. Clicking then waiting for your crosshairs to tighten will result the greatest accuracy you gun can have. As a result, you’ll be wasting fewer rounds and hitting at a higher percentage. This final type of shot selection shouldn’t be used in close combat situations. [Hint: when you spot an enemy a distance away, don’t panic and start spraying bullets. Instead, crouch and aim your shots before you fire.]
One Man Army:
Often times in Counterstrike you’ll find it necessary to become a “one man army.” When everyone else is dead and you’re left to face multiple enemies, one has to draw upon their skills. For a beginner, this task is daunting, but experienced players see this situation as a challenge. In original CS, I could take out an entire team of nine players by my lonesome. Unfortunately the aiming system in Source is a bit more complex and I’m only able to take on six at the most. However, I don’t expect most people to accomplish that task, not without much playing experience. As the last person on your team you have an advantage; any footsteps you hear will be the enemy. You should try separating the opposing force because if fought all at once, you’ll surely perish. Methodically eliminate one player then move onto the next. [Hint: once you kill an enemy, move to another spot. The others alive will see their teammate drop from radar and know where you’re located.]
Tactics
Predict the opponent... if a player is getting a lot of kills on the opposite team, he's probably working the same angle over and over and you'll easily be able to devise a plan to kill him.
When reloading and in a gunfight struggle, just pick up another gun asap.
Don't stay in one place during open long distance gunfights. Move from side to side, strafe around and fire short 1-3 shot bursts at the enemy's head when you stop shortly between moves. It's never a good idea to stay in one place for a long time during fights, it will make you an easy target.
When you surprise an enemy from the front and they start spraying at you, be mobile and try and get around them. Crouch, dance back and forth, jump on top of them, even switch to your pistol to increase your movement speed temporarily, do whatever it takes to avoid the gunfire.
Surprisingly, it's actually easier to outrun their spray when you're closer to them. It allows you the ability to run around them quicker. Why circle strafe 5 yards when you can strafe 1?
When your enemy is reloading, shoot, when your enemy is moving and and bursting, you move and shoot at them. Know how to counter their tactics. Consider utilising your knife when they are reloading, or even when they are shooting at you - a single "stab in the back" can take tens of points off their health.
When the opposite team starts rolling out the smokes and flashes, make sure you've got a retreat point you can maneuver to when you're blind. When they start kicking in the front door after they flash you, you don't want to be out where they can pick you off. Make sure your retreat point isn't too obvious either. When you can't find any retreat points to go to, it comes down to keeping mobile. Dodge back and forth, run and crouch when you stop, even bunny hopping will be of use sometimes.
Don't be a coward. It's okay to run away from certain situations, but if you run away from everything, it's going to come down to either you vs. the entire other team, or you vs. that grenade bouncing your way.
Give help to your team-mates. Your team will last longer this way, and hence keep you alive too as a benefit. Plus, if you cheap out on your team, there will likely be quite a few teamkills aimed at you in the coming rounds.
Know the maps that you play, and know the likely camping and sniping spots.
Be ready for anything. If you keep alert and think of the enemy's movements and tactics, you'll be less likely to be surprised by somebody jumping out at you with an ak spraying or a flash bouncing your way.
Flanking:
Flanking an opponent is another name for stealthily coming up from their behind. This strategy, if executed successfully will lead to many easy kills. Despite its rewards, flanking is very difficult and should only be attempted by those possessing adequate skills. In order to flank, you’ll have to guess which way the enemy team is going to travel and go the opposite. However, because teams split up and travel every way during a map you will meet some enemies on your way. If you can manage to eliminate these few, you’ll be able to shoot the others in the back. [Hint: in order to be successful flanking each map, you must know the other team’s strategy and guess your routes correctly.]
Timing:
Many kills are enabled by timing of movement and firing. If you’re in a firefight with an enemy and neither of you have killed the other, conserve your ammunition. Wait until your enemy is reloading and then use your remaining shots to finish them off. Timing is also important when throwing grenades. You don’t want to have a grenade in hand when an enemy comes into site. Once you’ve played many hours in Counterstrike, timing will be learned. Until then watch those who are performing the best, as they can show you what to do and when.
Throwing HE, Flash, Smoke Grenade and Tips:
Bounce flashes towards the ground for a short throw and quick peek around a corner, clip it right near the edge... that gives them less time to escape (like if you had bounced it off the inside wall.. they get too much warning).
Sometimes throw a smoke, bounce it and then jump out at the same time they'll think it's a flash and turn around.When you get flashed multiple times, it's an obvious rush, immediately pull out your nade and counter the flash... usually it'll land right in the middle of them.
Practice pitching a nade around a corner without even peeking it then right after the nade hits, pull your gun out immediately and start shooting. They'll most likely still be retreating your nade and you have an open shot.
Killing that pesky sniper:
When playing at long distances against snipers, make very SMALL strafing motions back and forth. There is a good reason why: when double scoped with a gun, strafing targets are really hard to hit. You're barely moving left or right, just moving a inch or so back and forth... people forget that when they have an AK out, and they move back and forth several inches, making them an easy target.
Don't always jump around corners, it makes you a easy shot for an sniper.
Sometimes come out of a corner halfway, not even enough to peek it, the awper will see your arm and try to shoot, then you can pop out on his recoil.
If you're out in the open, you're fair game for snipers and a lot of other things. Use cover during fights over long distance, move back and forth between cover and burst shooting. Just make sure to change up your pattern so they can't figure you out.
Map Reviews with a guide for a few.
Assault: Many versions of this map are played, but they are basically all the same map. The Counter-Terrorist team starts off outside the main warehouse containing the hostages. Being a Counter-Terrorist on this map is very difficult with the Terrorists camping the various entrances to the warehouse. The Terrorist team basically sits in their base and snipes at those trying to sneak inside. The front garage door is a “turkey shoot” for Terrorists with long-range weaponry. Your second option for entrance is the back door. However, if its being watched one has to escape crossfire from both the front and back. The last entrance into the warehouse is the most commonly used, and if flooded with Counter-Terrorists can be easily accessed. The hostages are rarely rescued in this map because of the difficulty for entrance and then exit. In my opinion this is the hardest map for which to be a Counter-Terrorist. Therefore, I recommend being a Terrorist and work on picking of the enemy long-range.
Aztec: A map filled with earthy tones and textures, this map provides great cover with it dark areas and color scheme. However the characteristics of Aztec provide for a difficult time seeing and hitting your opponents. Of all the maps I believe this one is the hardest to hit long-range targets. There are basically three areas to this map; the water, the bridge and the double doors leading to Terrorist spawn. Covering these entrances thoroughly will likely result in a Counter-Terrorist victory. Those who possess sniping skills will enjoy covering the bridge and picking off their enemy while they bravely run across. This map is either hit-or-miss, either team has a chance if they choose the right strategies. The water area of the map is the darkest and enemies often lurk in the depths waiting to pounce. With a proficient team of players one can dominate this map and slaughter the other team, but this doesn’t happen often and scores are generally kept even.
Dust: A classic and still the most popular map in all of Counter-Strike. Based in the Middle-East, Dust is one of the brighter maps and therefore the darker colors of your uniform will stand out. There are two ways to the bombsite in Dust, the fewest of any of the maps. You can either go through the hallways or the underpass. However, there are drawbacks to each. If the Terrorist don’t rush hard to Bombsite A, the hallways become a “bottle-neck” and a lengthy firefight. The only other way, the underpass is always guarded by snipers and is difficult to navigate. If the Terrorist team fails in their attempts to rush the bombsite they will likely start to camp outside the hallway entrance. When the T’s start to do this a Counter-Terrorist’s job becomes very difficult because the roles have been reversed and now they will have to rush.
Inferno: No official map has been released by Valve, but there is an excellent custom map version. Instead of the dusty older version, the new Inferno is more of a European town. The maps’ layout is basically the same, except that new source models have been added and the overall brightness is lower. The two bombsites are on separate sides of the map, and each present many camping spots for the Terrorist to camp after planting the bomb. Because of the long, open corridors of fire, the Counter-Terrorists have the advantage of the Terrorists having to rush. If the Terrorist choose a slow approach to the bombsite, they’ll likely be flanked from behind.
Italy tips and review:
Why do I love Italy so much? At least I used to..
- High replay value. There are many routes between the CT spawn and the hostage safe-house, around 4 or 5 direct routes and then many possible permutations if you zig-zag your way around. So after the initial rush and firefights, you're never quite sure where your opponents could be hiding. The Ts may be passive or aggressive; they may stick together, or spread out; they may camp the safe-house, or the hostage rescue point.
- Z-axis action. The term refers to the 3rd axis (up-down) on the 3D grid; in Italy, you always have look up (or down, depending on where you are) for potential ambushes. You can also boost your teammates onto a tall crate (or roof...) for a tactical advantage.
- Stealth. Different surfaces give different footstep sounds, so you can anticipate your opponents' arrival by listening carefully. This map is not just about the rush; you can have a great deal of success if you walk quietly.
- All the weapons are useful in Italy. The shotgun is devastating in close quarters like the central building, the cellar, and the safe-house. There are some good lines of sight leading to the safe-house, for sniping. You can use inexpensive, rapid-fire weapons (MP5, Mac-10, TMP) for ambushes. Expensive rifles like the Steyr Aug ("bullpup") and Krieg 552 are always useful in any map, but the scope will help you take out the pesky snipers.
- This map separates the men from the boys. I consider Dust to be a good learning map for new players, because it's bright, it has a simple layout, and it's not that easy for an opponent to sneak up behind you. Italy, on the other hand, has lots of twists and turns, and when you go through a doorway or around a corner, you have to be prepared to face multiple opponents. Experienced players can survive longer.
Counter-Terrorists: beginning of round
When you spawn, you will be facing a wedge-shaped building. You can go to the left, or the right of that building. There are four general routes to get to the safe-house, but you can make detours so the actual number of routes is much higher. Use voice chat to coordinate with your teammates before the round begins.
The 4 routes are:
(1) Left, then to the cellar: go to the left of the wedge-shaped building, go up some stairs, inside the building, then down some stairs into the cellar. When you exit the cellar, you can turn left and go up some stairs to the safe-house, or turn right and head back toward the fruit market.
(2) Left, then under the overpass: same as 1, but instead of going up the stairs to the building with the cellar, you make a right-hand turn and go under the overpass. Then you can turn left toward the cellar's exit, or turn right and go toward the fruit market.
(3) Right, then jump over the logs and climb into the central building's window: it takes a little bit of practice, but you hop onto the pile of logs, then hop onto the window sill and climb in. There will be three small rooms that you have to pass through, and when you exit the central building you will see a long walkway ahead.
(4) Right, then turn right to go through the fruit market: you could consider this to be two routes - there are two alleys that lead out of the fruit market, the closer one will take you to the cellar's exit, and the farther one will take you to the tunnel that leads up to the safe-house. The alleys are connected to each other, so it doesn't matter which alley you take.
There are multiple variations of the above routes. For example, you could go through the fruit market, hear the booming sound of an AWP, change your mind, then double back to the logs at the central building.
The CT side will want to mix-and-match routes, to keep Ts guessing. Travel in groups, to increase your chances of survival.
Counter-Terrorists: mid-game
On a larger server, your team will have enough players to cover all 4 routes. If you do not cover all routes in your initial rush, there is a possibility that some Ts have come through the uncovered route(s) and will be trying to sneak up from behind. Once in a while, take a peek over your shoulder, or have a teammate watch your back.
If you survived the initial rush, now's your chance to upgrade your weapon. Take a quick look at the ground for any valuable weapons. Use the "drop" key to lose the weapon you're holding (default: G, I think) then walk over the new weapon. Reload, to make sure you have a full clip.
Use the radar (top-left corner of your screen) to locate your surviving teammates. Or use voice chat to get a quick head count.
Now you have to focus on rescuing the hostages. There are 4 hostages in the safe-house, 2 on the ground floor and 2 upstairs. There are two ways to enter the safe-house: climb up onto some crates and then jump onto the window sill, or go through the doorway on the ground floor. If you did not encounter much resistance during the initial rush phase, then you can expect to find more Ts camping inside the safe-house.
It is very likely that there will be one or two terrorists waiting for you inside the safe-house. Smoke grenades and flashbangs would be really useful, to disorient your opponents. Avoid using the HE grenade; if you hurt the hostages, you will lose some cash.
Although the tunnel appears to be the easiest exit route to take the hostages, it might not be the safest. It's a bit dark, and there are at least three ambush spots for Ts. Furthermore, Ts could be waiting in one of the corners of the fruit market. Depending on how much backup you have, you might consider taking the hostages to the central building and then out the window.
As you approach the hostage rescue point (same area as CT spawn), take a peek over your shoulder to make sure all the hostages are still there. Sometimes, one will get stuck and you have to go back to retrieve him.
Walk quietly, and prepare for a terrorist that might be hiding around the corner or behind a crate.
The cash you receive for rescuing the hostages is well worth the risk you took. Be proactive in this map; don't camp.
Counter-Terrorists: end-game
You'll need around a minute or more, to bring the hostages safely back to the rescue point. If time is running short, you can still win by eliminating all the Terrorists. Problem is, they could be anywhere.
Check the popular ambush spots around the CT spawn area, to the left and right of the wedge-shaped building. Another hiding spot is the south-east corner of the fruit-market (if you consider T spawn to be north, and CT spawn to be south). There could be a T hiding behind the crate inside the safe-house, on the ground floor next to the 2 hostages. I would also check the area next to the logs, under the window.
Terrorists:
First of all, read the section on Counter-Terrorists, to familiarize yourself with the 4 major routes.
Terrorists: beginning of round
Ts can be passive (hang around the safe-house with sniper rifles and wait for the CTs to arrive) or aggressive (rush to meet the CTs at the various choke points) or sneaky (hide in dark corners or behind crates, and ambush the CTs before / after they arrive at the safe-house). Or some combination of the three (what you'll find on a public server).
Take a look at the screenshot on the right:
1) You can jump down onto the lower level, turn right to go into the cellar, or go straight toward the mid area.
2) You can stay on the upper level, turn the corner and wait for CTs to come through the central building.
3A) After you turn the corner, you can go straight to the central building, or hop down onto the lower level.
3B) Instead of hopping down to the lower level, you can hop onto the crate and try to climb onto the roof. Or wait to see if any CTs are heading toward the cellar.
If you go to 3B, and there are no CTs going to the cellar, you can jump down and head to the CT spawn (hostage rescue point) and wait for CTs to arrive with the hostages.
4) (not shown in the screenshot) You can head down the tunnel that leads up to the safe-house, and rush to the fruit market. You will always meet a few CTs there at the beginning of the round.
Counter-Strike is a numbers game; at the beginning of the round, you want your side to survive the early firefights, so that you outnumber the surviving opponents in the mid game. If the Ts outnumber the CTs in the mid game, it will be very difficult for the CTs to enter the safe-house undetected, and rescue the hostages.
Terrorists: mid-game
Always communicate with your teammates (and I don't mean spam). Let them know that you've survived the early rush, where you are located, where you are going, and if your sector is clear. Use keybindings to save time: CS:S Radio scripter from CSBanana
When a teammate uses a radio command, you will see a blinking red dot on your radar screen. So you will know where he is located. If he is in visual range, you will see a green exclamation mark above his head.
In the mid-game, the surviving CTs will be heading toward the safe-house. So you can head back to the safe-house yourself, camp the CT spawn, or try to sneak up behind the CTs.
If you want to sneak up on the CTs, use the "walk" key (default: SHIFT) so they can't hear you approach. Nothing's more satisfying than a knife kill.
T snipers will want to cover (a) the tunnel leading up to the safe-house, (b) the path leading to the central building, (c) the path leading from the cellar exit, (d) the open area that is the T spawn. When you play Italy, you will always here the booming sound of the AWP in the vicinity of the safe-house.
Terrorists: end-game
Depending on where you are located, you might not have enough time to check the safe-house (to see if the hostages are still there). So head towards the CT spawn, and find a good ambush spot (there are plenty).
If you are near the safe-house, and the hostages are still there, you can camp inside or wait on the ledge (accessible from the upper level of the house) outside. Or you can find a dark corner in the tunnel.
Another good waiting spot, is the area to the left of the stairs that go up from the cellar exit. You can see an Italian flag on the wall.
If there's only one CT left, perhaps he's AFK. So check the CT spawn, just in case. Just stay alive, and your side will win the round.
Office: Basis of all close combat maps. With the lack of large open areas, Office is basically a map consisting of small rooms and hallways. The Counter-Terrorists are usually the ones who rush the hostages and the Terrorist sit back and camp. You can either find the Terrorists hiding in the dark, hostage room or flanking the Counter-Terrorists through the garage door. This is one of the few maps that the teams are generally on a level playing field. Along with the Dust maps this is one of the most played, due to its fast, intense firefights.
The best things to do here is to make it difficult for the CTs to come rescue the hostages, blowing up cabinets, shooting the chairs into doorways are very effective.
Dust2 tips and review:
OK, you're ready to join a populated Dust2 server and get your ass kicked.
Terrorists: beginning of round
There are two areas of Terrorist spawns. One area is a bit closer to Bomb site B, and the other is a bit closer to site A. Before the round begins, have a look around to see where your teammates are facing.
The 5 routes are:
(1) Long A: go down the ramp on the right side, through the sets of double-doors, then up the long, straight walkway to bomb site A.
(2) Short A: instead of going through the double-doors, you take a left turn and go around, on the catwalk, to site A.
(3) What I'll call Short B: The shortest path to 'B' is to go straight from T spawn to the main building, go inside, take a left, then out. You will be at site B.
(4) A longer path to 'B' is to go straight through what I call "Sniper Alley", then through the double-doors, make a left, go uphill, through another set of double-doors, thus avoiding the main building altogether.
(5) The longest path to 'B' is to go into the main building, then turn right, down the curved stairwell, exit the building, turn left, go through the double doors, make a left, go uphill, through another set of double-doors. Phew!
Keep in mind that there are multiple variations on the 5 routes. For example, you might be heading Short A, but then change your mind, drop down to the mid, then head to Bomb site B. If you're playing T, and you want the fast rush, Short B is your best bet.
The T side will want to mix-and-match routes, to keep CTs guessing. Most servers enable voice chat, this is very useful if you use it for coordinating rushes.
Terrorists: mid-game
If you didn't go for the fast rush, and you haven't planted the bomb yet, things get really interesting. You still have time to get to a bomb site and plant the bomb, but you can bet there will be CTs camping the two sites.
Bomb site B is easier to protect (for either side that controls it first), there are many crates and an elevated platform that looks right into the main building. If you're inside the main building, walk don't run. You don't want your footsteps to give away your location.
The other entrance to B is a set of double-doors, you can expect the enemy to be parked behind the door, around the abandoned car.
The third entrance to B is a bit sneaky, you start from "Mid", go uphill, and climb up some rocks, then crawl through a hole in the wall. Newbie players might not know of its existence, but experienced players will be watching it.
Site A is not as easy to defend as site B, as it is more open and there are three paths to get there.
Depending on how many CTs survived, you can expect at least 2 CTs defending A: one CT sniper looking down Long A, and the other CT roving around, keeping an eye on the catwalk while listening for footsteps underneath. You might even find an AFK (away from keyboard) under the catwalk, since thaTs the CT spawn.
If you can plant the bomb in mid-game, and you're not the last T still alive, you should be able to defend your area and win. You need to kill your opponents quickly, and not take too much damage from return fire.
Terrorists: end-game
If you haven't planted the bomb yet, all is not lost. You can still hunt down all remaining CTs to get the victory. Start with the bomb site that is closest to you, then check the CT spawn area for any AFK's, then check the other site.
Counter-Terrorists:
First of all, read the section on Terrorists, so you know what to expect from the T side. Since the Ts have so many options, CTs have to be able to read-and-react well. Communicate (meaningful) information to your teammates, so they can rush back to an undefended bomb site.
Counter-Terrorists: beginning of round
Unlike Dust, Dust2 has a lot more variety of game situations as the round progresses. Like Dust, Dust2 forces CTs to be coordinated in their early rush so that they can prevent the Ts from getting an easy score.
Complete containment of Ts (possible in Dust) is not a viable option, in a public clanless server (in my opinion). At the beginning of the round, CTs have to rush to certain choke points, and try to win the firefights:
- the double-doors through which the Ts will pass, to get to Long A. Two CTs would be preferable, and they can communicate to their teammates if they sense a mass rush.
- right up the middle, and then veer left to see if Ts are trying to go Short A. In the later rounds, Ts can afford scouts, so bring smoke grenades.
- a mad rush to Bomb site B, where Ts are likely to exit the main building. Depending on your foot speed, you should be able to throw a flashbang into the corridor before the Ts come out. Two or three CTs should do the trick. If it turns out that no one is inside, then you can recover by taking the curved staircase back down to "Mid".
Counter-Terrorists: mid-game
If the bomb was not planted right away, CTs can settle in to protect both bomb sites. Ideally, you want to have 3 CTs at each site, but realistically you won't.
At site A, you'll want a sniper covering long A, another CT covering the catwalk (Short A), and a third CT could be camping in the dark area under the catwalk.
At site B, you'll need three CTs, one to cover each possible entrance.
Of course, in real life, players are too restless to stay in one spot. So what normally happens is that CTs wander around, looking for Ts. It's better to wander around in pairs than solo, if you must.
Counter-Terrorists: end-game
As the round nears its end, Ts have to locate all CTs and eliminate them to get the win. Hopefully you've still got enough ammo for that final firefight. If not, look around for corpses, chuck your weapon and pick up theirs. Who knows, you might get someone's AWP or machine-gun. Note that spray-and-pray firing doesn't work well in medium to long-distance fighting. If you're going to pick up someone's weapon, go for a scoped weapon and/or a Desert Eagle.
If there's only one Terrorist left, perhaps he's AFK. So check the T spawn, just in case.
Weapon Reviews and Equipment review
Kevlar
*Price: $650
Review:Increases the time of you dying from .02 miliseconds to .09 miliseconds.
HE Grenade
*Price: $300
*Special traits: You can only carry one of them
Review ower equivalent to 100 snap pops going off, useful when primary weapon is empty you have chucked your pistol at a squirrel and your knife is stuck in the wall where you have stabbed your teammates spray.
Flashbang grenade
* Price: $200
* Special traits: You can only carry two of them
Reviewisappears in a puff of white smoke blinding everyone for 10 seconds within its blast radius, useful for blinding your teammates then using them as a shield. Also used for great affect on the enemy in stopping you in your tracks and gunning you down like sitting ducks in front of a .50 cal.
Pistols:
Glock
Price: $400
Country of Origin: Austria
Caliber: 9mm Parabellum
Clip Capacity: 20 Rounds
Rate of Fire: N/A
Weight (Loaded): 0.9 kg
Projectile Weight: 8 grams
Muzzle Velocity: 1132 Feet/ Second
Muzzle Energy: 475 Joules
Review: Standard issue pistol, you will spawn with this weapon every round you are on the Terrorist team. Equipped with two modes of fire, this weapon is versatile, but not powerful. While in a firefight against other pistols, the Glock may have 20 rounds, but it needs every one. Even with an accurately placed three-round burst, many body shots are needed for a kill. One of the better long-range pistols, the Glock is accurate but not powerful.
H&K USP
Price: $500
Country of Origin: Germany
Caliber: .45 ACP
Clip Capacity: 12 Rounds
Rate of Fire: N/A
Weight (Loaded): 1 kg
Projectile Weight: 15.2 grams
Muzzle Velocity: 866 Feet/ Second
Muzzle Energy: 553 Joules
Review: Standard issue pistol, you will spawn with this weapon every round you are on the Counter-Terrorist team. Of all the pistols, the USP has the only silencer for those situations that require stealth. The USP is also the 2 nd largest caliber round pistol, behind only the Desert Eagle. While the USP is slight less accurate than the Glock, it can kill with less rounds. If you empty your primary weapon’s clip in a firefight, a USP is a worthy weapon to finish off your opponent. [Hint: Often times, it is better to switch to your secondary weapon instead of reloading your primary. Reloading may take time that you cannot spare, while a pistol can provide cover while you can retreat or kill your opponent.]
Sig Sauer
Price: $600
Country of Origin: Switzerland/Germany
Caliber: .357 SIG
Clip Capacity: 13 Rounds
Rate of Fire:> N/A
Weight (Loaded): 1.03 kg
Projectile Weight: 8.1 grams
Muzzle Velocity: 1400 Feet/ Second
Muzzle Energy: 600 Joules
Review: Rarely used pistol that has pluses and minuses. A positive is that it has one more bullet than the USP, however it is not as accurate and that extra bullet will be needed. Many body hits will be needed to kill, with the .357 SIG ammunition slightly more powerful than that of the 9mm of the Glock.
Desert Eagle
Price: $650
Country of Origin: Israel
Caliber: .50 Action Express
Clip Capacity: 7 Rounds
Rate of Fire: N/A
Weight (Loaded): 1.8 kg
Projectile Weight: 19.4 grams
Muzzle Velocity: 1380 Feet/ Second
Muzzle Energy: 1650 Joules
Review: Contrary to poular belief this is NOT the only pistol available it may however take you years to see a Sig Sauer or FN Five-Seven being used. It has a major flaw of only 7 rounds, each one of those could be fatal. Taking a point-blank hit by a .50 Desert Eagle will cause severe damage if not kill you. In a firefight, you will need to use extreme awareness of your ammunition. You can take more time to fire using a Desert Eagle because it will cause more damage than most other weapons, including automatic. While other weapons require you to pull the trigger for 15 seconds to kill anyone. Despite its close combat advantages, the Eagle is a very accurate long-range weapon. [Hint: If you should stumble upon an unaware sniper, be careful. I’d say 99% of all snipers buy a Desert Eagle to use close range.]
FN Five-Seven [Counter-Terrorist Weapon]
Price: $750
Country of Origin: Belgium
Caliber: 5.7 x 28mm
Clip Capacity: 20 Rounds
Rate of Fire: N/A
Weight (Loaded): 0.61 kg
Projectile Weight: 2 grams
Muzzle Velocity: 2345 Feet/ Second
Muzzle Energy: 465 Joules
Review: Although a favorite of mine, this gun really has no use in the game. Long range, no pistol can beat the 5-7’s aim. However, to kill someone you’ll need almost half of the guns’, large 20 round clips. Overall, this pistol has the most accuracy while having the least power.
Dual Beretta Elites [Terrorist Weapon]
Price: $800
Country of Origin: Italy
Caliber: 9mm Parabellum
Clip Capacity: 15 Rounds [Each]
Rate of Fire: N/A
Weight (Loaded): 1.15 kg [Each]
Projectile Weight: 8 grams
Muzzle Velocity: 1280 Feet/ Second
Muzzle Energy: 606 Joules
Review: Perhaps the weapon that yields the most “fun,” but these Berettas are highly inaccurate. If your luck your aim will only slightly suck and youll hit every other bullet, because every shot with the left pistol goes slightly left, every shot with the right pistol goes slightly right.
Fifteen rounds in each gun, these pistols have the largest capacity by far and will win in any lengthy pistol fight. Despite using the same caliber rounds, the Beretta will yield more damage with a body shot than a Glock. Firing rapidly into a crowd will likely cause damage to everyone. [Hint: As with all non-automatic weapons, pistols only fire as fast as you can click. Most important with the Berettas, the fastest you can fire lead, the more of a chance you can damage your opponent.]
Shotguns:
Benelli M3 Super 90
Price: $1700
Country of Origin: Italy
Caliber: 12 Gauge
Clip Capacity: 8 Rounds
Rate of Fire: N/A
Weight (Loaded): 3.5 kg
Projectile Weight: 3.8 grams
Muzzle Velocity: 1250 Feet/ Second
Muzzle Energy: 2429 Joules
Review: Much improved in CS:S than in previous versions. Not only is the M3 effective close range, but now it can be used in long range combat. Point blank, an M3 round will cause severe damage, including kill you in a single shot. I’d recommend using shotguns only when the map is close-combat orientated. [Hint: If you’re in a firefight with a shotgun you’d better kill the user quickly, because his shells will last longer than your automatic weapon clip.]
Benelli SPAS Shotgun
Price: $3000
Country of Origin: Italy
Caliber: 12 Gauge
Clip Capacity: 7 Rounds
Rate of Fire: N/A
Weight (Loaded): 4 kg
Projectile Weight: 3.8 grams
Muzzle Velocity: 1250 Feet/ Second
Muzzle Energy: 2429 Joules
Review: The so-called “nOOb tube” has many downfalls. First, the 7 shells will fire so quickly that if you don’t hit your target the first time, you’ll likely not receive a second-chance. Second, unless you’re firing point-blank, you’re not going to deal much damage to anyone. As a result, this weapon is relatively useless in most situations.
Sub-Machine Guns [SMGs]:
Steyr TMP [Counter-Terrorist Weapon]
Price: $1250
Country of Origin: Austria
Caliber: 9mm Parabellum
Clip Capacity: 30 Rounds
Rate of Fire: 857 RPM
Weight (Loaded): 1.3 kg
Projectile Weight: 8 grams
Muzzle Velocity: 1280 Feet/ Second
Muzzle Energy: 606 Joules
Review: The Steyr TMP is rarely used in CS because many of the other, more expensive weapons provide more “pop.” However, if you need a silenced weapon, or just an accurate weapon, the TMP works well. While the TMP has a fairly accurate spray, you will need a few body hits before someone is killed.
H&K MP5
Price: $1500
Country of Origin: Germany
Caliber: 9mm Parabellum
Clip Capacity: 30 Rounds
Rate of Fire: 800 RPM
Weight (Loaded): 3.42 kg
Projectile Weight: 8 grams
Muzzle Velocity: 1132 Feet/ Second
Muzzle Energy: 637 Joules
Review: Of all the Sub-Machine Guns the H&K MP5 is the most widely used, and for good reasons. Unlike most other guns, when you point this weapon at an opponent and spray, you will notice that its accuracy will provide more body hits. However, it will take five or six hits to kill the other person. With the mp5 you just want to tap on their head 1 shot at a time at a distance,
H&K UMP
Price: $1700
Country of Origin: Germany
Caliber: .45 ACP
Clip Capacity: 25 Rounds
Rate of Fire: 600 RPM
Weight (Loaded): 2.27kg
Projectile Weight: 15.2 grams
Muzzle Velocity: 1002 Feet/ Second
Muzzle Energy: 625 Joules
Review: Probably the least used weapon in the game. This gun is more of a pistol with 25 rounds, with its high caliber rounds. If used like a pistol with single shots, the UMP can be deadly long-range. However, in close combat the UMP’s slow rate of fire doesn’t help its performance.
FN P90
Price: $2350
Country of Origin: Belgium
Caliber: .338 Lapua Magnum
Clip Capacity: 50 Rounds
Rate of Fire: 900 RPM
Weight (Loaded): 3 kg
Projectile Weight: 2 grams
Muzzle Velocity: 2345 Feet/ Second
Muzzle Energy: 465 Joules
Review: Relatively small accuracy grouping for a gun with such a high rounds per minute. For those who feel they run out of bullets too quickly in a firefight, this weapon is for you. This miniature Para has about twenty more rounds than the average gun, thus you will still be firing when the other is reloading. The P90 can also be used as support for team movement, much like the Para, but with better accuracy and cheaper cost.
Ingram Mac-10 [Terrorist Weapon]
Price: $1400
Country of Origin: United States of America
Caliber: .45 ACP
Clip Capacity: 30 Rounds
Rate of Fire: 857 RPM
Weight (Loaded): 3.82 kg
Projectile Weight: 15.2 grams
Muzzle Velocity: 919 Feet/ Second
Muzzle Energy: 584 Joules
Review: Like the H&K UMP, the Mac-10 uses .45 ACP ammunition much like the USP pistol. If you look at the Mac-10 you’ll see that it is basically a one-handed weapon. Therefore, its recoil will cause the gun to jump wildly and the bullet spray will be wide, with little chance to hit much. Other than the Para, I’d say that this weapon is the most inaccurate. Unless you’re firing in a hallway you won’t hit anything. Don’t even think you’ll hit anything long-range with the Mac-10, you’re better off using your pistol.
Rifles:
FAMAS [Counter-Terrorist Weapon]
Price: $2250
Country of Origin: France
Caliber: 5.56 NATO
Clip Capacity: 25 Rounds
Rate of Fire: 1100 RPM
Weight (Loaded): 3.40 kg
Projectile Weight: 4 grams
Muzzle Velocity: 2212 Feet/ Second
Muzzle Energy: 1712 Joules
Review: The Counter-Terrorist’s version of a cheap, accurate weapon, much like the Terrorist’s Galil. If you’re down on money, the FAMAS is an excellent choice, if you’re shooting long-range use the weapon’s 3-round burst. One or two bursts on this setting will kill an opponent with extreme accuracy. When fighting close combat use the full automatic setting which has SMG accuracy with rifle power. One major drawback of this weapon is the slightly smaller than average 25-round clips. If you want to have accuracy with each shot long range, this is definitely your weapon. Using the three-round burst you will be pin-point with each fire.
Steyr Scout
Price: $2750
Country of Origin: Austria
Caliber: 7.62 NATO
Clip Capacity: 10 Rounds
Rate of Fire: N/A
Weight (Loaded): 3.3 kg
Projectile Weight: 8 grams
Muzzle Velocity: 2800 Feet/ Second
Muzzle Energy: 2200 Joules
Review: A real sniper’s choice of a rifle. Unlike the AWP or any of the auto sniper rifles, the scout actually takes skill. A well-place chest or head shot will kill someone, but anywhere else two shots are required. If you run into someone with this weapon out, it is useless without zoom. Therefore, be ready to switch to your pistol for close encounters. With the Scout being so lightweight, you are able to run as fast as when your knife is equipped.
Colt M4A1 [Counter-Terrorist Weapon]
Price: $3100
Country of Origin: United States of America
Caliber: 5.56 NATO
Clip Capacity: 30 Rounds
Rate of Fire: 685 RPM
Weight (Loaded): 3.22 kg
Projectile Weight: 4 grams
Muzzle Velocity: 2900 Feet/ Second
Muzzle Energy: 1570 Joules
Review: In the opinion of most the M4A1 is the best all-around weapon in CS. Some prefer the Colt with a silencer attached, and some prefer no silencer. Either way, I don’t think that there’s much difference in the weapon’s performance. Long range with a well aimed single shot, one can take out an opponent easily. While it can be inaccurate spraying down a hallway, you can easily kill an opponent using full auto. My personal favorite, this weapon is proficient in every area and therefore will be the weapon most seen while playing.
Steyr AUG [Counter-Terrorist Weapon]
Price: $3500
Country of Origin: Austria
Caliber: 5.56 NATO
Clip Capacity: 30 Rounds
Rate of Fire: 727 RPM
Weight (Loaded): 4.09 kg
Projectile Weight: 4 grams
Muzzle Velocity: 2900 Feet/ Second
Muzzle Energy: 1570 Joules
Review: A favorite weapon of mine for those maps with wide open areas.
Its damage is equivalent to a anti tank shell covered in anthrax and gasoline. With its zoom feature, the AUG can be deadly accurate, and will rival any sniper rifle. If you use single shot while zoomed, you’re shots shouldn’t spray too wildly, and are likely to hit your target. However, I don’t recommend holding down your mouse button while zoomed. Despite its long range pluses, the AUG fairs well in close combat and thus should be used in each. Close range, you’ll likely receive results that match the Colt M4A1, with the AUG using the same caliber ammunition, and having the same muzzle velocity and recoil.
Sig 550 [Counter-Terrorist Weapon] [Not allowed on eGO servers]
Price: $4200
Country of Origin: Switzerland
Caliber: 5.56 NATO
Clip Capacity: 30 Rounds
Rate of Fire: N/A
Weight (Loaded): 7.02 kg
Projectile Weight: 4 grams
Muzzle Velocity: 3100 Feet/ Second
Muzzle Energy: 1650 Joules
AWP [Not allowed on eGO servers]
Price: $4750
Country of Origin: United Kingdom
Caliber: .338 Lapua Magnum
Clip Capacity: 10 Rounds
Rate of Fire: N/A
Weight (Loaded): 6 kg
Projectile Weight: 16.2 grams
Muzzle Velocity: 3000 Feet/ Second
Muzzle Energy: 7000 Joules
Galil [Terrorist Weapon]
Price: $2000
Country of Origin: Israel
Caliber: .223
Clip Capacity: 35 Rounds
Rate of Fire: 675 RPM
Weight (Loaded): 4.35 kg
Projectile Weight: 4 grams
Muzzle Velocity: 2013 Feet/ Second
Muzzle Energy: 1712 Joules
Review: The cheapest rifle in the game, the Galil also has the largest capacity of ammunition; 35 rounds. Although the Galil doesn’t have an actual burst-round setting, clicking the fire button will shoot a few shots that rival the FAMAS’ accuracy. If you don’t shoot full-auto and merely hold fire for a few moments you will spray in a small area, must like that of an SMG. For price, you can’t beat the Galil for its power and accuracy.
AK-47 [Terrorist Weapon]
Price: $2500
Country of Origin: Russia
Caliber: 7.62 NATO
Clip Capacity: 30 Rounds
Rate of Fire: 600 RPM
Weight (Loaded): 4.79 kg
Projectile Weight: 7.9 grams
Muzzle Velocity: 2329 Feet/ Second
Muzzle Energy: 1992 Joules
Review: Terrorist mainstay weapon, much like the Colt of the Counter-Terrorists. However, the AK is also the most inaccurate rifle. Long-range you’ll receive more power than a Colt, but you’d better hit the other person with the first two single shots. Medium-to-short range to hit an opponent you must basically “pray and spray.” Sometimes you’ll be a few feet away from a person and not hit them at all, and other times you’ll receive lucky headshots.
Remember to closely pay attention to your spray, with AK you want a 2 shot burst, if it's close just spray at Headshot level...
Sig 552 [Terrorist Weapon]
Price: $3500
Country of Origin: Switzerland
Caliber: 5.56 NATO
Clip Capacity: 30 Rounds
Rate of Fire: 727 RPM
Weight (Loaded): 3.1 kg
Projectile Weight: 4 grams
Muzzle Velocity: 2900 Feet/ Second
Muzzle Energy: 1570 Joules
Review: x
H&K G3 [Terrorist Weapon] [Not allowed on eGO servers]
Price: $5000
Country of Origin: Germany
Caliber: 7.62 NATO
Clip Capacity: 20 Rounds
Rate of Fire: N/A
Weight (Loaded): 4.41 kg
Projectile Weight: 8 grams
Muzzle Velocity: 2800 Feet/ Second
Muzzle Energy: 2200 Joules
Heavy Weapons:
M249 Para
Price: $5750
Country of Origin: Belgium
Caliber: 5.56 Parabellum
Clip Capacity: 100 Rounds
Rate of Fire: 600 RPM
Weight (Loaded): 6 kg
Projectile Weight: 4 grams
Muzzle Velocity: 3000 Feet/ Second
Muzzle Energy: 1600 Joules
Review: The ultimate support weapon for that rush to the bombsite or down a crowded corridor. With a massive 100 round magazine, the Para can go for quite so time without being reloaded. However, when you need to reload, you’ll notice that it’ll take many venerable seconds. Overall, this gun is not worth the most expensive price tag in the game. You may be able to hit someone long range with your first, well-placed shot but after that, good luck. Even at close range, shooting at full-auto you’re not likely to hit anything. However when there’s a group of the enemy the Para will damage each one equally.
When all else fails you can always cry BS! Remember it lets everyone else know you are really serious about CS:S
Lyrics for "I will survive" theme song!
First I was afraid
I was petrified,
thought I couldn't get a frag
without you by my side,
and then I spent so many rounds
just camping out all on my own,
and I grew strong
and now i'm defusing the bomb...
And now i'm back,
so shut your face
you cannot play as good as me
you're such a fat disgrace
weren't you the one who left me
playing on my own
all up to me, the VIP.
No chance not I,
I will survive,
as long as I have bomber
then I know I'll stay alive
and now you're back and expect
weapons thrown for free
but I'm saving all my money for an AWP.
CT's arrive, you won't survive
because the second I see
with my colt you're gonna die
You just TK and keep the frags off of your own
but hey get ready man for planitudes of crap
now that you're on.
You say it's dark and that
you cannot tell the teams apart,
but that line's old and not as fresh
as pepper chili farts.
You just want kills
you do not care about your team
you beam them 37 times but keep
on coming back in clean.
He's in the pipes,
out on the lawn,
you're cheating
tell me why the hell FORCECHASECAM isn't on,
we can't do crap by simply banning your IP,
someone bring on down the console,
and you ban his WON ID.
Oh no not I,
I will survive,
no matter how much you are cheating,
well I know I'll stay alive.
You might have speed cheats on,
or wallhacks on to see,
by I've got the same ones running,
so just try and mess with me.
Nothing left to do,
I blew your team away,
the scores are 29 to 3
and your team cannot play.
The final round is coming in,
and you have not one ounce of class,
so you can take your stupid AK
shove it right up in your a**.
Now time is running out,
five minutes on the clock,
you lost your gun, you lost your style,
your playing shuttle #^#@
It's you and me,
it's one on one,
so one must die,
now I'm zooming in my reticle,
so baby it's goodbye.
Oh no not I,
I will survive,
can you remember when you fragged me
and I lost my life.
So many months ago,
that match was far away,
but now so sudden when I beat you
you've got nothing left to say.
I. Getting Started
Purchasing Weapons and Supplies:
“You Get What You Paid For”
If you’ve just started playing CS then I suggest that you spend time orienting yourself with each of the many various weapons. Everyone has their particular favorite(s) weapons. Since you’ll undoubtedly not always have enough money to buy the gun you desire, it is best that you are proficient with one from each category: Pistols - Shotguns - Sub Machine Guns - Rifles - Para. If you ask me, not buying a gun and saving for another round is a waste. With only a pistol, one does not stand a chance against an automatic rifle. If you continue to do this, your deaths will pile up and you kills will be few and far between. Say for instance you wait two rounds for money to purchase a Para and only produce one frag. For these three rounds your K
[Kill-to-Death] Ratio would be around 1:3 which is not good. As a result, buy what you can, when you can and fight with what you have. Ex = a SMG round + a SMG round + a SMG round > a Pistol round + a Pistol round + a Para Round. While the expensive weapons are fun, I don’t believe dying constantly and having bad statistics is enjoyable.“The Biggest Stick Is Not Always the Best”
As stated before, practice with all the weapons in a LAN game and find one of each category that suits your skills. Each of the guns has a different recoil and damage, and playing with an assortment will confuse a player’s aim. Personally I use the USP or Glock as my Pistol, MP-5 as my SMG, and either a M4A1 or AK-47 as my rifle. Depending on the map, I buy one over the other. If a map contains open spaces I’ll likely go with a Rifle over a SMG because of its long range power and accuracy. Although it will take many shots for a kill, the MP5’s low recoil makes it accurate in close quarters. Once you’ve chosen your favorite(s): practice, practice, practice. Knowing a gun’s accuracy and tendencies will help you in combat.
“Bare Essentials”
At the buy screen my number one priority is to first purchase my suit of Kevlar with helmet. Although you might question the effectiveness of the armor at times, it does provide protection. If for nothing else, Kevlar helps your self-confidence. Going into a round without armor, one has to feel less comfortable. My second selection at the buy screen is my weapon and its matching ammo. From here you’re ready for combat; that is unless you have a few bucks left for the “extras.” Grenades are a topic I will discuss later on, and when used properly can bail you out of sticky situations. Unless you’re a CT facing a T team who make’s a priority of planting the bomb, a defusal kit it unnecessary. You can defuse the bomb without one if you clear the bombsite of hostiles quickly enough. Also, a fallen comrade may have a defuse kit on their corpse which you can “borrow” after they’re gone. Nightvision = a complete waste of funds, thus you should not buy.
Movement:
The ability to transgress every obstacle will help you evade death. Ex = A Terrorist has you pinned you down with automatic fire and you need to retreat. Choice A: you can stumble over the file cabinets and be a sitting duck, or Choice B: execute a crouch-jump over the objects and around the next corner. As with weapon efficiency, practicing these maneuvers will help in -game. In CS:S most of the moveable objects can be hurdled if your timing and tactic of jumping is correct. Below are tips and explanations of the various jumps.
1. Normal Jump [Space Bar]
* This jump is self-explanatory and basic. With this command you can jump over objects or boundaries of heights no greater than, let’s say two feet. If you so chose, one can use this to “hop” around a firefight in order to be a harder target. A negative side of jumping while shooting is that your accuracy will be lower than walking. Also if you’re hit in mid-air you are stopped dead and will be a much easier kill.
2. Crouch-Jump [Combination of Ctrl and Space Bar]
* In order to climb those boxes and crates you’ll need this jump. To execute, approach the desired climb and hit the space bar. At the apex, or the top of your jump, hit the crouch button [Ctrl]. Often times it might take a few attempts, but once you’ve had practice you should be able to crouch-jump smoothly and with ease. So next time you see a guy in a hiding spot and state “how the heck did he get there,” you’ll know that he used a combination of normal and crouch jumps to do so. [Hint: your teammates can be used as stepping stones do reach otherwise unreachable heights.]
3. Running-Jump w/Knife
* If an area of length is your target jump, the running-jump will be needed. There is really no difference between this and the normal jump except that you need momentum and your knife equipped.
“Run, Forest, Run”
If you’re wondering why others on your team are moving faster than you, it’s due to them equipping their knife instead of their primary weapon. You may not choose to run with a knife due to the fact that you’re vulnerable to an attack without a weapon out. However, in order to reach that bombsite before the Terrorists do, you’ll need to run faster.
“Shhhhh…Be Quiet”
Sound is the most important factor in CS. By listening to footsteps, you can know when to start walking silently (default - shift) or to crouch and hide in a dark area. Then when your enemy walks out into the open.... Boom headshot! Also pay attention to the type of footstep sound, there are different sounds for gravel, wood, cement, and steel. Knowing which sound was made can pinpoint an enemy and make him very easy to shoot through a wall. These sounds are especially useful in detecting the elevation of a player, a good example would be de_nuke. Avoid hiding in obvious places, often times it's more of a surprise to an enemy to find you in the open than behind a paper-thin box.
If you're loud, the enemy will know where you are and likely put a bullet in your head.Walking or sneaking around is most often necessary when you’re outnumbered by the other team and the only one on your team alive.
By holding down Shift or Ctrl, you will hear footsteps approaching while silencing your own. However, if the other team is walking around it can provide quite a fright suddenly seeing a hostile. If you see one of your teammates sneaking around, please be courteous and do so as well. When he’s trying to hear the enemy, he doesn’t need your footsteps interfering. [Hint: If you’re a CT and in a silent mode, it is best to use a silenced weapon: either the H&K USP or Colt M4A1 can be equipped with a silencer by simply right-clicking. The Steyr TMP also comes with a fixed silencer. Using a silenced weapon against your opponent can allow you to remain hidden, while the other team cannot hear your shots.]
Teamwork
Teamwork is the basis of a successful Counter-strike match. Without an organized group of people you can’t possibly win. For instance, if everyone splits up and goes their separate ways, everyone will be eliminated one-by-one. However even if a team sticks together, it doesn’t necessarily mean that “teamwork” exists. If someone is being shot at, don’t wait until they die to shoot the enemy, help them out. When playing online I have frequently been shot when I was surrounded by teammates. This should not happen if a true team atmosphere exists. Instead one should focus on covering their teams’ back and hope that they’ll do likewise. An example for teamwork: going up the ladder from the sewers on Militia. In this situation, you should not let a teammate go up alone as they will be eliminated quickly. Flashbangs should be thrown up before the rush and the rest of the team should follow. Although some may die in this situation, at least it will not be the entire team.
“Don’t Irritate Your Teammates”
You see it in every Counterstrike server, a person whose sole purpose is to annoy. These few people choose to cause disruption and don’t care about what happens to you or them. They choose to constantly swear or verbally abuse both people on their team and their opponents. Because you need your teammates in order to succeed, I don’ recommend that you take to such actions. However, if you choose to annoy then you be aware that your teammates might not come to your rescue when you press the “Need Backup” message. I suggest that you remain polite and courteous, answering everyone’s questions and helping those who are inexperienced.
“Blinded by the Light”
Although you may not mean to do so, flashing a teammate can be almost as bad as killing them. If you throw a flashbang into a room when a teammate is nearby, he’ll be a sitting duck until the blinding affect wears off. In order to prevent this from occurring be sure to check before throwing flashbangs and to work on your grenade tossing. There is an art to throwing grenades, involving distance, ricochet, and trajectory. Distance: you can throw a grenade a great distance by moving forward and releasing while running. If you pull this tactic off, you’ll launch the grenade like Michael Vick does a football. Ricochet: although you may not be able to see the enemy around that corner, you are able to bounce a grenade off a wall and towards its destination. Be careful when throwing off walls, as the grenade can come back to bite you, literally. Trajectory: in order to throw a great distance you’ll have the correct level of launch. If you aim too low you’ll cause the grenade to hit the ground before reaching the opponent. Despite the ability to reach vast distances with a HE grenade, the weapon itself will detonate after a certain time. The most common cause of a miss-thrown grenade is not the player’s inexperience, but an ill-fated “bump.” For example, you’re moving to throw a grenade and a teammate runs into you, causing your throw to be offline and unsuccessful.
“Don’t Put to Sleep Those Who Watch Your Back”
If you’re the last person alive and are not likely to take out the remaining enemy you shouldn’t do one thing; camp. Choosing to camp will only accomplish a waste of time and the growing disloyalty of your teammates. One does not play Counterstrike to sit around waiting to start the next round; they want to be in the action. As a result, when people have to wait over 3 minutes they start to become annoyed. If this happens once, alright but if it happens multiple times you’ve lost your team. When your own team wants you dead, they won’t bother covering your back in a firefight. They’d rather see you die then have to wait more wasted minutes. The one exception to this is if the surviving teammate is a player of many skills, someone like me. In this situation, these types of players can take out multiple enemies before dying and therefore will provide a show for those watching.
“Keep Your Friends Close… and Your Enemy Dead”
You're less likely to die if you stick together with your team. It's easier to take on a threat when you've got people watching your back. Just make sure you're going with the right group. You can't count on a squad of n00bs to watch your back, make sure to stick with the more experienced players.Having good teamwork is good, having a close-knit group of friends… priceless. In my opinion a small group of three or four team members moving together can accomplish much. In order to have this success you must befriend those who are both skillful and show teamwork. Basically, you are working in a clan-like manner without actually being in a clan.
“Are You Deaf? I Said Hold This Position”
In Counterstrike, the three groups of radio messages are important to the game. If one does not have a microphone at their disposal to voice commands with, then these can be used instead of typing. Typing messages can make you venerable to attack and stop your movement completely. Instead uses the keys [Z, X, C] and the corresponding numbers for radio commands. I use these messages numerous times during each round, and without them my team wouldn’t know of the situation at my position. Using the commands is one aspect of radioing, the other is more important: listening. When a teammate plants the bomb and wants assistance covering it, they’ll radio “hold this position.” A team can work fluently to plant the bomb, but if everyone ignores this message and goes their separate ways, a Counter-Terrorist can easily defuse.
Camping
“Difference Between a Camper and a Retarded Sloth…Nothing”
I don’t recommend making a habit of camping in Counterstrike. As I have stated above, your teammates will grow to dislike you on their side and hope you die quickly each round. There are both advantages and disadvantages of camping. One positive is that you might be able to kill a few opponents before they recognize were you’re hiding. However, proficient players know almost all camping sites and routinely check them as they pass the area. A major disadvantage is that when camping you are sitting still and thus you are easier to hit. Also, when shooting at an enemy from a camping position you will have to hit a moving target, a much more difficult task. If you’re not successful with your first few shots, you’re likely to be spotted. Reaction time is generally longer when you’re camping making your shots more important than those of your target.
“To Camp, or Not To Camp, That is the Question”
There is only two times in which you can camp without being ridiculed. If you’re a Terrorist and the bomb has been planted, you’re safe to camp and guard the area. [Hint: when covering the bomb, I suggest that you don’t sit directly on the bomb. Instead remain hidden until you hear the sound of the defuse beginning. When a Counter-Terrorist is defusing, they are a “sitting-duck.” Even if they stop their defusing, it will take a second or two in order to fire.] The second time in which camping is allowed is when Terrorists are guarding hostages. However, I suggest that one waited until the Counter-Terrorists are approaching to start camping. I don’t think any situation calls for a Counter-Terrorist is called upon to camp, unless he is guarding the bombsite.
Game Preparation
1. Brightness: Adjust your settings to fit every map. Because each map has its own characteristics, different settings will be need to optimize gameplay. A map such as Havana is very dark in much of the areas and thus your monitor’s brightness should be higher than normal. On the lighter, Dust maps a much lower brightness level can be used without affecting your game. I don’t however recommend that one play Counterstrike with their brightness set very low. If you play like this, it’s unlikely that you’ll see anyone.
2. Rest: Do not play when you’re too tired or just awakening. If you wake up and want to play Counterstrike, I’d suggest taking a shower and refreshing yourself before playing. A nice warm shower will open your eyes and heighten your senses. On the other hand, playing Counterstrike for a lengthy period of time and growing tired will decrease your playing ability. If you care about your statistics and reputation don’t play if you need sleep. Likewise, if you notice your skills declining stop playing for a while and re-gather yourself.
3. Temperature: I have found that most people are affected by the temperature of their surroundings. Almost daily you’ll see someone state how their hands are freezing. Cold hands are probably the biggest threat to a person’s gameplay. One’s body loses warmth constantly and the first to lose heat is the extremities. Using freezing hands to play Counterstrike is similar to playing with your feet. Reaction time will be far, far slower when your hands are this way. Too much heat, on the other hand, isn’t good either. Becoming irritable and starting to sweat causes stress and a “slip” in performance [See below for more information on “slip”]
4. Food: Eating during play is up to the gamer, but I don’t suggest eating some foods. Greasy food such as pizza will cause both a slick mouse and a dirty keyboard. Nobody wants an unclean computer, but the damage will must likely be in gameplay. Trying to click your mouse when your fingers are either greasy or sweaty is a difficult task. You will not maintain solid contact with the fire button and thus you will often misfire. To prevent from having a slick system I recommend either not eating or constantly washing you hands. Cleaning with soap and water will dry your hands and improve your accuracy. Despite foods’ influence to gameplay, one must eat if playing for a lengthy time. If one does not eat they will grow physically weak and their body will tire. As I stated, it’s all up to the gamer, but if you want to eat while playing choose something with little crumbs and little grease.
5. Exercise: Before starting to play, I generally begin with a tapping regiment. Sure this may sound a bit strange, but drumming your fingers in different patterns helps out profoundly. Try rolling all your digits up and down, back and forth until they feel loose and ready to rock-and-roll. Stiff fingers will cause a drop in reaction time and fire effectiveness. In order to play Counterstrike you will need to use each hand simultaneously and with great precision. Because looking down at your keyboard will result in your demise, one must memorize the keys. This will come to a player after hours of playing CS. I’ve been often commented to have incredible movement skills. I accept this compliment because I am able to fly around the keyboard and multi-task. If you have heightened hand-eye coordination you will probably succeed at Counterstrike, much like me.
6. Watch: After you die in Counterstrike, you’ll go to a spectator mode in which you can watch those left alive. Use this time to study your opponent’s every move. If a particular enemy player is fairing well, observe where they go and how they act. Not only can you learn how a certain person behaves, but an entire team. If you’re wondering how your team is being annihilated, ascertain the other team’s strategies and tactics.
Various Strategy Topics:
Shot Selection
There are three types of firing methods in Counterstrike: full auto, burst, and single shot. Each should be used in different situations. The advantage of fully automatic firing is that you’ll spray rounds in the enemy’s direction at maximum clip. However, your accuracy will be greatly diminished holding down the fire button. Example: you’re pointing at an opponent point-blank. Here, you’re likely to go full auto and hit them only a few times. [Hint: because of each gun’s recoil, aim slightly downward when firing fully automatic. Your shots will jump upwards and aiming low might give you a better chance of hitting your opponent.] There are two methods of burst fire; fixed and manual. Some weapons have built-in burst fire modes, such as the Glock and the FAMAS. These particular weapons will shoot 3 rounds at a time when on this setting, while maintaining good accuracy. However, any gun can be fired in burst, simply hold the fire button down for short periods of time. I recommend using this shot selection when fighting long-to-medium range. The final type of shot selection is single shot. While basically self-explanatory, single shot is probably the most successful way to kill an opponent. Although you won’t be able to shoot as many shots as full auto or burst, you won’t have to. Clicking then waiting for your crosshairs to tighten will result the greatest accuracy you gun can have. As a result, you’ll be wasting fewer rounds and hitting at a higher percentage. This final type of shot selection shouldn’t be used in close combat situations. [Hint: when you spot an enemy a distance away, don’t panic and start spraying bullets. Instead, crouch and aim your shots before you fire.]
One Man Army:
Often times in Counterstrike you’ll find it necessary to become a “one man army.” When everyone else is dead and you’re left to face multiple enemies, one has to draw upon their skills. For a beginner, this task is daunting, but experienced players see this situation as a challenge. In original CS, I could take out an entire team of nine players by my lonesome. Unfortunately the aiming system in Source is a bit more complex and I’m only able to take on six at the most. However, I don’t expect most people to accomplish that task, not without much playing experience. As the last person on your team you have an advantage; any footsteps you hear will be the enemy. You should try separating the opposing force because if fought all at once, you’ll surely perish. Methodically eliminate one player then move onto the next. [Hint: once you kill an enemy, move to another spot. The others alive will see their teammate drop from radar and know where you’re located.]
Tactics
Predict the opponent... if a player is getting a lot of kills on the opposite team, he's probably working the same angle over and over and you'll easily be able to devise a plan to kill him.
When reloading and in a gunfight struggle, just pick up another gun asap.
Don't stay in one place during open long distance gunfights. Move from side to side, strafe around and fire short 1-3 shot bursts at the enemy's head when you stop shortly between moves. It's never a good idea to stay in one place for a long time during fights, it will make you an easy target.
When you surprise an enemy from the front and they start spraying at you, be mobile and try and get around them. Crouch, dance back and forth, jump on top of them, even switch to your pistol to increase your movement speed temporarily, do whatever it takes to avoid the gunfire.
Surprisingly, it's actually easier to outrun their spray when you're closer to them. It allows you the ability to run around them quicker. Why circle strafe 5 yards when you can strafe 1?
When your enemy is reloading, shoot, when your enemy is moving and and bursting, you move and shoot at them. Know how to counter their tactics. Consider utilising your knife when they are reloading, or even when they are shooting at you - a single "stab in the back" can take tens of points off their health.
When the opposite team starts rolling out the smokes and flashes, make sure you've got a retreat point you can maneuver to when you're blind. When they start kicking in the front door after they flash you, you don't want to be out where they can pick you off. Make sure your retreat point isn't too obvious either. When you can't find any retreat points to go to, it comes down to keeping mobile. Dodge back and forth, run and crouch when you stop, even bunny hopping will be of use sometimes.
Don't be a coward. It's okay to run away from certain situations, but if you run away from everything, it's going to come down to either you vs. the entire other team, or you vs. that grenade bouncing your way.
Give help to your team-mates. Your team will last longer this way, and hence keep you alive too as a benefit. Plus, if you cheap out on your team, there will likely be quite a few teamkills aimed at you in the coming rounds.
Know the maps that you play, and know the likely camping and sniping spots.
Be ready for anything. If you keep alert and think of the enemy's movements and tactics, you'll be less likely to be surprised by somebody jumping out at you with an ak spraying or a flash bouncing your way.
Flanking:
Flanking an opponent is another name for stealthily coming up from their behind. This strategy, if executed successfully will lead to many easy kills. Despite its rewards, flanking is very difficult and should only be attempted by those possessing adequate skills. In order to flank, you’ll have to guess which way the enemy team is going to travel and go the opposite. However, because teams split up and travel every way during a map you will meet some enemies on your way. If you can manage to eliminate these few, you’ll be able to shoot the others in the back. [Hint: in order to be successful flanking each map, you must know the other team’s strategy and guess your routes correctly.]
Timing:
Many kills are enabled by timing of movement and firing. If you’re in a firefight with an enemy and neither of you have killed the other, conserve your ammunition. Wait until your enemy is reloading and then use your remaining shots to finish them off. Timing is also important when throwing grenades. You don’t want to have a grenade in hand when an enemy comes into site. Once you’ve played many hours in Counterstrike, timing will be learned. Until then watch those who are performing the best, as they can show you what to do and when.
Throwing HE, Flash, Smoke Grenade and Tips:
Bounce flashes towards the ground for a short throw and quick peek around a corner, clip it right near the edge... that gives them less time to escape (like if you had bounced it off the inside wall.. they get too much warning).
Sometimes throw a smoke, bounce it and then jump out at the same time they'll think it's a flash and turn around.When you get flashed multiple times, it's an obvious rush, immediately pull out your nade and counter the flash... usually it'll land right in the middle of them.
Practice pitching a nade around a corner without even peeking it then right after the nade hits, pull your gun out immediately and start shooting. They'll most likely still be retreating your nade and you have an open shot.
Killing that pesky sniper:
When playing at long distances against snipers, make very SMALL strafing motions back and forth. There is a good reason why: when double scoped with a gun, strafing targets are really hard to hit. You're barely moving left or right, just moving a inch or so back and forth... people forget that when they have an AK out, and they move back and forth several inches, making them an easy target.
Don't always jump around corners, it makes you a easy shot for an sniper.
Sometimes come out of a corner halfway, not even enough to peek it, the awper will see your arm and try to shoot, then you can pop out on his recoil.
If you're out in the open, you're fair game for snipers and a lot of other things. Use cover during fights over long distance, move back and forth between cover and burst shooting. Just make sure to change up your pattern so they can't figure you out.
Map Reviews with a guide for a few.
Assault: Many versions of this map are played, but they are basically all the same map. The Counter-Terrorist team starts off outside the main warehouse containing the hostages. Being a Counter-Terrorist on this map is very difficult with the Terrorists camping the various entrances to the warehouse. The Terrorist team basically sits in their base and snipes at those trying to sneak inside. The front garage door is a “turkey shoot” for Terrorists with long-range weaponry. Your second option for entrance is the back door. However, if its being watched one has to escape crossfire from both the front and back. The last entrance into the warehouse is the most commonly used, and if flooded with Counter-Terrorists can be easily accessed. The hostages are rarely rescued in this map because of the difficulty for entrance and then exit. In my opinion this is the hardest map for which to be a Counter-Terrorist. Therefore, I recommend being a Terrorist and work on picking of the enemy long-range.
Aztec: A map filled with earthy tones and textures, this map provides great cover with it dark areas and color scheme. However the characteristics of Aztec provide for a difficult time seeing and hitting your opponents. Of all the maps I believe this one is the hardest to hit long-range targets. There are basically three areas to this map; the water, the bridge and the double doors leading to Terrorist spawn. Covering these entrances thoroughly will likely result in a Counter-Terrorist victory. Those who possess sniping skills will enjoy covering the bridge and picking off their enemy while they bravely run across. This map is either hit-or-miss, either team has a chance if they choose the right strategies. The water area of the map is the darkest and enemies often lurk in the depths waiting to pounce. With a proficient team of players one can dominate this map and slaughter the other team, but this doesn’t happen often and scores are generally kept even.
Dust: A classic and still the most popular map in all of Counter-Strike. Based in the Middle-East, Dust is one of the brighter maps and therefore the darker colors of your uniform will stand out. There are two ways to the bombsite in Dust, the fewest of any of the maps. You can either go through the hallways or the underpass. However, there are drawbacks to each. If the Terrorist don’t rush hard to Bombsite A, the hallways become a “bottle-neck” and a lengthy firefight. The only other way, the underpass is always guarded by snipers and is difficult to navigate. If the Terrorist team fails in their attempts to rush the bombsite they will likely start to camp outside the hallway entrance. When the T’s start to do this a Counter-Terrorist’s job becomes very difficult because the roles have been reversed and now they will have to rush.
Inferno: No official map has been released by Valve, but there is an excellent custom map version. Instead of the dusty older version, the new Inferno is more of a European town. The maps’ layout is basically the same, except that new source models have been added and the overall brightness is lower. The two bombsites are on separate sides of the map, and each present many camping spots for the Terrorist to camp after planting the bomb. Because of the long, open corridors of fire, the Counter-Terrorists have the advantage of the Terrorists having to rush. If the Terrorist choose a slow approach to the bombsite, they’ll likely be flanked from behind.
Italy tips and review:
Why do I love Italy so much? At least I used to..
- High replay value. There are many routes between the CT spawn and the hostage safe-house, around 4 or 5 direct routes and then many possible permutations if you zig-zag your way around. So after the initial rush and firefights, you're never quite sure where your opponents could be hiding. The Ts may be passive or aggressive; they may stick together, or spread out; they may camp the safe-house, or the hostage rescue point.
- Z-axis action. The term refers to the 3rd axis (up-down) on the 3D grid; in Italy, you always have look up (or down, depending on where you are) for potential ambushes. You can also boost your teammates onto a tall crate (or roof...) for a tactical advantage.
- Stealth. Different surfaces give different footstep sounds, so you can anticipate your opponents' arrival by listening carefully. This map is not just about the rush; you can have a great deal of success if you walk quietly.
- All the weapons are useful in Italy. The shotgun is devastating in close quarters like the central building, the cellar, and the safe-house. There are some good lines of sight leading to the safe-house, for sniping. You can use inexpensive, rapid-fire weapons (MP5, Mac-10, TMP) for ambushes. Expensive rifles like the Steyr Aug ("bullpup") and Krieg 552 are always useful in any map, but the scope will help you take out the pesky snipers.
- This map separates the men from the boys. I consider Dust to be a good learning map for new players, because it's bright, it has a simple layout, and it's not that easy for an opponent to sneak up behind you. Italy, on the other hand, has lots of twists and turns, and when you go through a doorway or around a corner, you have to be prepared to face multiple opponents. Experienced players can survive longer.
Counter-Terrorists: beginning of round
When you spawn, you will be facing a wedge-shaped building. You can go to the left, or the right of that building. There are four general routes to get to the safe-house, but you can make detours so the actual number of routes is much higher. Use voice chat to coordinate with your teammates before the round begins.
The 4 routes are:
(1) Left, then to the cellar: go to the left of the wedge-shaped building, go up some stairs, inside the building, then down some stairs into the cellar. When you exit the cellar, you can turn left and go up some stairs to the safe-house, or turn right and head back toward the fruit market.
(2) Left, then under the overpass: same as 1, but instead of going up the stairs to the building with the cellar, you make a right-hand turn and go under the overpass. Then you can turn left toward the cellar's exit, or turn right and go toward the fruit market.
(3) Right, then jump over the logs and climb into the central building's window: it takes a little bit of practice, but you hop onto the pile of logs, then hop onto the window sill and climb in. There will be three small rooms that you have to pass through, and when you exit the central building you will see a long walkway ahead.
(4) Right, then turn right to go through the fruit market: you could consider this to be two routes - there are two alleys that lead out of the fruit market, the closer one will take you to the cellar's exit, and the farther one will take you to the tunnel that leads up to the safe-house. The alleys are connected to each other, so it doesn't matter which alley you take.
There are multiple variations of the above routes. For example, you could go through the fruit market, hear the booming sound of an AWP, change your mind, then double back to the logs at the central building.
The CT side will want to mix-and-match routes, to keep Ts guessing. Travel in groups, to increase your chances of survival.
Counter-Terrorists: mid-game
On a larger server, your team will have enough players to cover all 4 routes. If you do not cover all routes in your initial rush, there is a possibility that some Ts have come through the uncovered route(s) and will be trying to sneak up from behind. Once in a while, take a peek over your shoulder, or have a teammate watch your back.
If you survived the initial rush, now's your chance to upgrade your weapon. Take a quick look at the ground for any valuable weapons. Use the "drop" key to lose the weapon you're holding (default: G, I think) then walk over the new weapon. Reload, to make sure you have a full clip.
Use the radar (top-left corner of your screen) to locate your surviving teammates. Or use voice chat to get a quick head count.
Now you have to focus on rescuing the hostages. There are 4 hostages in the safe-house, 2 on the ground floor and 2 upstairs. There are two ways to enter the safe-house: climb up onto some crates and then jump onto the window sill, or go through the doorway on the ground floor. If you did not encounter much resistance during the initial rush phase, then you can expect to find more Ts camping inside the safe-house.
It is very likely that there will be one or two terrorists waiting for you inside the safe-house. Smoke grenades and flashbangs would be really useful, to disorient your opponents. Avoid using the HE grenade; if you hurt the hostages, you will lose some cash.
Although the tunnel appears to be the easiest exit route to take the hostages, it might not be the safest. It's a bit dark, and there are at least three ambush spots for Ts. Furthermore, Ts could be waiting in one of the corners of the fruit market. Depending on how much backup you have, you might consider taking the hostages to the central building and then out the window.
As you approach the hostage rescue point (same area as CT spawn), take a peek over your shoulder to make sure all the hostages are still there. Sometimes, one will get stuck and you have to go back to retrieve him.
Walk quietly, and prepare for a terrorist that might be hiding around the corner or behind a crate.
The cash you receive for rescuing the hostages is well worth the risk you took. Be proactive in this map; don't camp.
Counter-Terrorists: end-game
You'll need around a minute or more, to bring the hostages safely back to the rescue point. If time is running short, you can still win by eliminating all the Terrorists. Problem is, they could be anywhere.
Check the popular ambush spots around the CT spawn area, to the left and right of the wedge-shaped building. Another hiding spot is the south-east corner of the fruit-market (if you consider T spawn to be north, and CT spawn to be south). There could be a T hiding behind the crate inside the safe-house, on the ground floor next to the 2 hostages. I would also check the area next to the logs, under the window.
Terrorists:
First of all, read the section on Counter-Terrorists, to familiarize yourself with the 4 major routes.
Terrorists: beginning of round
Ts can be passive (hang around the safe-house with sniper rifles and wait for the CTs to arrive) or aggressive (rush to meet the CTs at the various choke points) or sneaky (hide in dark corners or behind crates, and ambush the CTs before / after they arrive at the safe-house). Or some combination of the three (what you'll find on a public server).
Take a look at the screenshot on the right:
1) You can jump down onto the lower level, turn right to go into the cellar, or go straight toward the mid area.
2) You can stay on the upper level, turn the corner and wait for CTs to come through the central building.
3A) After you turn the corner, you can go straight to the central building, or hop down onto the lower level.
3B) Instead of hopping down to the lower level, you can hop onto the crate and try to climb onto the roof. Or wait to see if any CTs are heading toward the cellar.
If you go to 3B, and there are no CTs going to the cellar, you can jump down and head to the CT spawn (hostage rescue point) and wait for CTs to arrive with the hostages.
4) (not shown in the screenshot) You can head down the tunnel that leads up to the safe-house, and rush to the fruit market. You will always meet a few CTs there at the beginning of the round.
Counter-Strike is a numbers game; at the beginning of the round, you want your side to survive the early firefights, so that you outnumber the surviving opponents in the mid game. If the Ts outnumber the CTs in the mid game, it will be very difficult for the CTs to enter the safe-house undetected, and rescue the hostages.
Terrorists: mid-game
Always communicate with your teammates (and I don't mean spam). Let them know that you've survived the early rush, where you are located, where you are going, and if your sector is clear. Use keybindings to save time: CS:S Radio scripter from CSBanana
When a teammate uses a radio command, you will see a blinking red dot on your radar screen. So you will know where he is located. If he is in visual range, you will see a green exclamation mark above his head.
In the mid-game, the surviving CTs will be heading toward the safe-house. So you can head back to the safe-house yourself, camp the CT spawn, or try to sneak up behind the CTs.
If you want to sneak up on the CTs, use the "walk" key (default: SHIFT) so they can't hear you approach. Nothing's more satisfying than a knife kill.
T snipers will want to cover (a) the tunnel leading up to the safe-house, (b) the path leading to the central building, (c) the path leading from the cellar exit, (d) the open area that is the T spawn. When you play Italy, you will always here the booming sound of the AWP in the vicinity of the safe-house.
Terrorists: end-game
Depending on where you are located, you might not have enough time to check the safe-house (to see if the hostages are still there). So head towards the CT spawn, and find a good ambush spot (there are plenty).
If you are near the safe-house, and the hostages are still there, you can camp inside or wait on the ledge (accessible from the upper level of the house) outside. Or you can find a dark corner in the tunnel.
Another good waiting spot, is the area to the left of the stairs that go up from the cellar exit. You can see an Italian flag on the wall.
If there's only one CT left, perhaps he's AFK. So check the CT spawn, just in case. Just stay alive, and your side will win the round.
Office: Basis of all close combat maps. With the lack of large open areas, Office is basically a map consisting of small rooms and hallways. The Counter-Terrorists are usually the ones who rush the hostages and the Terrorist sit back and camp. You can either find the Terrorists hiding in the dark, hostage room or flanking the Counter-Terrorists through the garage door. This is one of the few maps that the teams are generally on a level playing field. Along with the Dust maps this is one of the most played, due to its fast, intense firefights.
The best things to do here is to make it difficult for the CTs to come rescue the hostages, blowing up cabinets, shooting the chairs into doorways are very effective.
Dust2 tips and review:
OK, you're ready to join a populated Dust2 server and get your ass kicked.
Terrorists: beginning of round
There are two areas of Terrorist spawns. One area is a bit closer to Bomb site B, and the other is a bit closer to site A. Before the round begins, have a look around to see where your teammates are facing.
The 5 routes are:
(1) Long A: go down the ramp on the right side, through the sets of double-doors, then up the long, straight walkway to bomb site A.
(2) Short A: instead of going through the double-doors, you take a left turn and go around, on the catwalk, to site A.
(3) What I'll call Short B: The shortest path to 'B' is to go straight from T spawn to the main building, go inside, take a left, then out. You will be at site B.
(4) A longer path to 'B' is to go straight through what I call "Sniper Alley", then through the double-doors, make a left, go uphill, through another set of double-doors, thus avoiding the main building altogether.
(5) The longest path to 'B' is to go into the main building, then turn right, down the curved stairwell, exit the building, turn left, go through the double doors, make a left, go uphill, through another set of double-doors. Phew!
Keep in mind that there are multiple variations on the 5 routes. For example, you might be heading Short A, but then change your mind, drop down to the mid, then head to Bomb site B. If you're playing T, and you want the fast rush, Short B is your best bet.
The T side will want to mix-and-match routes, to keep CTs guessing. Most servers enable voice chat, this is very useful if you use it for coordinating rushes.
Terrorists: mid-game
If you didn't go for the fast rush, and you haven't planted the bomb yet, things get really interesting. You still have time to get to a bomb site and plant the bomb, but you can bet there will be CTs camping the two sites.
Bomb site B is easier to protect (for either side that controls it first), there are many crates and an elevated platform that looks right into the main building. If you're inside the main building, walk don't run. You don't want your footsteps to give away your location.
The other entrance to B is a set of double-doors, you can expect the enemy to be parked behind the door, around the abandoned car.
The third entrance to B is a bit sneaky, you start from "Mid", go uphill, and climb up some rocks, then crawl through a hole in the wall. Newbie players might not know of its existence, but experienced players will be watching it.
Site A is not as easy to defend as site B, as it is more open and there are three paths to get there.
Depending on how many CTs survived, you can expect at least 2 CTs defending A: one CT sniper looking down Long A, and the other CT roving around, keeping an eye on the catwalk while listening for footsteps underneath. You might even find an AFK (away from keyboard) under the catwalk, since thaTs the CT spawn.
If you can plant the bomb in mid-game, and you're not the last T still alive, you should be able to defend your area and win. You need to kill your opponents quickly, and not take too much damage from return fire.
Terrorists: end-game
If you haven't planted the bomb yet, all is not lost. You can still hunt down all remaining CTs to get the victory. Start with the bomb site that is closest to you, then check the CT spawn area for any AFK's, then check the other site.
Counter-Terrorists:
First of all, read the section on Terrorists, so you know what to expect from the T side. Since the Ts have so many options, CTs have to be able to read-and-react well. Communicate (meaningful) information to your teammates, so they can rush back to an undefended bomb site.
Counter-Terrorists: beginning of round
Unlike Dust, Dust2 has a lot more variety of game situations as the round progresses. Like Dust, Dust2 forces CTs to be coordinated in their early rush so that they can prevent the Ts from getting an easy score.
Complete containment of Ts (possible in Dust) is not a viable option, in a public clanless server (in my opinion). At the beginning of the round, CTs have to rush to certain choke points, and try to win the firefights:
- the double-doors through which the Ts will pass, to get to Long A. Two CTs would be preferable, and they can communicate to their teammates if they sense a mass rush.
- right up the middle, and then veer left to see if Ts are trying to go Short A. In the later rounds, Ts can afford scouts, so bring smoke grenades.
- a mad rush to Bomb site B, where Ts are likely to exit the main building. Depending on your foot speed, you should be able to throw a flashbang into the corridor before the Ts come out. Two or three CTs should do the trick. If it turns out that no one is inside, then you can recover by taking the curved staircase back down to "Mid".
Counter-Terrorists: mid-game
If the bomb was not planted right away, CTs can settle in to protect both bomb sites. Ideally, you want to have 3 CTs at each site, but realistically you won't.
At site A, you'll want a sniper covering long A, another CT covering the catwalk (Short A), and a third CT could be camping in the dark area under the catwalk.
At site B, you'll need three CTs, one to cover each possible entrance.
Of course, in real life, players are too restless to stay in one spot. So what normally happens is that CTs wander around, looking for Ts. It's better to wander around in pairs than solo, if you must.
Counter-Terrorists: end-game
As the round nears its end, Ts have to locate all CTs and eliminate them to get the win. Hopefully you've still got enough ammo for that final firefight. If not, look around for corpses, chuck your weapon and pick up theirs. Who knows, you might get someone's AWP or machine-gun. Note that spray-and-pray firing doesn't work well in medium to long-distance fighting. If you're going to pick up someone's weapon, go for a scoped weapon and/or a Desert Eagle.
If there's only one Terrorist left, perhaps he's AFK. So check the T spawn, just in case.
Weapon Reviews and Equipment review
Kevlar
*Price: $650
Review:Increases the time of you dying from .02 miliseconds to .09 miliseconds.
HE Grenade
*Price: $300
*Special traits: You can only carry one of them
Review
ower equivalent to 100 snap pops going off, useful when primary weapon is empty you have chucked your pistol at a squirrel and your knife is stuck in the wall where you have stabbed your teammates spray.Flashbang grenade
* Price: $200
* Special traits: You can only carry two of them
Review
isappears in a puff of white smoke blinding everyone for 10 seconds within its blast radius, useful for blinding your teammates then using them as a shield. Also used for great affect on the enemy in stopping you in your tracks and gunning you down like sitting ducks in front of a .50 cal.Pistols:
Glock
Price: $400
Country of Origin: Austria
Caliber: 9mm Parabellum
Clip Capacity: 20 Rounds
Rate of Fire: N/A
Weight (Loaded): 0.9 kg
Projectile Weight: 8 grams
Muzzle Velocity: 1132 Feet/ Second
Muzzle Energy: 475 Joules
Review: Standard issue pistol, you will spawn with this weapon every round you are on the Terrorist team. Equipped with two modes of fire, this weapon is versatile, but not powerful. While in a firefight against other pistols, the Glock may have 20 rounds, but it needs every one. Even with an accurately placed three-round burst, many body shots are needed for a kill. One of the better long-range pistols, the Glock is accurate but not powerful.
H&K USP
Price: $500
Country of Origin: Germany
Caliber: .45 ACP
Clip Capacity: 12 Rounds
Rate of Fire: N/A
Weight (Loaded): 1 kg
Projectile Weight: 15.2 grams
Muzzle Velocity: 866 Feet/ Second
Muzzle Energy: 553 Joules
Review: Standard issue pistol, you will spawn with this weapon every round you are on the Counter-Terrorist team. Of all the pistols, the USP has the only silencer for those situations that require stealth. The USP is also the 2 nd largest caliber round pistol, behind only the Desert Eagle. While the USP is slight less accurate than the Glock, it can kill with less rounds. If you empty your primary weapon’s clip in a firefight, a USP is a worthy weapon to finish off your opponent. [Hint: Often times, it is better to switch to your secondary weapon instead of reloading your primary. Reloading may take time that you cannot spare, while a pistol can provide cover while you can retreat or kill your opponent.]
Sig Sauer
Price: $600
Country of Origin: Switzerland/Germany
Caliber: .357 SIG
Clip Capacity: 13 Rounds
Rate of Fire:> N/A
Weight (Loaded): 1.03 kg
Projectile Weight: 8.1 grams
Muzzle Velocity: 1400 Feet/ Second
Muzzle Energy: 600 Joules
Review: Rarely used pistol that has pluses and minuses. A positive is that it has one more bullet than the USP, however it is not as accurate and that extra bullet will be needed. Many body hits will be needed to kill, with the .357 SIG ammunition slightly more powerful than that of the 9mm of the Glock.
Desert Eagle
Price: $650
Country of Origin: Israel
Caliber: .50 Action Express
Clip Capacity: 7 Rounds
Rate of Fire: N/A
Weight (Loaded): 1.8 kg
Projectile Weight: 19.4 grams
Muzzle Velocity: 1380 Feet/ Second
Muzzle Energy: 1650 Joules
Review: Contrary to poular belief this is NOT the only pistol available it may however take you years to see a Sig Sauer or FN Five-Seven being used. It has a major flaw of only 7 rounds, each one of those could be fatal. Taking a point-blank hit by a .50 Desert Eagle will cause severe damage if not kill you. In a firefight, you will need to use extreme awareness of your ammunition. You can take more time to fire using a Desert Eagle because it will cause more damage than most other weapons, including automatic. While other weapons require you to pull the trigger for 15 seconds to kill anyone. Despite its close combat advantages, the Eagle is a very accurate long-range weapon. [Hint: If you should stumble upon an unaware sniper, be careful. I’d say 99% of all snipers buy a Desert Eagle to use close range.]
FN Five-Seven [Counter-Terrorist Weapon]
Price: $750
Country of Origin: Belgium
Caliber: 5.7 x 28mm
Clip Capacity: 20 Rounds
Rate of Fire: N/A
Weight (Loaded): 0.61 kg
Projectile Weight: 2 grams
Muzzle Velocity: 2345 Feet/ Second
Muzzle Energy: 465 Joules
Review: Although a favorite of mine, this gun really has no use in the game. Long range, no pistol can beat the 5-7’s aim. However, to kill someone you’ll need almost half of the guns’, large 20 round clips. Overall, this pistol has the most accuracy while having the least power.
Dual Beretta Elites [Terrorist Weapon]
Price: $800
Country of Origin: Italy
Caliber: 9mm Parabellum
Clip Capacity: 15 Rounds [Each]
Rate of Fire: N/A
Weight (Loaded): 1.15 kg [Each]
Projectile Weight: 8 grams
Muzzle Velocity: 1280 Feet/ Second
Muzzle Energy: 606 Joules
Review: Perhaps the weapon that yields the most “fun,” but these Berettas are highly inaccurate. If your luck your aim will only slightly suck and youll hit every other bullet, because every shot with the left pistol goes slightly left, every shot with the right pistol goes slightly right.
Fifteen rounds in each gun, these pistols have the largest capacity by far and will win in any lengthy pistol fight. Despite using the same caliber rounds, the Beretta will yield more damage with a body shot than a Glock. Firing rapidly into a crowd will likely cause damage to everyone. [Hint: As with all non-automatic weapons, pistols only fire as fast as you can click. Most important with the Berettas, the fastest you can fire lead, the more of a chance you can damage your opponent.]
Shotguns:
Benelli M3 Super 90
Price: $1700
Country of Origin: Italy
Caliber: 12 Gauge
Clip Capacity: 8 Rounds
Rate of Fire: N/A
Weight (Loaded): 3.5 kg
Projectile Weight: 3.8 grams
Muzzle Velocity: 1250 Feet/ Second
Muzzle Energy: 2429 Joules
Review: Much improved in CS:S than in previous versions. Not only is the M3 effective close range, but now it can be used in long range combat. Point blank, an M3 round will cause severe damage, including kill you in a single shot. I’d recommend using shotguns only when the map is close-combat orientated. [Hint: If you’re in a firefight with a shotgun you’d better kill the user quickly, because his shells will last longer than your automatic weapon clip.]
Benelli SPAS Shotgun
Price: $3000
Country of Origin: Italy
Caliber: 12 Gauge
Clip Capacity: 7 Rounds
Rate of Fire: N/A
Weight (Loaded): 4 kg
Projectile Weight: 3.8 grams
Muzzle Velocity: 1250 Feet/ Second
Muzzle Energy: 2429 Joules
Review: The so-called “nOOb tube” has many downfalls. First, the 7 shells will fire so quickly that if you don’t hit your target the first time, you’ll likely not receive a second-chance. Second, unless you’re firing point-blank, you’re not going to deal much damage to anyone. As a result, this weapon is relatively useless in most situations.
Sub-Machine Guns [SMGs]:
Steyr TMP [Counter-Terrorist Weapon]
Price: $1250
Country of Origin: Austria
Caliber: 9mm Parabellum
Clip Capacity: 30 Rounds
Rate of Fire: 857 RPM
Weight (Loaded): 1.3 kg
Projectile Weight: 8 grams
Muzzle Velocity: 1280 Feet/ Second
Muzzle Energy: 606 Joules
Review: The Steyr TMP is rarely used in CS because many of the other, more expensive weapons provide more “pop.” However, if you need a silenced weapon, or just an accurate weapon, the TMP works well. While the TMP has a fairly accurate spray, you will need a few body hits before someone is killed.
H&K MP5
Price: $1500
Country of Origin: Germany
Caliber: 9mm Parabellum
Clip Capacity: 30 Rounds
Rate of Fire: 800 RPM
Weight (Loaded): 3.42 kg
Projectile Weight: 8 grams
Muzzle Velocity: 1132 Feet/ Second
Muzzle Energy: 637 Joules
Review: Of all the Sub-Machine Guns the H&K MP5 is the most widely used, and for good reasons. Unlike most other guns, when you point this weapon at an opponent and spray, you will notice that its accuracy will provide more body hits. However, it will take five or six hits to kill the other person. With the mp5 you just want to tap on their head 1 shot at a time at a distance,
H&K UMP
Price: $1700
Country of Origin: Germany
Caliber: .45 ACP
Clip Capacity: 25 Rounds
Rate of Fire: 600 RPM
Weight (Loaded): 2.27kg
Projectile Weight: 15.2 grams
Muzzle Velocity: 1002 Feet/ Second
Muzzle Energy: 625 Joules
Review: Probably the least used weapon in the game. This gun is more of a pistol with 25 rounds, with its high caliber rounds. If used like a pistol with single shots, the UMP can be deadly long-range. However, in close combat the UMP’s slow rate of fire doesn’t help its performance.
FN P90
Price: $2350
Country of Origin: Belgium
Caliber: .338 Lapua Magnum
Clip Capacity: 50 Rounds
Rate of Fire: 900 RPM
Weight (Loaded): 3 kg
Projectile Weight: 2 grams
Muzzle Velocity: 2345 Feet/ Second
Muzzle Energy: 465 Joules
Review: Relatively small accuracy grouping for a gun with such a high rounds per minute. For those who feel they run out of bullets too quickly in a firefight, this weapon is for you. This miniature Para has about twenty more rounds than the average gun, thus you will still be firing when the other is reloading. The P90 can also be used as support for team movement, much like the Para, but with better accuracy and cheaper cost.
Ingram Mac-10 [Terrorist Weapon]
Price: $1400
Country of Origin: United States of America
Caliber: .45 ACP
Clip Capacity: 30 Rounds
Rate of Fire: 857 RPM
Weight (Loaded): 3.82 kg
Projectile Weight: 15.2 grams
Muzzle Velocity: 919 Feet/ Second
Muzzle Energy: 584 Joules
Review: Like the H&K UMP, the Mac-10 uses .45 ACP ammunition much like the USP pistol. If you look at the Mac-10 you’ll see that it is basically a one-handed weapon. Therefore, its recoil will cause the gun to jump wildly and the bullet spray will be wide, with little chance to hit much. Other than the Para, I’d say that this weapon is the most inaccurate. Unless you’re firing in a hallway you won’t hit anything. Don’t even think you’ll hit anything long-range with the Mac-10, you’re better off using your pistol.
Rifles:
FAMAS [Counter-Terrorist Weapon]
Price: $2250
Country of Origin: France
Caliber: 5.56 NATO
Clip Capacity: 25 Rounds
Rate of Fire: 1100 RPM
Weight (Loaded): 3.40 kg
Projectile Weight: 4 grams
Muzzle Velocity: 2212 Feet/ Second
Muzzle Energy: 1712 Joules
Review: The Counter-Terrorist’s version of a cheap, accurate weapon, much like the Terrorist’s Galil. If you’re down on money, the FAMAS is an excellent choice, if you’re shooting long-range use the weapon’s 3-round burst. One or two bursts on this setting will kill an opponent with extreme accuracy. When fighting close combat use the full automatic setting which has SMG accuracy with rifle power. One major drawback of this weapon is the slightly smaller than average 25-round clips. If you want to have accuracy with each shot long range, this is definitely your weapon. Using the three-round burst you will be pin-point with each fire.
Steyr Scout
Price: $2750
Country of Origin: Austria
Caliber: 7.62 NATO
Clip Capacity: 10 Rounds
Rate of Fire: N/A
Weight (Loaded): 3.3 kg
Projectile Weight: 8 grams
Muzzle Velocity: 2800 Feet/ Second
Muzzle Energy: 2200 Joules
Review: A real sniper’s choice of a rifle. Unlike the AWP or any of the auto sniper rifles, the scout actually takes skill. A well-place chest or head shot will kill someone, but anywhere else two shots are required. If you run into someone with this weapon out, it is useless without zoom. Therefore, be ready to switch to your pistol for close encounters. With the Scout being so lightweight, you are able to run as fast as when your knife is equipped.
Colt M4A1 [Counter-Terrorist Weapon]
Price: $3100
Country of Origin: United States of America
Caliber: 5.56 NATO
Clip Capacity: 30 Rounds
Rate of Fire: 685 RPM
Weight (Loaded): 3.22 kg
Projectile Weight: 4 grams
Muzzle Velocity: 2900 Feet/ Second
Muzzle Energy: 1570 Joules
Review: In the opinion of most the M4A1 is the best all-around weapon in CS. Some prefer the Colt with a silencer attached, and some prefer no silencer. Either way, I don’t think that there’s much difference in the weapon’s performance. Long range with a well aimed single shot, one can take out an opponent easily. While it can be inaccurate spraying down a hallway, you can easily kill an opponent using full auto. My personal favorite, this weapon is proficient in every area and therefore will be the weapon most seen while playing.
Steyr AUG [Counter-Terrorist Weapon]
Price: $3500
Country of Origin: Austria
Caliber: 5.56 NATO
Clip Capacity: 30 Rounds
Rate of Fire: 727 RPM
Weight (Loaded): 4.09 kg
Projectile Weight: 4 grams
Muzzle Velocity: 2900 Feet/ Second
Muzzle Energy: 1570 Joules
Review: A favorite weapon of mine for those maps with wide open areas.
Its damage is equivalent to a anti tank shell covered in anthrax and gasoline. With its zoom feature, the AUG can be deadly accurate, and will rival any sniper rifle. If you use single shot while zoomed, you’re shots shouldn’t spray too wildly, and are likely to hit your target. However, I don’t recommend holding down your mouse button while zoomed. Despite its long range pluses, the AUG fairs well in close combat and thus should be used in each. Close range, you’ll likely receive results that match the Colt M4A1, with the AUG using the same caliber ammunition, and having the same muzzle velocity and recoil.
Sig 550 [Counter-Terrorist Weapon] [Not allowed on eGO servers]
Price: $4200
Country of Origin: Switzerland
Caliber: 5.56 NATO
Clip Capacity: 30 Rounds
Rate of Fire: N/A
Weight (Loaded): 7.02 kg
Projectile Weight: 4 grams
Muzzle Velocity: 3100 Feet/ Second
Muzzle Energy: 1650 Joules
AWP [Not allowed on eGO servers]
Price: $4750
Country of Origin: United Kingdom
Caliber: .338 Lapua Magnum
Clip Capacity: 10 Rounds
Rate of Fire: N/A
Weight (Loaded): 6 kg
Projectile Weight: 16.2 grams
Muzzle Velocity: 3000 Feet/ Second
Muzzle Energy: 7000 Joules
Galil [Terrorist Weapon]
Price: $2000
Country of Origin: Israel
Caliber: .223
Clip Capacity: 35 Rounds
Rate of Fire: 675 RPM
Weight (Loaded): 4.35 kg
Projectile Weight: 4 grams
Muzzle Velocity: 2013 Feet/ Second
Muzzle Energy: 1712 Joules
Review: The cheapest rifle in the game, the Galil also has the largest capacity of ammunition; 35 rounds. Although the Galil doesn’t have an actual burst-round setting, clicking the fire button will shoot a few shots that rival the FAMAS’ accuracy. If you don’t shoot full-auto and merely hold fire for a few moments you will spray in a small area, must like that of an SMG. For price, you can’t beat the Galil for its power and accuracy.
AK-47 [Terrorist Weapon]
Price: $2500
Country of Origin: Russia
Caliber: 7.62 NATO
Clip Capacity: 30 Rounds
Rate of Fire: 600 RPM
Weight (Loaded): 4.79 kg
Projectile Weight: 7.9 grams
Muzzle Velocity: 2329 Feet/ Second
Muzzle Energy: 1992 Joules
Review: Terrorist mainstay weapon, much like the Colt of the Counter-Terrorists. However, the AK is also the most inaccurate rifle. Long-range you’ll receive more power than a Colt, but you’d better hit the other person with the first two single shots. Medium-to-short range to hit an opponent you must basically “pray and spray.” Sometimes you’ll be a few feet away from a person and not hit them at all, and other times you’ll receive lucky headshots.
Remember to closely pay attention to your spray, with AK you want a 2 shot burst, if it's close just spray at Headshot level...
Sig 552 [Terrorist Weapon]
Price: $3500
Country of Origin: Switzerland
Caliber: 5.56 NATO
Clip Capacity: 30 Rounds
Rate of Fire: 727 RPM
Weight (Loaded): 3.1 kg
Projectile Weight: 4 grams
Muzzle Velocity: 2900 Feet/ Second
Muzzle Energy: 1570 Joules
Review: x
H&K G3 [Terrorist Weapon] [Not allowed on eGO servers]
Price: $5000
Country of Origin: Germany
Caliber: 7.62 NATO
Clip Capacity: 20 Rounds
Rate of Fire: N/A
Weight (Loaded): 4.41 kg
Projectile Weight: 8 grams
Muzzle Velocity: 2800 Feet/ Second
Muzzle Energy: 2200 Joules
Heavy Weapons:
M249 Para
Price: $5750
Country of Origin: Belgium
Caliber: 5.56 Parabellum
Clip Capacity: 100 Rounds
Rate of Fire: 600 RPM
Weight (Loaded): 6 kg
Projectile Weight: 4 grams
Muzzle Velocity: 3000 Feet/ Second
Muzzle Energy: 1600 Joules
Review: The ultimate support weapon for that rush to the bombsite or down a crowded corridor. With a massive 100 round magazine, the Para can go for quite so time without being reloaded. However, when you need to reload, you’ll notice that it’ll take many venerable seconds. Overall, this gun is not worth the most expensive price tag in the game. You may be able to hit someone long range with your first, well-placed shot but after that, good luck. Even at close range, shooting at full-auto you’re not likely to hit anything. However when there’s a group of the enemy the Para will damage each one equally.
When all else fails you can always cry BS! Remember it lets everyone else know you are really serious about CS:S
Lyrics for "I will survive" theme song!
First I was afraid
I was petrified,
thought I couldn't get a frag
without you by my side,
and then I spent so many rounds
just camping out all on my own,
and I grew strong
and now i'm defusing the bomb...
And now i'm back,
so shut your face
you cannot play as good as me
you're such a fat disgrace
weren't you the one who left me
playing on my own
all up to me, the VIP.
No chance not I,
I will survive,
as long as I have bomber
then I know I'll stay alive
and now you're back and expect
weapons thrown for free
but I'm saving all my money for an AWP.
CT's arrive, you won't survive
because the second I see
with my colt you're gonna die
You just TK and keep the frags off of your own
but hey get ready man for planitudes of crap
now that you're on.
You say it's dark and that
you cannot tell the teams apart,
but that line's old and not as fresh
as pepper chili farts.
You just want kills
you do not care about your team
you beam them 37 times but keep
on coming back in clean.
He's in the pipes,
out on the lawn,
you're cheating
tell me why the hell FORCECHASECAM isn't on,
we can't do crap by simply banning your IP,
someone bring on down the console,
and you ban his WON ID.
Oh no not I,
I will survive,
no matter how much you are cheating,
well I know I'll stay alive.
You might have speed cheats on,
or wallhacks on to see,
by I've got the same ones running,
so just try and mess with me.
Nothing left to do,
I blew your team away,
the scores are 29 to 3
and your team cannot play.
The final round is coming in,
and you have not one ounce of class,
so you can take your stupid AK
shove it right up in your a**.
Now time is running out,
five minutes on the clock,
you lost your gun, you lost your style,
your playing shuttle #^#@
It's you and me,
it's one on one,
so one must die,
now I'm zooming in my reticle,
so baby it's goodbye.
Oh no not I,
I will survive,
can you remember when you fragged me
and I lost my life.
So many months ago,
that match was far away,
but now so sudden when I beat you
you've got nothing left to say.
- Joined
- May 8, 2008
- Messages
- 14,991
Jimmy Kudo's guide to rebelling
Jimmy here with basically a lot of stuff in rebellion. Heres how i rebel.
Basics things of a t
A t only has a knife with him, the cts have armed guns with them so it pretty hard to get them when they can see you knifing them. It is hard as a t do rebel cause you are being watched by armed people. The good thing is that the ts and cts are a 2:1 ratio, a good advantage. Another good advantage is you might find a pre-planted gun in your cells armed with bullets that are like 1 clip or 2, You can shoot the warden or any of the guards to get a gun if they are near. Rebeling depends all in the map your in and how you rebel. If you back stab a ct, thats easy. If you rush the ct and the ct sees you rushing, thats bad. If you have a pre-planted gun and you are right next to a ct with full clip, thats good, If you spray and prey from a long distance and the ct has an awp, bad news.
Choices
Rebeling also depends on if you want to rebel and have a perfect chance of killing him or just want to rush it and hope you get kill. You have a choice in rebeling or doing the wardens orders. You have to see whats going on around you to make that choice and you need to make that choice fast. You can't just rebel whenever you want cause there are opportunities in rebellion, not go and rebel cause if you don't think and you just rush, your dead.
Knifing
When in the beginning of the round, you have a knife, only thing you get at the beginning of the round and maybe a pre-planted gun. There are two easy ways to get a kill with an armed ct, the backstab, and right click. Backstab is easy, its really self-explanatory but its when you right click the ct in the back with 100 health and he dies with only one knife. Its sometimes rare cause you need to aim at the back and you have a melee weapon. That sometimes takes time. Right click takes away 65 hp so 2 knifes to a ct with right clicks = death to the ct. Also, don't stand around just knifing the ct and standing still, the cts have fast reaction so you got to move around to knife the cts. You can go through the ct to knife him but that is also hard.
Teamwork
Teamwork is kinda hard when it comes to rebeling. Usually they don't even go rebeling cause they don't want to get killed in the beginning of the round. If you somehow get the team to rebel make sure you are spearated when going for a ct. When you are lined up, the chances are that you would get sprays by one ct and you all die. You need to be all separated and rushing the particular ct in every direction. Be also sure thata no ct would catch you, only the ct you are aiming at.
Rebelling in the begging of the round
Rebelling in the beginning of the round is probably hard cause you would die in teh beginning and jail rounds are usually long. The thing you need to focus if you are planning to begin rebelling when cells open is the ct you are aiming, where he is, who are the cts around him, whats the map, the guns the others have, and who might kill you when going for it. Also, if there is a bunch of cts around him and you rebel, you need to backstab him or your dead.
Cts who are open to kill
There are sometimes a time when the ct is afk or doing something wrong like baiting is when you get your knife ready and kill him. Its pretty easy and especially easy when theres other ts damaging him. When he dies, you get the gun and go rebel. Its especially easy when you are with a huge group and the group is depending on you to kill a ct and the group gets his gun or wait for you to die and get the rebellers gun.
Stupid things to do
DON"T DO STUPID THINGS! When it comes to rebelion, you are wanted and the cts are able to kill you. Don't fool around and mess with things cause you several cts are hunting you down and you have this opportunity to kill them. One stupid thing that i always see is hiding in your cell. It doesnt work and most of the time, a t would snitch you or a ct will cellcheck. When a ct cellcheck and you try to knife him, he is seeing you rushing him, thats bad. Another stupid thing is not thinking. Don't just think that you can go out there and just rebel. No, its not like that, rebeling hardcore takes skill.
What to do after killing a ct
Its really hard what to do when you kill a ct and your wanted from every ct. Sometimes you can stack with other ts and hope your body matches his and that cts can't spray when there are stacks. You can also hide somewhere and hope the cts finds you and you can spray him down.
LR rebelling
LR rebelling is pretty simple when you have them stacked or lined up. Just look at it, you have a gun and the cts arn't warning you to drop the gun. You have an advantage, just use the advantage correctly an you be in the top score at the end of the round.
Vents and armory
The two auto-wants of freedays are usually guarded by the outside so you would be dead if you entered in. If you want to enter in the vents, you have to be quick so a ct don't spot you or catches you in the vents. You need to make sure no ct is near the armory to open it and go in.
Rebeling on the warden
Rebeling on the warden is just the same as rebeling on every ct, the only thing is that the warden is guarded. Also you got to know whose the warden. The skins are no different, its the same skins so you got to know whose the warden and whose the guards. Also you need to know who is actually the warden. If it Evilbear, hes fun. It its someone else that doesn't do fun stuff, rebel on him cause the ts would love to see a new warden.[/QUOTE]
Jimmy here with basically a lot of stuff in rebellion. Heres how i rebel.
Basics things of a t
A t only has a knife with him, the cts have armed guns with them so it pretty hard to get them when they can see you knifing them. It is hard as a t do rebel cause you are being watched by armed people. The good thing is that the ts and cts are a 2:1 ratio, a good advantage. Another good advantage is you might find a pre-planted gun in your cells armed with bullets that are like 1 clip or 2, You can shoot the warden or any of the guards to get a gun if they are near. Rebeling depends all in the map your in and how you rebel. If you back stab a ct, thats easy. If you rush the ct and the ct sees you rushing, thats bad. If you have a pre-planted gun and you are right next to a ct with full clip, thats good, If you spray and prey from a long distance and the ct has an awp, bad news.
Choices
Rebeling also depends on if you want to rebel and have a perfect chance of killing him or just want to rush it and hope you get kill. You have a choice in rebeling or doing the wardens orders. You have to see whats going on around you to make that choice and you need to make that choice fast. You can't just rebel whenever you want cause there are opportunities in rebellion, not go and rebel cause if you don't think and you just rush, your dead.
Knifing
When in the beginning of the round, you have a knife, only thing you get at the beginning of the round and maybe a pre-planted gun. There are two easy ways to get a kill with an armed ct, the backstab, and right click. Backstab is easy, its really self-explanatory but its when you right click the ct in the back with 100 health and he dies with only one knife. Its sometimes rare cause you need to aim at the back and you have a melee weapon. That sometimes takes time. Right click takes away 65 hp so 2 knifes to a ct with right clicks = death to the ct. Also, don't stand around just knifing the ct and standing still, the cts have fast reaction so you got to move around to knife the cts. You can go through the ct to knife him but that is also hard.
Teamwork
Teamwork is kinda hard when it comes to rebeling. Usually they don't even go rebeling cause they don't want to get killed in the beginning of the round. If you somehow get the team to rebel make sure you are spearated when going for a ct. When you are lined up, the chances are that you would get sprays by one ct and you all die. You need to be all separated and rushing the particular ct in every direction. Be also sure thata no ct would catch you, only the ct you are aiming at.
Rebelling in the begging of the round
Rebelling in the beginning of the round is probably hard cause you would die in teh beginning and jail rounds are usually long. The thing you need to focus if you are planning to begin rebelling when cells open is the ct you are aiming, where he is, who are the cts around him, whats the map, the guns the others have, and who might kill you when going for it. Also, if there is a bunch of cts around him and you rebel, you need to backstab him or your dead.
Cts who are open to kill
There are sometimes a time when the ct is afk or doing something wrong like baiting is when you get your knife ready and kill him. Its pretty easy and especially easy when theres other ts damaging him. When he dies, you get the gun and go rebel. Its especially easy when you are with a huge group and the group is depending on you to kill a ct and the group gets his gun or wait for you to die and get the rebellers gun.
Stupid things to do
DON"T DO STUPID THINGS! When it comes to rebelion, you are wanted and the cts are able to kill you. Don't fool around and mess with things cause you several cts are hunting you down and you have this opportunity to kill them. One stupid thing that i always see is hiding in your cell. It doesnt work and most of the time, a t would snitch you or a ct will cellcheck. When a ct cellcheck and you try to knife him, he is seeing you rushing him, thats bad. Another stupid thing is not thinking. Don't just think that you can go out there and just rebel. No, its not like that, rebeling hardcore takes skill.
What to do after killing a ct
Its really hard what to do when you kill a ct and your wanted from every ct. Sometimes you can stack with other ts and hope your body matches his and that cts can't spray when there are stacks. You can also hide somewhere and hope the cts finds you and you can spray him down.
LR rebelling
LR rebelling is pretty simple when you have them stacked or lined up. Just look at it, you have a gun and the cts arn't warning you to drop the gun. You have an advantage, just use the advantage correctly an you be in the top score at the end of the round.
Vents and armory
The two auto-wants of freedays are usually guarded by the outside so you would be dead if you entered in. If you want to enter in the vents, you have to be quick so a ct don't spot you or catches you in the vents. You need to make sure no ct is near the armory to open it and go in.
Rebeling on the warden
Rebeling on the warden is just the same as rebeling on every ct, the only thing is that the warden is guarded. Also you got to know whose the warden. The skins are no different, its the same skins so you got to know whose the warden and whose the guards. Also you need to know who is actually the warden. If it Evilbear, hes fun. It its someone else that doesn't do fun stuff, rebel on him cause the ts would love to see a new warden.[/QUOTE]
- Status
- Not open for further replies.
Similar threads

- Replies
- 18
- Views
- 733

- Replies
- 3
- Views
- 1K
- Replies
- 5
- Views
- 636

- Replies
- 1
- Views
- 354


